Esri_Tutorial_05_Import_Initial_Shapes
1
Esri R&D Center Zurich
Esri CityEngine
TUTORIAL 5 : IMPORT INITIAL SHAPES
Content
Part 1: Import Shapes from SHP / GDB 2 Part 2: Import Shapes from OBJ 8 Part 3: Import Volumes
10 Part 4: Import Landmarks as Shapes
14
2
Part 1: Import Shapes from SHP / GDB
Import .shp files into CityEngine
? Open a new scene file File > New ...> CityEngine > CityEngine scene . ? In the File Navigator, locate the .shp file ‘footprints.shp’ in the folder ‘data/shp_footprints/’.
? Drag and Drop the file into the viewport.
? Import the data without a projection: Use ‘Raw data in meters’.
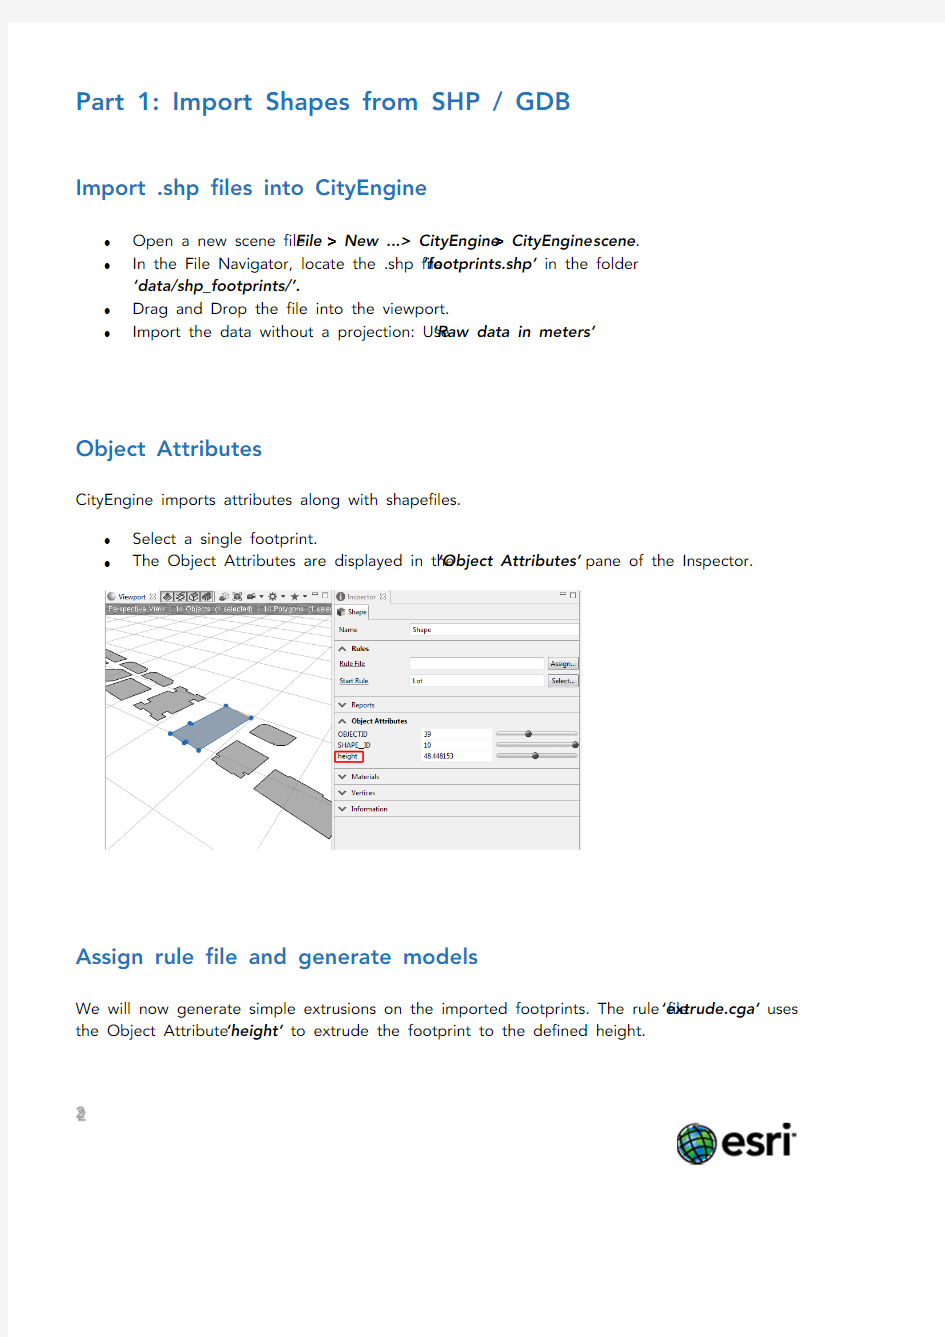
Object Attributes
CityEngine imports attributes along with shapefiles.
? Select a single footprint.
? The Object Attributes are displayed in the ‘Object Attributes’
pane of the Inspector.
Assign rule file and generate models
We will now generate simple extrusions on the imported footprints. The rule file ‘extrude.cga’ uses the Object Attribute ‘height’ to extrude the footprint to the defined height.
3
? Open the rule file and find the following code:
attr height = 10
@StartRule
Lot --> extrude (height )
? Select all footprints in the 3D viewport. ? Assign the rule via drag and drop. ? Watch the buildings be generated.
? Alternatively, open ‘footprints_from_shp.cej’ to see the finished scene.
Importing from File Geodatabase
Importing data from a File Geodatabase is analogous to Shapefile import:
? Open a new scene file File > New ... > C tyEng ne > C tyEng ne scene. In the File Navigator, locate the File Geodatabase folder ‘footprints.gdb’ in the folder ‘data’. ? Note that the .gdb file format is displayed as a folder in the Navigator. ? Drag the folder ‘footprints.gdb’ into the 3D viewport.
? A dialog lets you choose which layers you want to import from the geodatabase.
? During import, CityEngine will ask to choose a Scene Coordinate System. The coordinate
system suggested in the dialog is taken from the data found in the Geodatabase. ? Hit ‘Finish’ to import the selected layers.
The dataset in the provided Geodatabase is identical to the Shapefile content. You can now apply the same steps as described above for the Shapefile.
4
Importing PolylineZ Shapes with additional CGA attributes
? Open a new scene file ’File > New ... > CityEngine > CityEngine scene’.
? In the File Navigator, locate the .shp file ‘sphereCity.shp’ in the folder ‘data/sphereCity_shp/’.
? Drag the file into the 3D viewport.
?
During import, CityEngine will ask to choose a Data Coordinate System (the projection of the shapefile) for the file ‘sphereCity.shp’. The data in the shapefile is in meters, and not georeferenced, so choose ‘Raw data in meters’
.
The shapefile ‘sphereCity.shp’ has no .prj file, therefore CityEngine needs to ask the user to define the data coordinate system. The next Dialog asks to choose a Scene Coordinate System .
?
Again , choose ‘Raw Data i n meters’. By using the same coordinate system for data and
scene, no reprojection is applied to the data on import.
A new Shape Layer called ‘Shapes sphereCi ty’ appears in the Scene Editor, and the footprint shapes are visible in the 3D viewport.
5
The polygons in this shapefile data have Z-values, resulting in 3D shapes in CityEngine:
Attributes
Two special attributes are defined in this dataset:
1) attribute ‘ruleFile’ 2) attribute ‘startRule’
Use this specific syntax already in your GIS application to define, which R ule Files and
Start R ules should be assigned directly after the import . That way, you can save the time of manually assign them! This is a special import behavior!
The Attribute Table in the GIS application:
6
? Select a single shape (one face of the sphere).
? The Object Attributes are displayed in the Object Attributes pane of the Inspector. ? Rule File and Start rule have been assigned automatically during import.
With rule file and start rule already assigned, we can now directly generate the models.
? Select all shapes of the sphereCity in the 3D viewport. ? Generate the buildings.
Let’s change the Start Rule on individual shapes to change the generated model.
? Select a model in the 3D viewport.
? In the Inspector, Hit the Start Rule ‘Select...’ Button.
?
In the Start Rule Dialog, choose ‘Commercial’ as new Start Rule. StartRules (= rules with the @StartRule tag in CGA code) are displayed in bold font.
7
(Continue with Part 2 on the next page)
8
Part 2: Import Shapes from OBJ
OBJ import
? Open a new scene file. File > New... > CityEngine > CityEngine scene
? Locate and select the .obj file ‘pompeii_footprints.obj’ in the older ‘data/obj/’. ? Right-click the file and choose ‘Import...’.
? In the OBJ import dialog, uncheck ‘Import as static model’. ?
Hit Finish.
9
Assign rule file and generate models
We will now generate simple extrusions on the imported footprints. The rule file ‘extrude.cga’ uses the Object Attribute ‘height’ to extrude the footprint to the defined height.
? Select all footprints in the 3D viewport.
? In the File Navigator, locate the cga file ‘extrude.cga’ in the rules folder of the project. ? Drag it onto the selected footprints in the 3D viewport. ? The rule file will extrude all footprints to a height of 10.
Shapes vs. Static Models
OBJ and Collada DAE files can be imported as shapes or as static models : Shapes : Serve as a base for CGA generation. A typical example is footprint data.
Static Models : Can be scaled, rotated and translated after import, but cannot be processed further with CGA. Typical examples are landmark models.
? If desired, open ’footprints_from_obj.cej’ to see the finished scene.
(Continue with Part 3 on the next page)
10
Part 3: Import Volumes
Importing volumes as Shapes
In some cases, it is easier to model volumes in an external application than to describe them with the CGA grammar. This tutorial shows how a crude building volume, modeled in Maya, can be imported into CityEngine, and how it’s facades can then be refined using CGA rules.
Note: An analogous workflow can be applied using multipatch data from .shp, .gdb or .dae (Collada) instead of OBJ data.
Importing
The building volume in the image below has been modeled with conventional methods in Maya, and exported as an .obj file:
Import .obj file into CityEngine
? Open a new scene file. File > New... > CityEngine > CityEngine scene ? Locate and select the .obj file ‘Building_1.obj’ in the folder ‘data/obj/’. ? Right-click the file and choose ‘Import...’
? In the OBJ import dialog, uncheck ‘Import as static model’. ? Hit ‘Finish’.
11
A new Shape Layer called ‘Building_1’ appears in the Scene Editor, and the data is displayed in the 3D viewport.
Writing the rule file
The building volume's name ‘Building_1’ already defines its start rule ‘Building’. We therefore need to have ‘Building’ as the starting rule. We need to align the coordinate system of the imported model to CityEngine’s yUp system. This is done with the help of the CGA command alignScopeToAxes(). Afterwards, we can identify the different faces of the imported volume with the component split comp(f) . We use the top selector for the roof faces, and the side selector for the
facades. All we do at this step is color the Roof shape to see that the faces are identified correctly.
12
Building --> alignScopeToAxes (y) comp (f){top : color ("#ff0000") Roof. | side : Facade. }
? Select the building shape in the 3D viewport.
? In the File Navigator, locate the cga file ‘importedVolume_01_markFaces.cga’ in the rules folder of the project.
?
Drag it onto the selected shape in the 3D viewport.
The imported building volume generated with a simple rule to identify the faces. R ed : top faces (Roof) ; Grey : side faces (Facades):
Once the faces are identified correctly, we can continue the rule set. As these faces are modeled outside CityEngine, their orientation is not necessarily the way we need them for our rule operations. For the Facade rule, we therefore start with the CGA command alignScopeToGeometry(zUp, auto). With this operation, the scope of the Facade shape is aligned to its lowest edge, with z facing outward. This ensures that we operate with identically oriented scopes on all Facade faces.
Facade -->
alignScopeToGeometry (zUp, auto)
split (y){3.5 : Groundfloor | {~3 : Floor }* }
The rule file ‘importedVolume_02_facades.cga’ has a set of rules that add more details to the building's facades. Refer to the ShapeGrammar tutorials to get help about writing CGA rules. Let’s generate the building now again, using this rule set:
13
? Select the building shape in the 3D viewport.
? In the File Navigator, locate the cga file ‘importedVolume_02_facades.cga’ in the rules folder of the project.
? Drag it onto the selected shape in the 3D viewport.
The scene file ‘volume_from_obj.cej’ contains the imported model with the rule file assigned.
(Continue with Part 4 on the next page)
14
Part 4: Import Landmarks as Shapes
In case you have pre-modelled, textured assets you want to use in your scene, those can be imported as well.
Note: Supported formats are Wavefront .obj, Collada .dae, .kml and .kmz. (The last two are basically Collada files with georeference.)
Import .dae file into the CityEngine
? Open a new scene file. ‘File > New... > CityEngine > CityEngine scene’ ? Locate and select the .dae file ‘building_0.dae’ in the folder ‘data/dae/’. ? Right-click the file and choose ‘Import...’.
? In the OBJ import dialog, uncheck ‘Import as static model’. ?
Hit ‘Finish’.
A new Shape Layer called ‘building_0’ appears in the Scene Editor.
Converting Static Models to Shapes
In case you have imported Static Models and would like to continue working on them with CGA
code, you can always convert them to Shapes.
15
To do so, right-click on the model, then ’Convert Models to Shapes’. You can do the same with Models which were generated with CGA!
Applying a CGA rule
If required, imported shapes can be processed further with CGA rules.
? Assign the rule file ‘landmark.cga’. ? Generate the model.
4 Styles showing different possibilities how to process the import:
? If desired, open ‘landmark_as_shape.cej’ to see the finished scene.
(Continue with the other Tutorials. Have fun learning CityEngine!)