Eclipse UML插件介绍、安装及使用
Eclipse UML插件
Green
官网:https://www.360docs.net/doc/7117787985.html,/
安装方法:
解压后,把plugins文件夹拷贝到Eclipse的根目录了下,即把plugins文件夹里的文件拷贝到Eclipse的plugins目录下。
注意:最新版本只支持Eclipse 3.5 (Galileo)
Green Builds
Release Date Installation Release Notes Version GEF Version Eclipse Version October 22,2009 N/A Notes 3.5.0 3.4 3.5 (Galileo)
October 30,2009 N/A Notes 3.4.0 3.4 3.4 (Ganymede) December 14, 2008 N/A N/A 3.1.0 3.4 3.4 (Ganymede)
November 5, 2008 N/A N/A 3.1.0 RC2 3.4 3.4 (Ganymede)
October 3, 2008 N/A N/A 3.1.0 RC1 3.4 3.4 (Ganymede) September 15, 2008 N/A N/A 3.0.1 3.4 3.4 (Ganymede) October 19, 2007 Procedures Notes 3.0.0 3.3 3.3 (Europa) July 17, 2007 Procedures Notes 2.5.1 3.2 3.3 (Europa)
June 5, 2007 Procedures Notes 2.5.0 3.2 3.2 September 12, 2006 Procedures Notes 2.5.0 RC3 3.2 3.2
March 1, 2006 Procedures N/A 2.5.0 RC2 3.1.1 3.2 December 13, 2005 N/A N/A 2.5.0 RC1 3.1.1 3.2
October 12, 2005 N/A N/A 2.4.0 3.1.1 3.1
操作说明:
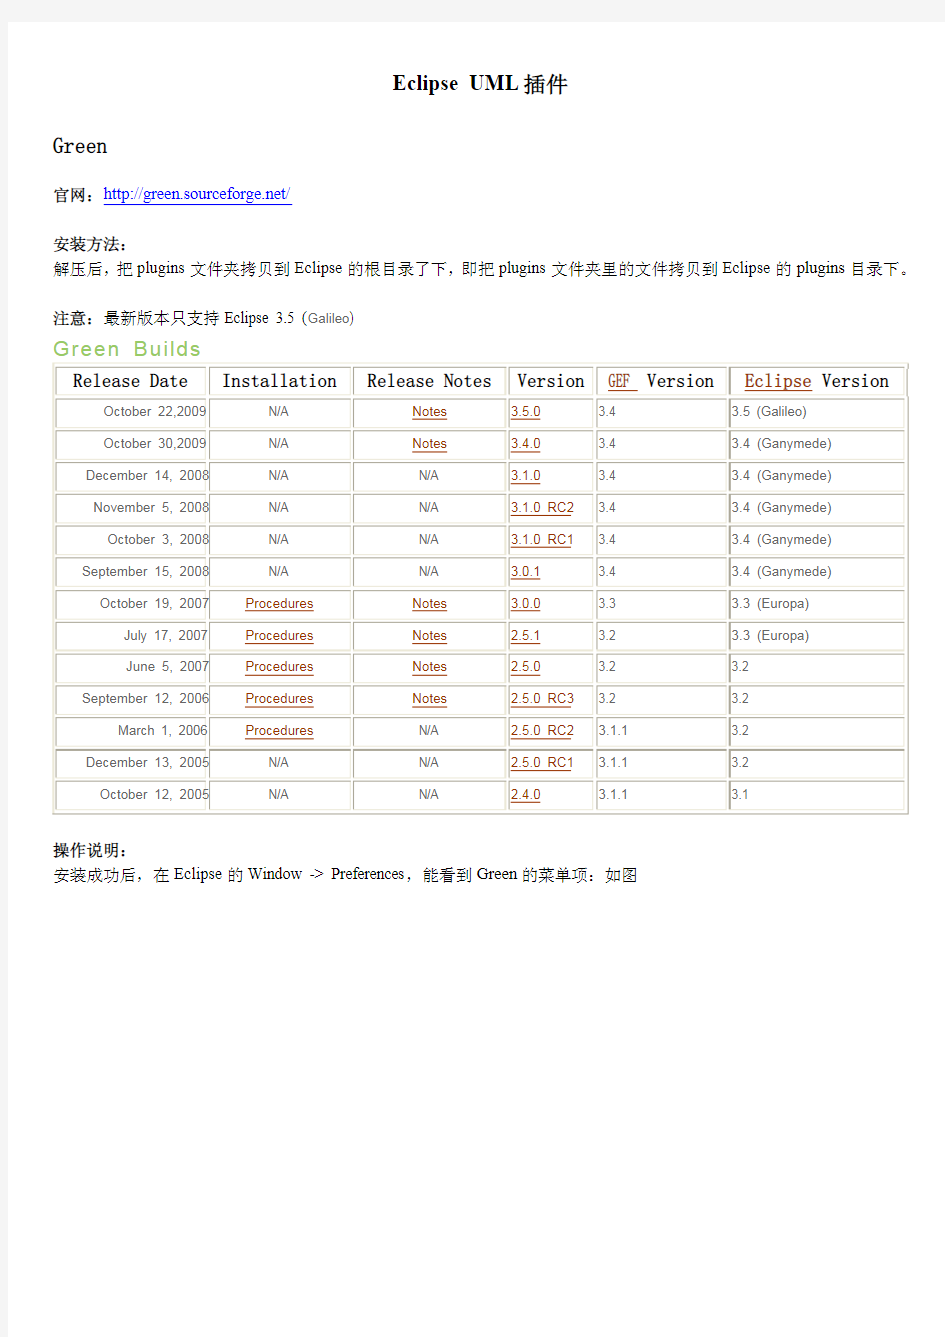
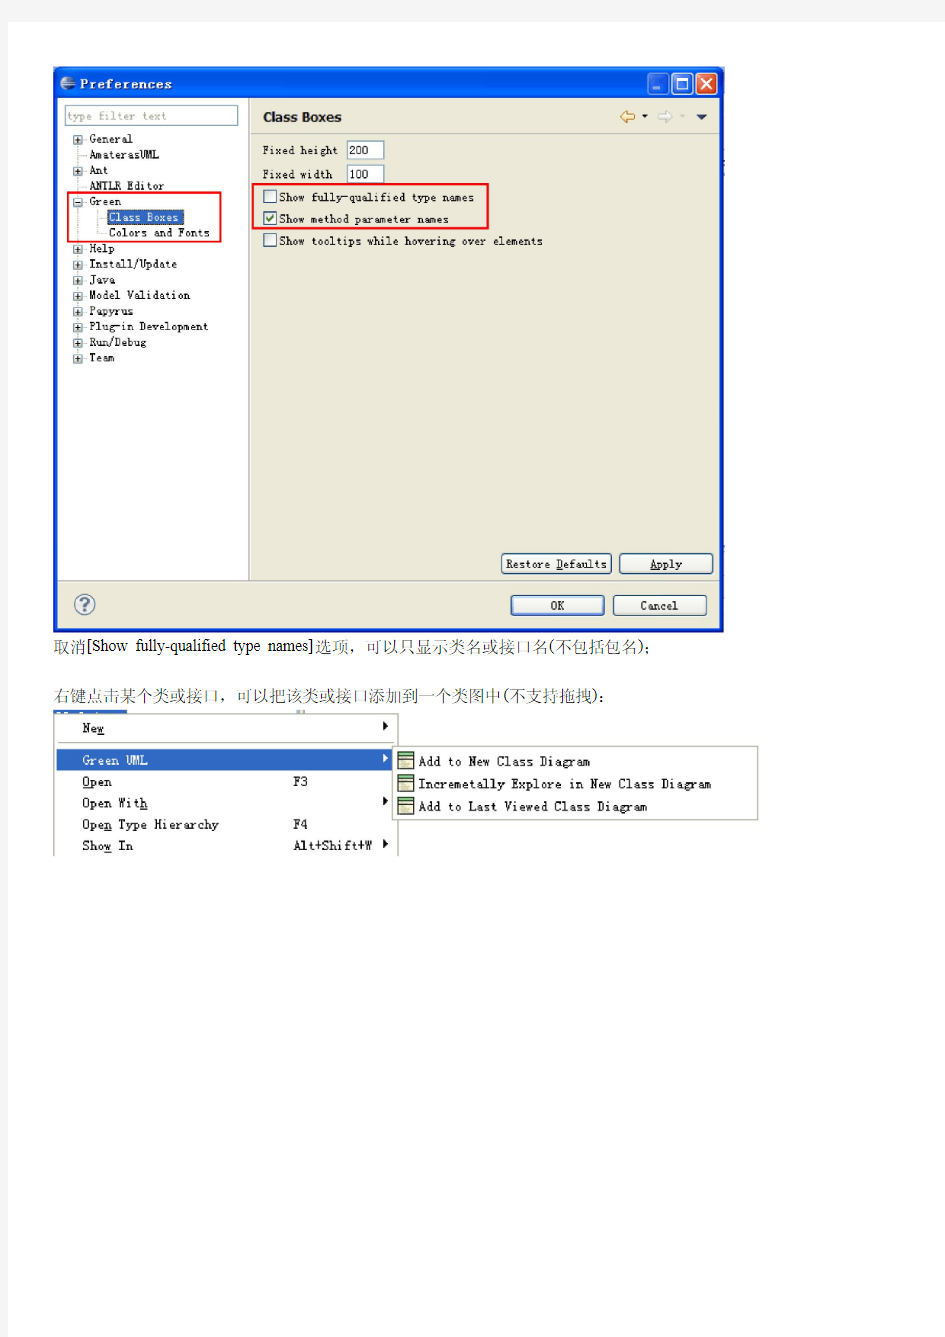
安装成功后,在Eclipse的Window -> Preferences,能看到Green的菜单项:如图
右键点击某个类或接口,可以把该类或接口添加到一个类图中(不支持拖拽):
点击右下角的案件[Toggle Explwration Icons],可以去掉[All ->…]
可以通过点击右键,把类图导出为.gif, .jpg, .png等格式的图片
Using the Green UML Plugin for Eclipse
The open-source Green UML plug-in, from the Computer Science and Engineering Department at the University at Buffalo (State Univ. of New York), enables the developer to generate Java code by directly creating and manipulating a UML diagram. Likewise, a UML diagram can be created from existing code ("round-trip engineering"). Changes in the diagram are immediately reflected in the code and changes in the code are reflected in the diagram right away as well. This frees the developer to focus on the design and architecture of their system without worrying about the syntactical details of the programming language.
Home page of Green UML.
On-line Documentation
Off-line Documentation: In Eclipse, in the main top menu, go to Help/Help Contents and click on the Green Users Guide.
To install the Green UML plug-in, please go to the Eclipse installation page.
If you are new to UML class diagrams, it is highly recommended that you review the basics of UML first.
Green UML Screen Shot
Quick Start
Note: Sometimes a change made directly in the Java code does not immediately show up in the diagram. It is recommended that after making changes directly to the code, when
switching back to the diagram, right-click in any clear area of the diagram and select
"Refresh Editor". This will insure that the diagram is properly synchronized with the code.
Create a New Diagram
Important Note: Green UML will not work with classes in the default package! In
practice, this is not really a restriction because you should always put all of your classes
in packages and never have code in the default package.
Create a New Blank Diagram
In the Package Explorer, right-click anywhere in the desired project and select "New/Other/Green UML Class Diagram"
Create a New Diagram from an Existing Class or Interface -- creates a new class
diagram with
New class diagram with only one class/interface in it:Right-click the class or
interface in the Package Explorer and select "Green UML/Add to New Class
Diagram"
New class diagram with the specified class/interface and its immediate
superclass: Right-click the class or interface in the Package Explorer and select
"Green UML/Incrementally Explore in New Class Diagram"
Green UML will create an XXX.grn file in the root of the src folder (the default
package location). To rename a class diagram, highlight it's *.grn file and go to the Eclipse main menu and select File/Rename or hit the F2 function key.
Adding Classes and Interfaces to Diagrams
Create a New Class or Interface in the Diagram
1.On the right side of the diagram, in the Palette, highlight either "Class" or
"Interface".
2.Move the mouse over to the desired location for the class on the diagram and
left-click to deposit a class or interface icon at that location.
3.Fill out all the desired information in the pop-up dialog that appears.
Green UML will automatically generate the appropriate Java file for your new
class or interface and will also auto-generate the code stubs for the class or
interface.
Add an Existing Class or Interface to a Diagram
To add an existing class or interface to a diagram, be sure that the desired diagram
is open and visible.
Right-click the desired Java file in the Package Explorer and select Green UML/Add to Last Viewed Class Diagram
Modify a Class or Interface on a Diagram
Double-clicking on a class or interface will open its Java code file for editing.
o Changing the visibility (public, private, protected, etc) of a class must be done via the code editor.
Adding a method or field:
1.Right-click the name of class or interface in the diagram to select the entire
class/interface
2.Then select Add and then click Add Field or Add Method.
3.Fill out the pop-dialog box with the appropriate specifications for the new field or
method.
Green UML will automatically generate a stub (signature but no code body) for any
methods and fields that are made.
Editing an existing method
Right-click the method and select "Refactor/Change Method
Signature". This will bring up the dialog window to edit the signature of the
method.
Adding Relationship Lines to a UML Class Diagram
Adding Inheritance Lines
Generalization Lines (solid lines with closed arrowheads) indicate that a
subclass extends superclass or an sub-interface extends a
super-interface. The arrow will point from the subclass (sub-interface) to the
superclass (super-interface).
1.In the Palette, highlight the "Generalization" option.
2.Left-click on the desired subclass (sub-interface). A line will now be
attached from that class/interface to the mouse pointer.
3.Move the mouse to the desired superclass (super-interface) and left-click. A
generalization line will be created and the associated Java code will be
auto-generated. Green UML will not let you create a line that would result
in invalid Java code.
Realization Lines (dotted lines with closed arrowheads) indicate that a
class implements an interface. The arrow will point from the class to the
interface.
1.In the Palette, highlight the "Realization" option.
2.Left-click on the desired class. A line will now be attached from that
class/interface to the mouse pointer.
3.Move the mouse to the desired interface and left-click. A realization line
will be created and the associated Java code will be auto-generated. Green
UML will not let you create a line that would result in invalid Java code.
Adding Association and Composition Lines
Association line s (tailless solid lines with open arrowheads) indicate that one
class holds a static reference to another class or instance of an interface, i.e. it has
a field of the referenced type. The association line points from the class with the
reference to the referenced class. Green UML has the erroneous notion
unfortunately, that all such fields are initialized via constructor input parameters,
so it auto-generates both the field and adds constructor code to initialize it via a
constructor input parameter. Unfortunately, this constructor code will need to be
deleted if one initializes the field in a different manner, such as by using a factory
object.
1.In the Palette, highlight the "Association" option.
2.Left-click on the class you want to have the reference to the other class. A
line will now be attached from that class to the mouse pointer.
3.Move the mouse to the desired interface and left-click. An association line
will be created and the associated Java code (field & constructor) will be
auto-generated. Green UML will not let you create a line that would result
in invalid Java code.
Composition lines (solid lines with no arrowheads and a diamond-shaped tail)
indicate that one class holds a static reference to another class or instance of an
interface, i.e. it has a field of the referenced type, but also explicitly constructs the
objects being referenced. Colloquially, we say that one object "owns"
another. The composition line points from the "owner" to the referenced
class. Green UML has the erroneous notion unfortunately, that all such fields
are initialized via constructor input parameters, so it auto-generates both the field
and adds constructor code to initialize it with the referenced class's
constructor.. Unfortunately, this constructor code will need to be deleted if one
initializes the field in a different manner, such as by using a factory
object. Green UML is currently unable to handle an composition with an abstract
class or interface, which is rather common.
1.In the Palette, highlight the "Composition" option.
2.Left-click on the class you want to have the reference to the other class. A
line will now be attached from that class to the mouse pointer.
3.Move the mouse to the desired interface and left-click. An association line
will be created and the associated Java code (field & constructor) will be
auto-generated. Green UML will not let you create a line that would result
in invalid Java code.
Adding Dependency Lines (not shown on screen shot above)
Dependency lines (tailless dotted lines with open arrowheads) are used to indicate a
variety of usually dynamic relationships between classes and interfaces, such as taking
another class as an input or returning it from a method, or instantiating it for use as a
local variable or value. If class "A" uses class "B", the dependency arrow will point
from class "A" to class "B".
Green UML supports the two dependency scenarios. In the Palette, you may see
either the "Instantiaton Dependency" or "Local Assignment
Dependency" option. Clicking the small triangle next to the visible choice will
show you the other choice. A "push-pin" icon lets you show both options at once.
Instantiation Dependency is when a method in one class instantiates another class for
use as a value in a method.
1.Highlight the "Instantiaton Dependency" option and drawing a line from
the class doing the instantiation to the one being instantiated. Green UML will
want you to only use concrete, classes that can be instantiated.
2.A dialog box will appear asking you what method to put the code stub. The
"cardinality" is simply how many instances you wish created.
3.Green UML will generate the constructor call in the desired method.
Local Assignment Dependency is when a method in one class creates a local variable of the type of the target class of the dependency.
1.Highlight the "Local Assignment Dependency" option and drawing a line
from the class doing the instantiation to the one being instantiated. The target
may be an abstract class or an interface, but if it is, Green UML will ask you
which concrete sub-class/implementation to actually instantiate.
2.A dialog box will appear asking you what method to put the code stub. The
"cardinality" is simply how many instances you wish created.
3.Green UML will generate the constructor call and local variable assignment in the
desired method. The variable type will be the target of the dependency but the
constructor call will be to the selected concrete sub-type if the target is
abstract. Green UML is not capable of auto-generating code for instantiating a
concrete subclass of a concrete superclass local variable.
Adding Notes (not shown on screen shot above)
Notes are just boxes of text placed on the diagram to help the reader understand it
better.
1.Highlight the "Note" option in the Palette.
2.Left-click wherever you want the note to appear in the diagram.
3.Fill out the text of the note box.
Tips and Traps
Exporation Icons
Green UML has a feature where it can automatically add the superclass or implemented
interface of a selected class onto the diagram. This is referred to as "incremental
exploring". If your diagram looks like the following, where an "ALL......" is
displayed under the class name, the exploration feature is activated.
Clicking on the "ALL" will display the superclass or interface. You can choose what
to show by right-clicking the class and selecting "Incrementally Explore".
Clicking the "Toggle Exploration Icons" option in the Paletter will turn the
incremental exploration feature on and off.
Technical Errors
Green UML incorrectly uses an empty diamond symbol to denote a composition--the
UML standard is to use a filled diamond. Empty diamonds are generally used for
"aggregations" which closely resembles Green UML's "associations", which is really the
generic term encompassing both aggregations and compositions. See, for
instance, https://www.360docs.net/doc/7117787985.html,/content/m11658/latest/ and https://www.360docs.net/doc/7117787985.html,/wiki/Class_d
iagram.
BUG in Green 3.5.0 when branching in SVN: In this version (and presumably,
earlier versions as well) of Green UML, the .GRN diagram file holds hard-coded
references to the Eclipse project folder. These references are NOT updated when the
source code is branched and subsequently copied to another project folder. Thus, in
the branched code, the diagrams will appear blank because Green UML cannot find the
source files because it is looking in the wrong place. Work around:The .GRN
diagram files are just ASCII text files in an XML-like format. Use any text editor, e.g.
Notepad, to open the file and globally search and replace all occurances of the old
project folder name with the new project folder name.
AmaterasUML
官网:http://amateras.sourceforge.jp/cgi-bin/fswiki_en/wiki.cgi?page=AmaterasUML
安装方法:
解压后,把.jar文件(3个)拷贝到Eclipse的plugins目录下。
注意:最新版本只支持Eclipse 3.3 ~ 3.5 (Galileo) ,3.6安装失败。
操作说明:
安装成功后,在Eclipse的Window -> Preferences,能看到AmaterasUML的菜单项:如图
通过勾选[Show simple name of Class or Interface],可以只显示类名或接口名(不包括包名);
通过New -> Others…,新建一个类图,然后可以通过拖拽的方式把一个类或接口添加到当前的类图中:
可以通过点击右键,把类图导出为.jpg格式的图片
AmaterasUML
AmaterasUML is an Eclipse plug-in for drawing UML class-diagram, and UML sequence-diagram.
Class diagram
Sequence diagram
License
Eclipse Public License 1.0
Download
AmaterasUML
AmaterasUML works with Eclipse 3.3 or later(not support Eclipse 3.2), and AmaterasUML also requires GEF.
1.Please download AmaterasUML_x.x.x.zip from here.
2.Unzip that and put all jar files into ECLIPSE_HOME/plugins.
How to Use
Class diagram editor
Please select "File"->"New"->"Other"->"AmaterasUML"->"Class diagram". Then class diagram file (*.cld) was created.
Opened Class diagam editor, and you can edit diagram using pallete. Then fields/methods can add from a context menu.
Some properties (ex class name) are edit directry in diagram. but some property(is abstract class or concrete class) are edit only property view.
If you want import/export Java, choose "Java" from a context menu.
Edit directry
AmaterasUML automaticaly parse field/methods when edit directry.
edit directy
parse your input
Sequence diagram editor
Please select "File"->"New"->"Other"->"AmaterasUML"->"Class diagram". Then class diagram file (*.sqd) was created.
Opened Sequence diagram editor, and you can edit diagram using pallete.
If you want add a Message, choose "Message". Then select source "Lifeline" or "Activation"
and target "Lifeline" or "Activation"
If you want add a Creation message, choose "Message". Then select source "Lifeline" or "Activation" and target "Instance" (Target instance must be none of imcoming/outgoing
message)
If you want add a Self-call message, choose "Message". Then select source "Activation" and same "Activation" by target.
You can select a class of Instance. Select the instance and choose "Import and Assign Class model" from a context menu. Then you can code assist on diagram or property view. Please hit CTRL + SPACE(limitation: can't use mouse when select the proposal, and if you escape the edit on diagram, hit esc key 2 times...)
Add Creation message
Please connect Lifeline/Activation to Instance.
Add Self-call message
Please connect same Activation.
Message completion
Please hit CTRL+SPACE on message.
Sequence API example
Please select "Window"->"Show View"->"Other"->"AmaterasUML"->"Stack Trace Sample".Then paste Java stack trace to opened view, and execute action. New stacktrace.sqd file is created on selected project/folder.
paste stack trace.
generated stack trace sequence diagram.
If you use Sequence API, you can create such plugin easily. This is a sample code, how to use Sequence API.
Sample code
//Add net.java.amateras.umleditor plugin in your plugin dependency.
//instanciate builder.
SequenceModelBuilder builder = new SequenceModelBuilder();
// create instances
InstanceModel start = builder.createInstance("Start");
InstanceModel next = builder.createInstance("Next");
InstanceModel last = builder.createInstance("Last");
InstanceModel instanciated = builder.createInstance("NewObject");
// ready to create message
builder.init(start);
// create message from Start to Next
MessageModel msg = builder.createMessage("Message to Next", next);
// create message from Next to Last
builder.createCreationMessage("Message to Last", last);
// create message from Last to Start
builder.createMessage("Return to Start", start);
// create self-call message on Start
builder.createSelfCallMessage("Self-Call");
// back to pointer
builder.back(msg);
// create message from Start to Last on next to first message.
builder.createMessage("Message to Last", last);
// add creation message.
builder.createCreationMessage("create", instanciated);
// convert to xml
System.out.println(builder.toXML());
generated sequence diagram
Usecase diagram editor
Please select "File"->"New"->"Other"->"AmaterasUML"->"Usecase diagram". Then class diagram file (*.ucd) was created.
Opened Usecase diagram editor, and you can edit diagram using pallete.
You can change the Actor image using property.
You can also attach any file to Usecase using property.
If you double click the Usecase, attached file will open in Eclipse.
Activity diagram editor
Please select "File"->"New"->"Other"->"AmaterasUML"->"Activity diagram". Then class diagram file (*.acd) was created.
Opened Usecase diagram editor, and you can edit diagram using pallete.
Common
You can swtich the hide/show grid by using "AmaterasUML" file menu History
2009/04/19 - Version 1.3.2
New appearance settings of class diagram / sequence diagram
Auto diagram reloading when the file is updated such as SVN update
See details here about new features.
2008/02/14 - Version 1.3.1
Auto layout in the class diagram editor.
Java model importing supports aggregation.
See details here about new features.
2007/10/07 - Version 1.3.0
Eclipse 3.3 Support (This version can't work with Eclipse 3.2.x)
Copy & Pase in the class diagram, the usecase diagram and the activity diagram.
Brand new visual theme for diagrams.
See details here about new features.
2007/04/22 - Version 1.2.2
Activity diagram is available.
Connection routers which exclude BendpoinConnectionRouter are not supported.
Bendpoint moves according to the entity dragging.
Note: This version hasn't compatibility with old versions.
See details here about new features.
2006/8/31 - Version 1.2.1
Class Diagram
o Enable to drag two or more classes at a time.
o Enable auto connect to Generalization/Realization connection.
Eclipse安装插件
Eclipse安装插件有2种方法,第一种直接覆盖目录,第二种用link的方式。 我们推荐用第二种,可以实现动态的配置。 插件一般安装在features目录和plugins目录下,如果用覆盖安装,就直接覆盖这2个目录。 一、使用links方式安装eclipse插件。 ●假设eclipse安装目录是D:\eclipse,待安装插件目录是 D:\eclipse\eclipseplugins。以MyEclipse和Hibernate-tools为例说明如何使用links方式安装eclipse插件。 ● ●在D:\eclipse\eclipseplugins中建立如下的目录结构: ● ●D:\eclipse\eclipseplugins\MyEclipse\eclipse ●将MyEclipse安装文件解压到此目录中(有安装版和解压版2种),这个目 录将包含一个plugins目录,即目录结构是这样的: ● ●D:\eclipse\eclipseplugins\MyEclipse\eclipse\plugins ●在D:\eclipse\links目录下新建文件,命名为MyEclipse.link,编辑此文件, 加入如下内容并保存 ●path = D:/eclipse/eclipseplugins/MyEclipse ●eclipse 将会到指定的目录下去查找eclipse\features目录和eclipse\plugins 目录,看是否有合法的功能部件和(或)插件。也就是说,目标目录必须包含一个\eclipse 目录。如果找到,附加的功能部件和插件在运行期配置是将是可用的,如果链接文件是在工作区创建之后添加的,附加的功能部件和插件会作为新的配置变更来处理。 ●其它压缩文件解压后若已经包含eclipse\plugins目录,则不需要建立eclipse 目录 ● ●2、安装Hibernate-tools ● ●解压hibernate-tools-3.1.0.alpha5.zip到目录 D:\eclipse\eclipseplugins\hibernate-tools\eclipse\plugins目录下。 ● ●在D:\eclipse\links下新建文件,命名为hibernate.link,编辑此文件,加入 如下内容并保存。 ● ●path = D:/eclipse/eclipseplugins/ hibernate-tools 二、插件管理 启动eclipse,在菜单Help->Software Updates->Manage Configuration...下,启用或者禁用插件。
eclipse使用技巧
代码篇: 1.在源代码中快速跳转: eclipse中的跳转甚至比https://www.360docs.net/doc/7117787985.html,还方便,方法是按住Ctrl键,然后鼠标指向变量名,方法名,类名,就会出现链接,点击就可跳到定义处。 2.实时语法检查: 编辑区右侧如果有红色小方块,直接点击就可跳到有错的行;黄色小方块是警告,可以忽略,但最好检查一下;如果某个函数尚未完成,要提 醒自己注意怎么办?加上注释// TODO,右侧就会有蓝色小方块,提示你此处尚未完成。当一个源码的右侧没有任何提示时,说明这个文件已经 完成了。 3.自动生成getter/setter方法: 只需要申明protected,private类成员变量,然后在Package Explore中找到该类,右键点击,选择“Source”“Generate Getters and Setters”。 4.更改类名/变量名: 如果涉及到多处修改,不要直接在源码中更改,在Package Explore中找到要改名的类或变量,右键点击,选择“Refactor”“Rename”, eclipse会自动搜索所有相关代码并替换,确保不会遗漏或改错。 5.匹配Try: 如果写的代码需要抛出或者捕捉异常,在JBuilder中,你需要首先引入这个异常类,然后再在写好的代码前后加try,catch或者在方法后面加 throws,在eclipse里完全不必要这样,只需要写好代码,然后按ctrl + 1,这时会出来提示,提示你是throw还是catch这个异常,选择你需要 的,按下enter就可以了。 6.快速书写循环代码: 在写循环或者选择条件的语句时,先写出关键字如if、while,然后按alt + /自己去看有什么好处吧。接下来会出来提示代码,按下tab可以在 框框中跳,按下确定跳出代码提示。 热键篇: ctrl + D:删除行 ctrl + M:当前窗口的最大化或最小化 ctrl + L:跳到指定的行 ctrl + 1:代码纠错提示 alt + /:代码辅助提示 F11:运行上次运行的程序
eclipse安装adt插件和SDK安装
ADT插件和SDK安装 1.e c l i p s e和A D T插件安装 1、下载eclipse和ADT软件 下载eclipse软件:https://www.360docs.net/doc/7117787985.html,/downloads/ 下载ADT软件:https://https://www.360docs.net/doc/7117787985.html,/sdk/installing/installing-adt.html 2、解压两个软件: 3、打开eclipse的解压目录(eclipse文件夹),选择 启动eclipse软件。 4、选择help菜单中的install new software
5、选择add按钮 6、选择location,找到本地ADT所在的目录 选择之后见下图
点击OK。 7、选中对应的软件,选择next(下一步) 8、继续next
9、选择同一,点击finish(完成)
10、等待eclipse自动安装完成,这个过程需要连接网络,下载部分软件 在安装的过程中会弹出来一个警告,直接点击OK,即可,不用理会。安装完成之后提示重启eclipse,直接重启。 11、在重启之后弹出提示没有SDK,这时不用理会
点击close,关闭之后,再进行SDK的安装和配置。 2.S D K下载和更新 下载SDK软件:https://https://www.360docs.net/doc/7117787985.html,/sdk/installing/index.html?pkg=tools 解压SDK: 解压后的目录: 这个目录是不完整的,需要运行SDK Manager 软件下载对应的开发环境和文档等资源双击运行SDK Manager.exe 文件,出现下面窗口
Eclipse 3.4 安装及使用说明
Eclipse 3.4 安装及使用说明 1. 安装Eclipse 3.4 由于Eclipse是绿色软件,所以直接解压至任意目录即可(例如D:\eclipse)。 2.在Eclipse中安装tomcat插件 解压tomcatPluginV31.zip,获取com.sysdeo.eclipse.tomcat_3.1.0并直接复制到eclipse目录plugins文件夹下即可。如果插件安装成功,新建项目时(File->New->Project)会看到Tomcat Project,如图1所示,否则说明安装不成功。 图 1 接下来在Eclipse中配置Tomcat服务器。在eclipse的菜单中选择: Window->Preferences->Tomcat(没有安装Tomcat插件就不会出现这项),设置Tomcat
Version: 选择“Version 5.x”, Tomcat Home: “C:\Program Files\Apache S oftware Foundation\Tomcat 5.5\”,即Apache Tomcat的安装目录。 图 2 3.采用Eclipse开发简单的Web应用 3.1 创建新项目 新建Tomcat Project,项目名称为“testPrj”,如图3,单击Next按钮进入下一步,如图4,web服务应用根目录为“web”,单击Finish按钮完成项目创建。
图3
图 4 3.2 修改项目的配置及目录结构 单击如图5所示的下三角符号,打开弹出菜单,选择“Filters”,打开过滤器窗口,如图6所示,把“*.resources”项的勾选去掉以显示.classpath文件。打开该文件并进行修改:把“
Eclipse使用方法[精髓]
附录C 3.2.2使用简介 C.3 使用开发工具进行编程 当下载并安装完毕Eclipse 3.2.2开发工具后,可以使用该开发工具进行代码的开发了,本节将使用该工具开发一段代码,介绍如何使用该开发工具进行编程,请按照如下步骤进行操作。 (1)首先打开Eclipse 3.2.2开发工具,稍等片刻之后,会进入到图C-8所示的界面,在这里将设置工程文件默认的存放路径。 图C-8 设置工程文件默认的存放路径 (2)本书选用默认路径作为工程文件的存放路径,当设置完成之后,就可以单击“OK”按钮,稍等片刻进入Eclipse 3.2.2的主程序。如图C-9所示。 图C-9 Eclipse 3.2.2主程序的欢迎界面 (3)这时可以将欢迎界面关掉,并单击“File” 菜单,将鼠标移动到“New”菜单项上,此时可以看
到图C-10所示的界面。 (4)在图C-11所示的“New”子菜单中选择“Project…”菜单项来创建工程文件,单击之后,会弹出一个图C-12所示的对话框。 (5)在该对话框中将选择所要创建工程的类型,可以选择“Java Project”选项,并单击“Next”按钮来进行创建。单击完“Next”按钮后,会进入图C-13所示的界面,在这里将设置工程文件的名称。 (3)可以在“Project Name”文本框中设置该工程的名称,例如这里将该工程的名称设置为“T est”,当设置完毕之后,可以单击“Fini sh”按钮完成设置。单击完“Fini sh”按钮后,可以在开发工具的主界面左侧看到本工程的工程树。如图C-14所示。 图C-12 选择工程文件的类型图C-13 设置工程文件的名称 图C-14 主界面中的工程树 (4)由于还没有创建文件,所以创建工程完毕之后,工程树比较空,这时可以为该工程创建代码文件,单击“File”菜单,并在其中“New”子菜单中选择“Class”选项。这样会弹出一个用来创建文件的向导提示框,如图C-15所示。
eclipse插件不显示的解决方法
eclipse插件不显示的解决方法 有时启动Eclipse未加载插件,解决方法很多,总结一下: a 、删除整个目录/eclipse/configuration/org.eclipse.update/,(eclipse 3.4 全新推出的更新管理器,如果我们想清空eclipse的配置信息,需要保留configuration目录下的config.ini和org.eclipse.equinox.simpleconfigurator目录,注意,只需要保留这两个目录)重启Eclipse b 、在启动Eclipse时带上 -clean参数 如:d:\eclipse\eclipse.exe -clean c 、如果Eclipse启动找不到插件了,解决办法: 在/configuration/config.ini文件中加入一行 osgi.checkConfiguration=true 这样它会寻找并安装插件,找到后可以把那行再注释掉,这样以后每次启动就不会因寻找插件而显得慢了。 4、为了便于管理众多插件,建议用links方式安装各种eclipse插件 Eclipse基础--使用links方式安装Eclipse插件 eclispe想必大家都很熟悉了,一般来说,eclipse插件都是安装在plugins目录下。不过这样一来,当安装了许多插件之后,eclipse变的很大,最主要的是不便于更新和管理众多插件。用links方式安装eclipse插件,可以解决这个问题。 当前配置XP SP1,eclipse3.0.1 现在假设我的eclipse安装目录是D:\eclipse,待安装插件目录是D:\plug-in ,我将要安装LanguagePackFeature(语言包)、emf-sdo-xsd-SDK、GEF-SDK、Lomboz这四个插件。 先把这四个插件程序全部放在D:\plug-in目录里,分别解压。如Lomboz3.0.1.zip解压成Lomboz3.0.1目录,这个目录包含一个plugins目录,要先在Lomboz3.0.1目录中新建一个子目录eclipse,然后把plugins目录移动到刚建立的eclipse 目录中,即目录结构要是这样的:D:\plug-in\Lomboz3.0.1\eclipse\plugins Eclipse 将会到指定的目录下去查找 eclipse\features 目录和eclipse\plugins 目录,看是否有合法的功能部件和(或)插件。也就是说,目标目录必须包含一个 \eclipse 目录。如果找到,附加的功能部件和插件在运行期配置是将是可用的,如果链接文件是在工作区创建之后添加的,附加的功能部件和插件会作为新的配置变更来处理。 其它压缩文件解压后若已经包含eclipse\plugins目录,则不需要建立eclipse目录。 然后在 eclipse安装目录D:\eclipse目录中建立一个子目录links,在links目录中建立一个link文件,比如LanguagePackFeature.link,改文件内容为path=D:/plug-in/LanguagePackFeature 即这个link文件要对应一个刚解压后的插件目录。
Eclipse使用指南
Eclipse使用指南(北京)技术有限公司
1 修订记录
2 目录 1修订记录 (1) 2目录 (1) 3概述 (1) 4基本操作 (1) 4.1常用的快捷键 (1) 4.2设置T ask (2) 4.3eclipse.ini配置 (2) 4.4代码模板 (2) 5插件 (3) 5.1Subversion插件 (3) 5.2Tomcat插件 (4) 6常见问题解答 (4) 6.1Javaw.exe启动有问题 (4) 6.2Ant不能执行 (4) 6.3ant超时解决办法 (4) 7参考资源 (5) 7.1插件地址 (5)
3 概述 本文是关于Eclipse的使用指南。内容包括:eclipse配置、快捷键的使用、使用建议、代码模版的配置、相关参考资源等。 4 基本操作 4.1 常用的快捷键 它可以大大的增强您的开发效率,要想成为高手的必备技能之一。 对于一个仅仅知道几个快捷键的选手,不要急于一天就能掌握所有的操作。可以每天重点使用几个,对于一个java程序员,几周就可以熟练掌握。 1. Alt+shift+s 操作source源代码的一些方式 2. F4 查看类的结构和继承关系 3.可以用Ctrl+shift+L可以查阅,它能增加巨大的效率。 4. Ctr+H:查找具体的类 5. F3 :等价于Ctr+被选中的某个单词 6.Ctrl+/:可以在选中一定的区域后,可以直接的全部加上注释。Ctrl + shift +/可以注释块。 7. Tab+shift:按钮可以跳tab距离。 8.全部选中+tab:可以向前跳置tab的距离。 9. F5和F6:是常用的调试按钮。非常的有用。 10.F4:在选中的类中可以查看类图的集成结构。 11.Shift+鼠标右键,可以选择一行,比直接的按住右键好用多了。 12.Ctr + Shift + o organize import 非常的好用。 13.Ctr + o Quick outline 14.Ctr + Shift + e 在单独的窗口中。列出当前所有的文件, 15.Ctr + T 查询调用该函数父函数。比F4好用。 16.Alt + shift + R 重命名选中的函数rename 17.Ctr + F3 可以查看类
eclipse插件安装方法
eclipse插件安装方法 eclipse平台+插件的方式使eclipse很容易扩充,eclipse插件安装的方式有两种: 1.一种是内置方式安装,即下载插件后解压缩,然后把解压后插件的plugins和features 目录里面的内容分别复制到eclipse安装目录的plugins和feature目录里面,这种方法安装比较简单,但是问题也比较多,因为所有的插件的文件都混合到了plugins和feature目录里面,eclipse会变得比较臃肿,而且如果你不想再使用某个插件,卸载会是一件非常麻烦的事情。 2.第二种方式就是使用外挂的方法,下面通过eclipse 3.2汉化包的安装来说明一下: 1)建立一个D:\eclipse3.2.2\myPlugins目录,这个目录是我们准备存放所有eclipse插件的地方 3)然后建立一个D:\eclipse.2.2\myPlugins\NLPack1-eclipse-SDK-3.2目录,这个目录是我们存放汉化包的地方 4)然后解压eclipse汉化包,NLPack1-eclipse-SDK-3.2.zip,在 D:\eclipse3.2.2\myPlugins\NLPack1-eclipse-SDK-3.2目录里面解压缩,解压缩后的内容会在一个名为eclipse目录中 5)建立一个D:\eclipse3.2.2\links目录,新建一个文件language.link(文件名可随意),文件的内容只有一行,如下:path=D:\\eclipse3.2.2\\myPlugins\\NLPack1-eclipse-SDK-3.2 6)启动eclipse,汉化成功 tip:其他的插件也可以用这样的方式安装,目录和文件的名字建议保留插件的版本号,这样便于今后对插件进行升级和管理. 4.配置SWT Designer6.2.0 SWT Designer6.0 下载后是一个文件名为“Designer_v6.0.0_for_Eclipse3.2.zip”的压缩包。 1)在D:\eclipse3.2.2\myPlugins\目录下建"SWTDesigner_v6.0.0_for_Eclipse3.2"目录 2)再在"SWTDesigner_v6.0.0_for_Eclipse3.2"下建"eclipse"目录 3)把解压后的文件(features文件夹和plugins文件夹)放到: D:\eclipse3.2.2\myPlugins\SWTDesigner_v6.0.0_for_Eclipse3.2\eclipse目录下 4)返回"D:\eclipse3.2.2"目录,在"links"文件夹下新建SWTDesigner.link文件,用记事 本打开,写入: path=D:\\eclipse3.2.2\\myPlugins\\SWTDesigner_v6.0.0_for_Eclipse3.2
Eclipse与ClearCase结合使用方法
eclipse与clearcase结合使用方法 ClearCase开发eclipse项目(二) 为User2 设置工作区域以访问由User1 所共享的模型 在本节章,User2 将通过创建一个web视图并在其工作空间中导入Piggy Bank UML 项目,来设置他个人的工作区域。要创建一个视图并导入此共享的Piggy Bank 建模项目,请遵循以下步骤: 1.启动User2 的客户端机器上的Software Architect。 2.当收到提示时,选择你的工作空间或者创建一个新的工作空间。 3.这会激活Software Architect 中的ClearCase Remote Client。为得到更多信息,参见 前面的在Software Architect 中激活ClearCase Remote Client 一节(由User1所执行)。 4.从Software Architect 中的ClearCase 透视图创建一个新的ClearCase Web 视图 (命名为baseccrc_view2)。为得到更多信息,参见在Software Architect 中创建一个ClearCase Web 视图,并加载Base ClearCase VOB 工件。 5.在Software Architect(ClearCase透视图)中的ClearCase Navigator 视图中,右键点 击baseccrc_view2 并选择Update Resource(如图21所示)以将UML Project 工件获取到你的本地Web 视图(baseccrc_view2)中。 图21:将UML Project 工件获取到你的本地Web 视图
eclipse插件安装
Eclipse插件的安装有两种方法 1、在eclipse的主目录(ECLIPSE_HOME,比如在我的机器上安装的目录是:D:\JavaDev\3.1)有一个plugins的目录,这种方法的插件安装非常简单,只要将插件copy到这个目录下就可以了。比如我有一个weblogic的插件(bea站点上可以下载),解压缩之后得到得到一个目录:【com.bea.eclipse.weblogic_1.1.1】,我就将这个目录直接放到%ECLIPSE_HOME%\plugins 目录下,重新启动eclipse之后就看到Run->“Start Weblogic”的菜单。安装之后,weblogic 插件的全路径为:D:\JavaDev\3.1\plugins\com.bea.eclipse.weblogic_1.1.1] 2、在eclipse目录(ECLIPSE_HOME)下创建一个links目录,然后将你自己的插件放在你想放的任何地方,这个时候你放插件的目录我称她为插件目录(PLUGIN_HOME),然后在你的%ECLIPSE_HOME%\links\目录下创建一个link文件,比如我要安装一个vss插件,我就在我的links目录下创建了:VSS_1.6.1.link文件。而这个VSS_1.6.1.link文件则是指向的我的插件目录(PLUGIN_HOME,比如在我的机器上插件目录为D:\JavaDev\plugins)。VSS_1.6.1.link文件的内容是: path=D:\\JavaDev\\plugins\\vssplugin_1.6.1 第二种安装插件的时候需要注意,如果你是一个单独的jar文件,则最好在link文件指定的目录下创建这样级别的目录:eclipse\plugins\xxx.xxx(插件名称和版本号),然后将jar 文件放在这个目录下即可。比如vss插件在我的机器上的目录是D:\JavaDev\plugins\vssplugin_1.6.1\eclipse\plugins\org.vssplugin_1.6.1,下有一个文件:vssplugin.jar 两种方法的插件安装之后需要重新启动eclipse才能看到插件。如果某一个插件已经安装了想要重新安装,只要将文件替换或者修改link文件的路径即可。如果发现认不到插件,可能是你的插件不支持你的当前eclipse版本,请检查。也有可能是系统配置引起的,我出现过一次,我的解决方法是将ECLIPSE_HOME下的configuration目录下的所有文件删除,剩下config.ini文件。 13.Eclipse插件使用links目录的用法: 假设把插件安装在d:\myplugin目录中,则myplugin的目录结构一定要是这样的: d:\\myplugin\\eclipse\\plugins\\插件及 d:\\myplugin\\eclipse\\features\\插件 例如安装EclipseME插件到d:\myplugin目录中,则目录结构 d:\\myplugin\\eclipse\\plugins\\eclipseme_0.4.5。 再假设eclipse安装在d:\eclipse目录中,则在eclipse目录中创建名称为links的目录,在links目 录中建立一个link文件,比如myplugin.link,该文件内容为path=d:\\myplugin。 启动eclipse,插件即安装上了,如果想暂时不启动插件,只需把myplugin.link文件删除即可。 补充说明: 1. 插件可以分别安装在多个自定义的目录中。
Eclipse for C++使用说明
Eclipse(for C++)使用说明 1、启动eclipse,在命令行中输入eclipse,出现窗口,如下图所示: 2、添加工程 在file菜单中选择import,出现窗口如下: 3、在General下选择Existing Projects into Workspace,单击next,出现如下窗口:
4、点击Browse,选择工程位置,出现下图所示 5、单击Finish,工作区如下图所示:
6、修改build选项,有两种方法 方法一:在项目名称上单击右键,选择Properties 方法二:选中项目,在菜单栏,选择Project/Properties 出现下图: 在左边选择C/C++ Build,修改Build directory:选择File system,选择makefile所在的文件夹,点击OK 7、在菜单栏选择Project/Build All,整个项目开始编译,如下图所示:
8、Run,在菜单栏选择Run/Run Configurations,出现窗口如下: 选择Arguments,点击File System,然后选择可执行文件所在目录,点击Apply,Close 然后在工具栏点击,程序即可运行 9、Debug 在Project explorer中,选择可执行文件,然后在菜单栏选择Run/Debug As,出现如下对话框,或者在工具栏点击图标,配置如下图:
点击OK,会弹出如下窗口: 选择Yes,整个工作区将切换到debug模式,如下图所示:
10、切换工作区视图 11、其他 A、查看函数的定义,按下CTRL键后,将鼠标移动到函数名称上左键单击,即可跳转 到函数的定义处。 B、如果想返回到上一视图,在工具栏点击 C、将鼠标移动到函数定义处,然后按下F2键,即可在浮出的窗口中查看该函数的代码 D、在左边Project explore中双击文件,即可在工作区中打开该文件进行编辑 12、在Eclipse中使用CVS 在项目名上单击鼠标右键,在弹出的菜单中选择Team,会出现相关选项
eclipse中svn插件的安装与使用
eclipse中svn插件的安装与使用 一.eclipse中svn插件的安装 Install Subclipse in Eclipse 3.X(参考官网https://www.360docs.net/doc/7117787985.html,/) 1.打开eclipse->Help->Install New Software 出现如下页面
2.点击Add按钮,根据自己需要的版本填写name和url Name: Subclipse 1.6.x (Eclipse 3.2+) URL: https://www.360docs.net/doc/7117787985.html,/update_1.6.x Name: Subclipse 1.4.x (Eclipse 3.2+) URL: https://www.360docs.net/doc/7117787985.html,/update_1.4.x Name: Subclipse 1.2.x (Eclipse 3.2+) URL: https://www.360docs.net/doc/7117787985.html,/update_1.2.x Name: Subclipse 1.0.x (Eclipse 3.0/3.1) URL: https://www.360docs.net/doc/7117787985.html,/update_1.0.x 3.点击ok,出现如下页面
4.点击Select All,全选后点击next,出现如下页面 点击next
选中接受license复选框,点击Finish,开始安装 安装完成后重启eclipse,打开Window->Preference,如下则说明安装成功
二.eclipse中svn插件的使用 1.初始导入,将本地项目共享到svn服务器版本库中 在eclipse中右键你的项目->team->Share Project 出现如下界面 选中SVN,点击next
Eclipse操作指南
Eclipse操作指南和地质建模数据附录 第一部分Eclipse操作指南 一功能介绍 ECLIPSE100是一个全隐式,三维、三相,还包括天然气、凝析油选项功能综合的黑油模拟软件。 Eclipse的输入资料是用关键字系统自由格式输入的。任何标准的编辑程序都可以编辑输入文件。EDIT是一个可供选择的专门用于屏幕编辑的Eclipse编辑程序。当数据输入后,EDIT程序能检查输入数据。 Eclipse软件提供的角点模型和常规筷中心模型非常实用,在一、二和三维模拟中,径向和笛卡尔块中心点模型也都很有用。三维径向模型能模拟0~360o界面上的圆形流动(关键词COORDSYS)。 Eclipse角点模型是唯一的能对正确代表油藏最复杂的几何地质图形进行模拟。前处理程序FILL和GRID常用来准备eclipse油藏模拟的角点数据。独立图形的处理GRAF和GRID 程序能用多种方法显示网格。例如,在进行大型的三维模拟时,用户可要求同时显示在XZ 方向的多条横剖面。网格的平面透明覆盖图是十分有用的,它能正确地对地质平面图进行检查。 Eclipse软件有一套综合的单井控制选择程序。生产井能在给定的油量、水量、液量、气量、油藏流体废弃产量、井底压力和井口压力等数值下进行运算。油藏工程师应对上述数值中一项定出一个目标值,而对其余数值的各项定出限制值。生产井只要不超过限制,在规定的目标下工作。若一个限制值将要超越他的限制界限,那么生产井将自动改变它的控制模式,使井保持在允许的限制条件下工作。效率系数还可用于考虑正常的停产时间。该程序将能计算处于正常流动条件下的流量和流动压力,但累计流量按照有效系数进行扣除。这有助于历史拟合的全过程,生产井可处于另处一种控制类型。输入这些井实际生产的油、气和水量,使井处于相同的产液量的条件下生产,这样,甚至当含水率和气/油比不完全拟合时,压力下降的速度也是大致正确的。实际生产的和计算的这两个产量都可以编入汇总文件,以便进行图形对比。 二建模 1 建立实际模型(Flogrid建模) 煤层气产能数值模拟是跟实际的地质情况紧密联系的,在煤层气田地质和开发资料数据充足的情况下,需要建立包含各种地质参数的三维地质模型,在此基础上全面布井(虚拟井),进一步对所有井开展值模拟工作,从而达到气田产能预测的最终目的。
Eclipse下安装keil插件和导入keil工程教程
Eclipse下安装keil插件 注明:这个插件只有MDK下才有,keil C51是没有的。所以在装keil的时候要装MDK和C51(当然是你用到51开发的情况下)。 本人安装的MDK位4.7.2a Keil C51版本为C51V952 只装了Keil C51的keil目录下是这个样子的: 装了MDK 和C51的目录是这个样子的 Eclipse的插件就在Eclipse目录下。 下面开始Eclipse下安装keil的插件。 再次补充一下,这个插件只是用来启动keil软件(至少我是这么用的),不可以在Eclipse下编译keil工程,可以通过插件进行Flash程序下载。我能理解的程度就是这样了,现在还是没有好好的研究。 我安装这些的原因是,keil下文件编辑功能太弱,尤其是51单片机开发的时候。最简单的是结构体内部的成员不能自动显示。当然在MDK4.7.2之后keil已经具备这个功能,但是C51还是不能够支持。所以为了提高代码的写作速率我还是装上了。 第一步:你要有一个好用的Eclipse。主要是安装java的SDK,至于怎么安装请自行参考网上的教程。 第二步:打开Eclipse help-->Install New Software
Add Name 自行填写我用的是MDK 点击Archive 选择keil下Eclipse文件夹下的压缩包点击ok 然后在下框中会出现Keil MDk-ARM 选中并且将最下边的勾去掉这是检查更新,不去掉勾安装会验证更新很慢。如下图: 因为我已经安装过了,所以next是灰色的,如果没安装直接next直至完成。 安装完成在工具栏中出现keil图标如下图: 至此插件安装完成。 插件安装完成了那怎么用呢?这就是个问题了。我自己的理解其实就是把keil建立好的文件放到Eclipse下借助其强大的功能进行编辑。当然并不是这么简单,我下面介绍一下快速将keil工程转换成Eclipse下进行编辑的办法,可能方法很笨,不过为了更强大的编辑功能多一点配置我觉得是可以的。 首先建立一个keil工程工程目录如下
Eclipse插件安装方法总结
第一种方法很简单,在Eclipse的主目录(%ECLIPSE_HOME%)下有一个plugins目录和features目录。将插件解压缩后,在解压缩后的文件夹里一般可以看到plugins文件夹,有的插件解压缩后还可以看到一个features文件夹。一般将plugins文件夹下的内容直接拷贝到%ECLIPSE_HOME%\plugins目录下,如果解压缩后的插件目录下还有features文件夹,则把该文件夹下的内容也拷贝到%ECLIPSE_HOME%\features下。重新启动Eclipse之后就可以使用刚刚安装的插件了。如果不能使用插件,可能是因为插件还未启用。可以到Help/Software Updates/Manage Configuration下将“Disable”的插件“Enable”即可。这种插件安装方式简单、快捷,但是有缺陷,若插件太多,会使内容非常混乱,而且分不清哪个是系统自带的,哪个是以后安装的。当安装了许多插件之后,Eclipse变的很大,不便于更新和管理众多插件。每次重新安装Eclipse,就要花时间来安装那几个常用的插件。 第二种方法也很简单,它主要借助于Eclipse的向导来安装插件。通过Help/Software Updates/Find and Install,在弹出的菜单中选择“Search for new features to install”,点“Next”,在下一菜单中选择“New Local Site”或“New Archived Site”,找到你下载的插件所在目录,选中安装即可。这种方法安装插件比较安全,不易出错,缺点就是对于插件的要求也比较挑剔,所以能够支持这种方式安装的插件也比较少。一般要求插件目录下不光有plugins和features文件夹,还要有site.xml文件(site.xml是进行自动安装的配置文件,eclipse会根据文件的信息自动安装插件)。支持J2ME开发的EclipseME插件就是通过这种方式安装的。 第三种方式就是在Eclipse主目录下创建一个links目录,然后将你自己的插件放在你想放的任何地方,这个时候你放插件的目录就是插件目录(%PLUGIN_HOME%),然后在你的%ECLIPSE_HOME%\links\目录下创建一个link文件,比如要安装一个vss插件,可以在links目录下创建一个vss.eclipse.link文件,link文件的名称随便取。这个vss.eclipse.link 文件指向的存放vss插件的目录(%PLUGIN_HOME%)。假如你的vss插件的zip/rar文件解压缩后放在C:\eclipse_plugins\vss.eclipse下(如果是插件是jar文件则可以不用解压缩),则vss.eclipse.link文件的内容就应该是:path=C:\\eclipse_plugins\\vss.eclipse。注意:path所指的文件路径一定要增加一个“\”转义符来分开。以这种方式安装插件要有一定的讲究。即:插件目录下面一定要有eclipse目录,然后在eclipse目录下分别建立features 和plugins。例如:如vss.eclipse.zip解压成vss.eclipse目录,这个目录包含一个plugins 子目录。先在vss.eclipse目录中新建一个子目录eclipse,然后把plugins目录移动到刚建立的eclipse 目录中,然后再在刚刚建立的eclipse目录下建立一个features目录。即目录结构要是这样的:C:\eclipse_plugins\vss.eclipse\eclipse\plugins、 C:\eclipse_plugins\vss.eclipse\eclipse\features。其它压缩文件解压后若已经包含 eclipse\plugins、eclipse\features目录,则不需要建立eclipse目录结构。启动Eclipse后,Eclipse会到link文件指定的目录下去查找eclipse\features 目录和eclipse\plugins 目录,看是否有合法的功能部件和插件。也就是说,目标目录必须包含一个\eclipse 目录。如果找到,附加的功能部件和插件在运行期配置是将是可用的,如果链接文件是在工作区创建之后添加的,附加的功能部件和插件会作为新的配置变更来处理。对于第三种方式的说明: 1. 插件可以分别安装在多个自定义的目录中; 2. 一个自定义目录可以安装多个插件; 3. link文件的文件名及扩展名可以取任意名称,比如ddd.txt,myplugin都可以; 4. link文件中path=插件目录的path路径分隔要用“\\”或是“/”; 5. 在links目录也可以有多个link文件,每个link文件中的path参数都将生效; 6. 插件目录可以使用相对路径;
Eclipse使用指南96
Eclipse使用指南 张大为 全星科技珠海有限公司 2009-9-1 一、简介(此节内容为转载,只有小部分修改和添加) Eclipse最初是替代由IBM公司开发的价值4千万美金的商业软件Visual Age for Java的下一代IDE开发环境,2001年11月交给非营利软件供应商联盟Eclipse基金会(Eclipse Foundation)管理。2003年,Eclipse 3.0选择OSGi服务平台规范为运行时架构。 Eclipse 是一个开放源代码的、基于Java 的可扩展开发平台。就其本身而言,它只是一个框架和一组服务,用于通过插件组件构建开发环境。幸运的是,Eclipse 附带了一个标准的插件集,包括Java 开发工具(Java Development Tools,JDT)。虽然大多数用户很乐于将Eclipse 当作Java IDE 来使用,但Eclipse 的目标不仅限于此。Eclipse 还包括插件开发环境(Plug-in Development Environment,PDE),这个组件主要针对希望扩展Eclipse 的软件开发人员,因为它允许他们构建与Eclipse 环境无缝集成的工具。由于Eclipse 中的每样东西都是插件,对于给Eclipse 提供插件,以及给用户提供一致和统一的集成开发环境而言,所有工具开发人员都具有同等的发挥场所。 这种平等和一致性并不仅限于Java 开发工具。尽管Eclipse 是使用Java 语言开发的,但它的用途并不限于Java 语言;例如,支持诸如C/C++、COBOL、Eiffel、PHP、Ant等等编程语言的插件已经可用。Eclipse 框架还可用来作为与软件开发无关的其他应用程序类型的基础,比如内容管理系统,数据库系统。另外,很多Eclipse的爱好者开发了非常小巧且实用的插件,譬如Column(可以像UltraEdit那样按列编辑),Spell(检查拼写错误),Subclipse(SVN在Eclipse中的客户端插件)。 基于Eclipse 的应用程序的突出例子是IBM 的WebSphere Studio Workbench,它构成了IBM Java 开发工具系列的基础。例如,WebSphere Studio Application Developer 添加了对JSP、servlet、EJB、XML、Web 服务和数据库访问的支持。 注:本人最常用的插件为Column,Spell和Subclipse。
Eclipse使用方法介绍
(1)Eclipse启动后,弹出一个【工作空间启动程序】对话框,在【工作空间】文本框中输入“D:\java”目录,单击【确定】按钮。 工作空间workspace用于保存Eclipse所建立的程序项目和相关的设置。 (2)单击【确定】按钮,系统将出现Eclipse的欢迎界面,其中包含【概述】、【教程】、【样本】、【新增内容】以及工作台相关按钮和菜单栏等。
在Eclipse的欢迎界面中,单击【工作台】按钮或者关闭【欢迎】的界面窗口,将显示出Eclipse的工作台,包括标题栏、菜单栏、工具栏、编辑器、透视图和相关的视图。 3.Eclipse菜单栏 (1)文件菜单 包含【新建】、【保存】、【关闭】以及【刷新】等命令,主要用于新项目的创建、保存以及关闭等操作。 (2)编辑菜单 主要用于辅助程序设计代码设计工作、如代码的【复制】、【剪贴】和【粘贴】等。 (3)源代码菜单 包含的命令都是和代码编写相关的,主要用于复制编程工作。 (4)重构菜单 是Eclipse最为关键的菜单,主要包括对项目重构的相关命令,需重点掌握。 (5)项目菜单 用于管理Eclipse中的项目,用于项目的打开与关闭、自动构建等操作。 (6)运行菜单 包含了与程序运行和调试相关的各种操作,同时还具有保存运行和调试的记录功能。(7)窗口菜单 用于显示、隐藏或处理Eclipse中的各种视图和透视图。 4.Eclipse中创建Java项目 在Eclipse中编写应用程序时,需要先创建一个项目。Eclipse的多种项目中,其中Java 项目是用于管理和编写Java程序的。 (1)创建一个java项目
(2)新建一个类文件
安装Eclipse使用说明
Eclipse Tutorial For Introduction to Java Programming By Y. Daniel Liang This supplement covers the following topics: ?Getting Started with Eclipse ?Choosing a Perspective ?Creating a Project ?Creating a Java Program ?Compiling and Running a Java Program ?Run Java Applications from the Command Line ?Debugging in Eclipse NOTE: To use this supplement with the text, you may cover Sections 1 – 6 in this supplement after Chapter 1 in the text, cover Section 7 in this supplement after Chapter 2 in the text, and cover Section 8 in this supplement at the beginning of Chapter 15 in the text. 0 Introduction This tutorial is for students who are currently taking a Java course that uses Eclipse and for Java programmers who want to develop Java projects using Eclipse. Eclipse is an open source supported by IBM. You can use JDK command line utility to write Java programs. The JDK command line utility consists of a set of separate programs, such as compiler and interpreter, each of which is invoked from a command line. Besides the JDK command line utility, there are more than a dozen Java development tools on the market today, including Borland JBuilder, NetBeans, Sun ONE Studio (a commercial version of NetBeans), Eclipse, and WebGain Visual Café. These tools support an integrated development environment (IDE) for rapidly developing Java programs. Editing, compiling, building, debugging, and online help are integrated in one graphical user interface. Using these tools effectively will greatly increase your programming productivity. This brief tutorial will help you to become familiar with Eclipse. Specifically, you will learn how to create projects, create programs, compile, and run programs.