PyQt4编程简介
PyQt4 编程简介
作者:
日期:
注解:
该文档根据"Introduction to PyQt4"翻译,依照创作公用约定发布。
该文档的doxygen源文件可以从pyqt-doc-cn下载。
开始
创建一个PyQt4一般可以通过很少的步骤完成。通常的方法是用Qt提供的QtDesigner工具创建界面。使用QtDesigner,可以方便地创建复杂的GUI界面。然后,可以在窗口上创建部件,添加名字等。创建一个PyQt4一般需要:
1. 使用QtDesigner创建GUI界面
2. 在属性编辑器中修改部件的名字
3. 使用pyuic4工具生成一个python类
4. 通过GUI对应类来运行程序
5. 通过设置自己的slots来扩展功能
6. 当使用窗口部件的时候,可以从"PyQt's Classes"查询。Qt采用易于理解的方式来命名
函数,例如:"setText"。
教程列表
1. 简易的文本编辑器 - PyQt4第一个程序
2. 增加文本编辑器的功能 - 增加更多的功能
3. QYolk I - PyQt4中的列表部件 - 怎么使用PyQt4中的列表部件
4. QYolk II - 容器部件 - 怎么使用Tab Widget
5. PyQt4文本编辑器 - 最终版 - PyQt4的一些高级特性
6. QYolk III - 升级包列表 - 新的特性
?下载教程代码 (缺少的部分请从原网站下载)
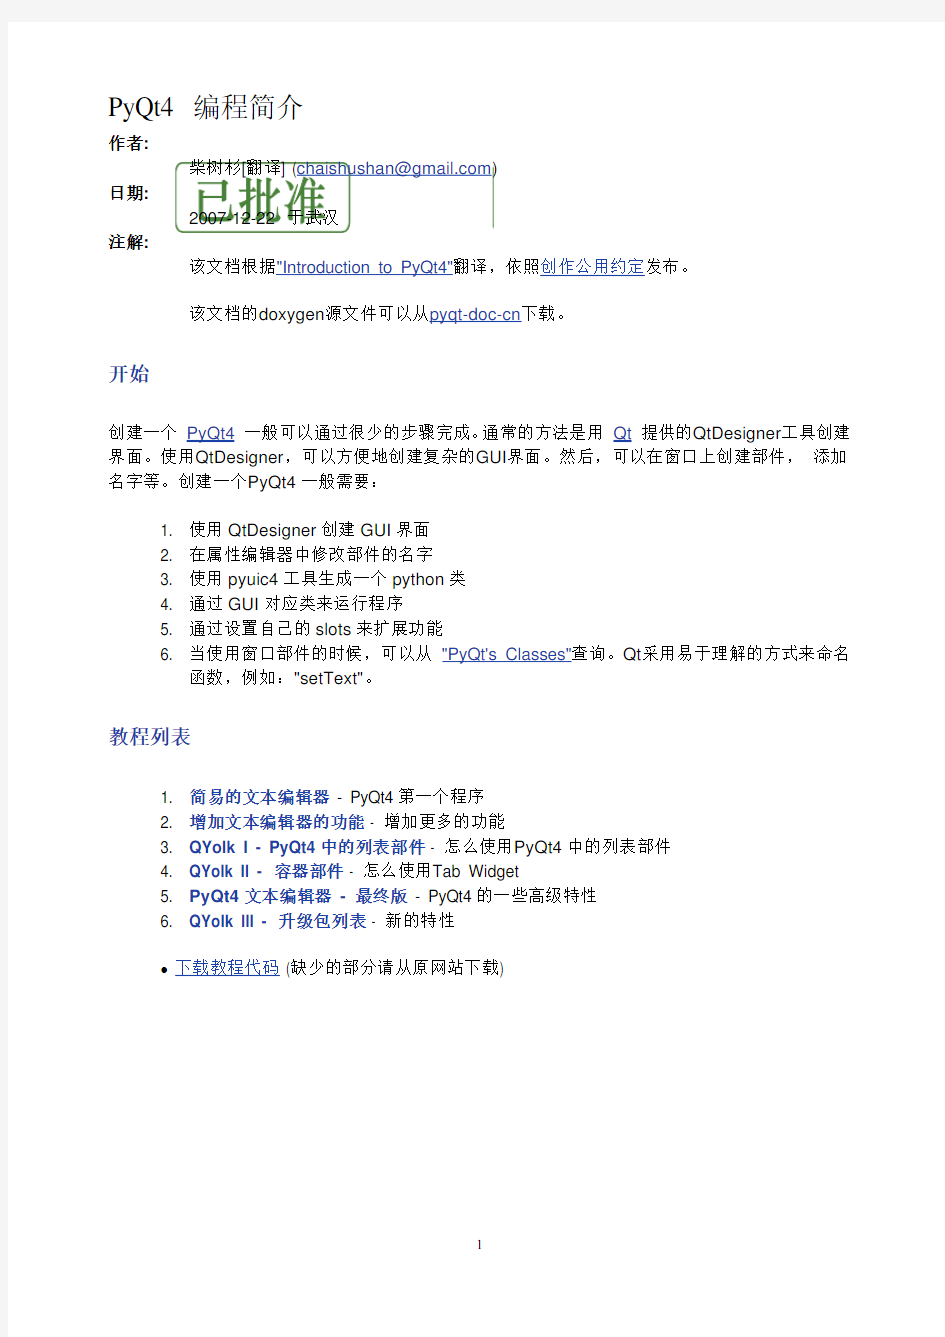
简介
打开QtDesigner,会出现"Hello... Close Button"对话框,让我们选择类型类型:
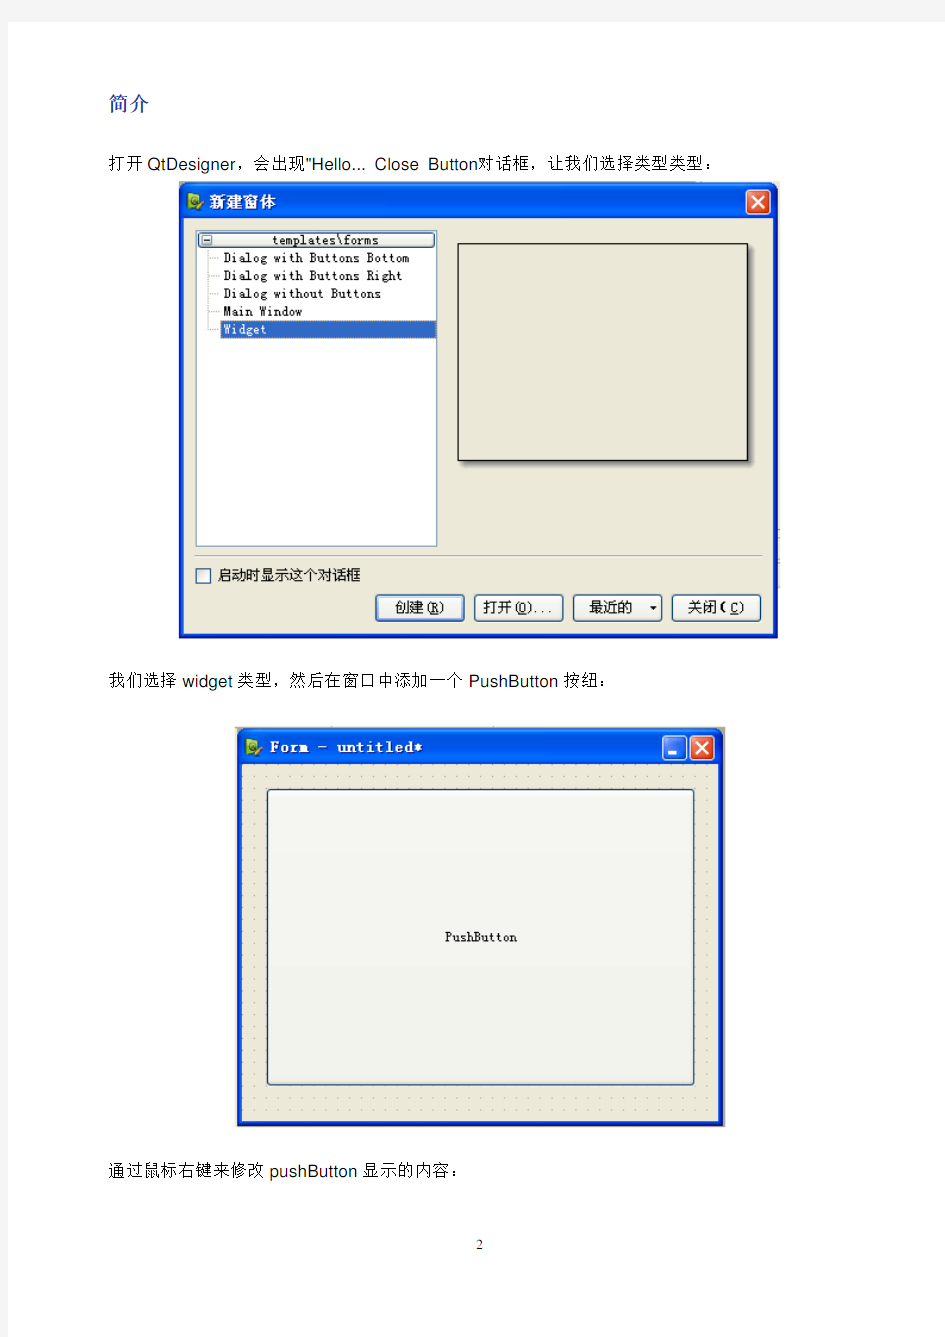
我们选择widget类型,然后在窗口中添加一个PushButton按纽:
通过鼠标右键来修改pushButton显示的内容:
当窗口建好之后,我们可以QtDesigner来编辑一些Qt预定义的信号/槽。这里我们使用的是"close()"槽函数来关闭程序。首先切换到信号/槽边界模式:
用鼠标移到pushButton区域,然后拖动:
弹出一个信号/槽选择框:
信号选择clicked(),槽选择close()。将窗口保存为test.ui文件。切换到test.ui所在的目录,然后输入以下命令:
pyuic4 test.ui > test_ui.py
下一步是创建一个test.py文件:
import sys
from PyQt4 import QtCore, QtGui
from test_ui import Ui_Form
class MyForm(QtGui.QMainWindow):
def __init__(self, parent=None):
QtGui.QWidget.__init__(self, parent)
self.ui = Ui_Form()
self.ui.setupUi(self)
if __name__ == "__main__":
app = QtGui.QApplication(sys.argv)
myapp = MyForm()
myapp.show()
sys.exit(app.exec_())
运行test.py:
python test.py
现在应该出现响应的窗口,当你点击按钮的时候退出程序。
提示
Ui_Form是用pyuic4工具从"Form"窗口生成的对应python类的名字。你可以在QtDesigner自己喜欢的名字一个类的名字(下一节我们会讲到)。
简易的文本编辑器
我们将要实现一个简单的文本编辑器,如图。用QtDesigner创建一个"Widget"类型的窗口。我们使用两个PushButton和一个TextEdit:
"关闭"按钮被连接到窗口的"close()"槽函数,可以被用来关闭窗口。修改"打开"按钮的对象名字为"button_open";修改TextEdit部件的对象名字为"editor_window";修改窗口的名字为"notepad" (开始为"MainWindow")。选择要该名字的对象,然后出现的属性编辑器中可以修改名字。
保存窗口,并生成对应的类:
pyuic4 edytor.ui > edytor.py
得到一个"Ui_notepad"类。我们还需要自己添加一些代码,创建start.py:
import sys
from PyQt4 import QtCore, QtGui
from edytor import Ui_notepad
class StartQt4(QtGui.QMainWindow):
def __init__(self, parent=None):
QtGui.QWidget.__init__(self, parent) self.ui = Ui_notepad()
self.ui.setupUi(self)
if __name__ == "__main__":
app = QtGui.QApplication(sys.argv)
myapp = StartQt4()
myapp.show()
sys.exit(app.exec_())
运行start.py启动程序,点击“关闭”关闭程序。
下面我们编辑自己的slot函数:
import sys
from PyQt4 import QtCore, QtGui
from edytor import Ui_notepad
class StartQt4(QtGui.QMainWindow):
def __init__(self, parent=None):
QtGui.QWidget.__init__(self, parent)
self.ui = Ui_notepad()
self.ui.setupUi(self)
# here we connect signals with our slots
QtCore.QObject.connect(self.ui.button_open,QtCore.SIGNAL("clicked()"),
self.file_dialog)
def file_dialog(self):
self.ui.editor_window.setText('aaaaaaaaaa')
if __name__ == "__main__":
app = QtGui.QApplication(sys.argv)
myapp = StartQt4()
myapp.show()
sys.exit(app.exec_())
当你点击“打开”的时候,在编辑框中将出现"aaaaaaaaaa"内容。那是因为我们把“打开”信号连接到了我们自己实现的slot函数:
QtCore.QObject.connect(self.ui.button_open,QtCore.SIGNAL("clicked()"),
self.file_dialog)
self.ui对应窗口,通过它我们可以访问窗口中的部件。因此,self.ui.button_open对应“打开”按钮。self.file_dialog是信号对应的函数,它是比较重要的部分,例如:
def file_dialog(self):
self.ui.editor_window.setText('aaaaaaaaaa')
self.ui.editor_window对应TextEdit,setText方法用来设置文本的内容。下面我们用QFileDialog 来选择文件,代码如下:
import sys
from PyQt4 import QtCore, QtGui
from edytor import Ui_notepad
class StartQt4(QtGui.QMainWindow):
def __init__(self, parent=None):
QtGui.QWidget.__init__(self, parent)
self.ui = Ui_notepad()
self.ui.setupUi(self)
QtCore.QObject.connect(self.ui.button_open,QtCore.SIGNAL("clicked()"),
self.file_dialog)
def file_dialog(self):
fd = QtGui.QFileDialog(self)
plik = open(fd.getOpenFileName()).read()
self.ui.editor_window.setText(plik)
if __name__ == "__main__":
app = QtGui.QApplication(sys.argv)
myapp = StartQt4()
myapp.show()
sys.exit(app.exec_())
fd.getOpenFileName()弹出一个文件选择框。fd.getOpenFileName()用于返回我们选择文件的名字。但是,如果我们没有选择文件的话,将得到一个空的文件名,程序出现以下错误:
IOError: [Errno 2] Nie ma takiego pliku ani katalogu: < PyQt4.QtCore.QString object at 0x2b6465569738 >
继续完善代码:
So we have to improve our code:
import sys
from PyQt4 import QtCore, QtGui
from edytor import Ui_notepad
class StartQt4(QtGui.QMainWindow):
def __init__(self, parent=None):
QtGui.QWidget.__init__(self, parent)
self.ui = Ui_notepad()
self.ui.setupUi(self)
# tutaj dajemy wlasne polaczenia slotow
QtCore.QObject.connect(self.ui.button_open,QtCore.SIGNAL("clicked()"),
self.file_dialog)
def file_dialog(self):
fd = QtGui.QFileDialog(self)
self.filename = fd.getOpenFileName()
from os.path import isfile
if isfile(self.filename):
text = open(self.filename).read()
self.ui.editor_window.setText(text)
if __name__ == "__main__":
app = QtGui.QApplication(sys.argv)
myapp = StartQt4()
myapp.show()
sys.exit(app.exec_())
目前我们可以浏览文件了,但是并不能保存文件的任何修改。还需要增加一个“保存”按钮用来保存文件。在QtDesigner中添加一个pushButton,名字改为"button_save",保存*.ui文件。然后重新生成对应的类:
pyuic4 edytor.ui > edytor.py
现在程序外观如图:
我们给"Save"按钮的click信号连接对应的槽函数:
import sys
from PyQt4 import QtCore, QtGui
from edytor import Ui_notepad
class StartQt4(QtGui.QMainWindow):
def __init__(self, parent=None):
QtGui.QWidget.__init__(self, parent)
self.ui = Ui_notepad()
self.ui.setupUi(self)
QtCore.QObject.connect(self.ui.button_open,QtCore.SIGNAL("clicked()"), self.file_dialog)
QtCore.QObject.connect(self.ui.button_save,QtCore.SIGNAL("clicked()"), self.file_save)
def file_dialog(self):
fd = QtGui.QFileDialog(self)
self.filename = fd.getOpenFileName()
from os.path import isfile
if isfile(self.filename):
text = open(self.filename).read()
self.ui.editor_window.setText(text)
def file_save(self):
file = open(self.filename, 'w')
file.write(self.ui.editor_window.toPlainText())
file.close()
if __name__ == "__main__":
app = QtGui.QApplication(sys.argv)
myapp = StartQt4()
myapp.show()
sys.exit(app.exec_())
现在程序虽然可以基本工作,但是并不完善!它只能处理ASCII格式的文件。因此,我们最好给它增加 UTF-8格式的支持:
# -*- coding: utf-8 -*-
import sys
from PyQt4 import QtCore, QtGui
from edytor import Ui_notepad
class StartQt4(QtGui.QMainWindow):
def __init__(self, parent=None):
QtGui.QWidget.__init__(self, parent)
self.ui = Ui_notepad()
self.ui.setupUi(self)
QtCore.QObject.connect(self.ui.button_open,QtCore.SIGNAL("clicked()"),
self.file_dialog)
QtCore.QObject.connect(self.ui.button_save,QtCore.SIGNAL("clicked()"),
self.file_save)
def file_dialog(self):
fd = QtGui.QFileDialog(self)
self.filename = fd.getOpenFileName()
from os.path import isfile
if isfile(self.filename):
import codecs
s = codecs.open(self.filename,'r','utf-8').read()
self.ui.editor_window.setPlainText(s)
def file_save(self):
import codecs
s = codecs.open(self.filename,'w','utf-8')
s.write(unicode(self.ui.editor_window.toPlainText())) s.close()
if __name__ == "__main__":
app = QtGui.QApplication(sys.argv)
myapp = StartQt4()
myapp.show()
sys.exit(app.exec_())
现在可以完美地处理UTF-8格式的文件了。下一节我们将演示更多的特性。
增加文本编辑器的功能
现在我们给编辑器增加两个新的功能。同时也可以练习我们查阅文档的技巧。
禁用"Save"按钮
当没有打开任何文件,或者是文件没有改动的时候,禁用"Save"按钮。在QtDesigner工具的属性编辑器中,我们将"Save"按钮设置"enabled"属性为"False"。
textEdit部件含有"textChanged()"信号,因此检测文本是否改动比较简单。但是,pushButton并没有类似的 "enabled"操作。查阅文档可以发现:pushButton从QAbstractButton继承,QAbstractButton从QWidget继承,而QWidget刚好有setEnabled()函数。因此可以修改代码:
# -*- coding: utf-8 -*-
import sys
from PyQt4 import QtCore, QtGui
from edytor import Ui_notatnik
class StartQt4(QtGui.QMainWindow):
def __init__(self, parent=None):
QtGui.QWidget.__init__(self, parent)
self.ui = Ui_notepad()
self.ui.setupUi(self)
self.filename = None
QtCore.QObject.connect(self.ui.button_open,QtCore.SIGNAL("clicked()"),
self.file_dialog)
QtCore.QObject.connect(self.ui.button_save,QtCore.SIGNAL("clicked()"),
self.file_save)
QtCore.QObject.connect(self.ui.editor_window,QtCore.SIGNAL("textChanged()"), self.enable_save)
def file_dialog(self):
fd = QtGui.QFileDialog(self)
self.filename = fd.getOpenFileName()
from os.path import isfile
if isfile(self.filename):
import codecs
s = codecs.open(self.filename,'r','utf-8').read()
self.ui.editor_window.setPlainText(s)
# inserting text emits textChanged() so we disable the button :)
self.ui.button_save.setEnabled(False)
def enable_save(self):
self.ui.button_save.setEnabled(True)
def file_save(self):
from os.path import isfile
if isfile(self.filename):
import codecs
s = codecs.open(self.filename,'w','utf-8')
s.write(unicode(self.ui.editor_window.toPlainText()))
s.close()
self.ui.button_save.setEnabled(False)
if __name__ == "__main__":
app = QtGui.QApplication(sys.argv)
myapp = StartQt4()
myapp.show()
sys.exit(app.exec_())
增加以下连接:
QtCore.QObject.connect(self.ui.editor_window,QtCore.SIGNAL("textChanged()"), self.enable_save)
def enable_save(self):
self.ui.button_save.setEnabled(True)
当我们修改文本的时候,file_dialog函数将由"textChanged()"触发,因此我们在函数末尾应该禁止"Save"按钮:
self.ui.editor_window.setPlainText(s)
# inserting text emits textChanged() so we disable the button :)
self.ui.button_save.setEnabled(False)
保存修改
如果修改了文件没有保存的时候,又尝试打开新的文件,我们应该给出相关的提示信息。可以使用QMessageBox提供的功能:
message = QtGui.QMessageBox(self)
message.exec_()
提示窗口还需要进一步改进,增加一些按钮和信息。首先修改file_dialog函数,如果文本没有被保存的时候显示提示消息。但是怎么才能知道文本没有被保存呢?答案是"Save"没有被禁用的时候(self.ui.button_save.isEnabled())。修改start.py:
# -*- coding: utf-8 -*-
import sys
from PyQt4 import QtCore, QtGui
from edytor import Ui_notatnik
class StartQt4(QtGui.QMainWindow):
def __init__(self, parent=None):
QtGui.QWidget.__init__(self, parent)
self.ui = Ui_notepad()
self.ui.setupUi(self)
self.filename = None
QtCore.QObject.connect(self.ui.button_open,QtCore.SIGNAL("clicked()"),
self.file_dialog)
QtCore.QObject.connect(self.ui.button_save,QtCore.SIGNAL("clicked()"),
self.file_save)
QtCore.QObject.connect(self.ui.editor_window,QtCore.SIGNAL("textChanged()"), self.enable_save)
def file_dialog(self):
response = False
# buttons texts
SAVE = 'Save'
DISCARD = 'Discard'
CANCEL = 'Cancel'
# if we have changes then ask about them
if self.ui.button_save.isEnabled() and self.filename:
message = QtGui.QMessageBox(self)
message.setText('What to do about unsaved changes ?')
message.setWindowTitle('Notepad')
message.setIcon(QtGui.QMessageBox.Question)
message.addButton(SAVE, QtGui.QMessageBox.AcceptRole)
message.addButton(DISCARD,
QtGui.QMessageBox.DestructiveRole)
message.addButton(CANCEL, QtGui.QMessageBox.RejectRole) message.setDetailedText('Unsaved changes in file: ' +
str(self.filename))
message.exec_()
response = message.clickedButton().text()
# save file
if response == SAVE:
self.file_save()
self.ui.button_save.setEnabled(False)
# discard changes
elif response == DISCARD:
self.ui.button_save.setEnabled(False)
# if we didn't cancelled show the file dialogue
if response != CANCEL:
fd = QtGui.QFileDialog(self)
self.filename = fd.getOpenFileName()
from os.path import isfile
if isfile(self.filename):
import codecs
s = codecs.open(self.filename,'r','utf-8').read() self.ui.editor_window.setPlainText(s)
self.ui.button_save.setEnabled(False)
def enable_save(self):
self.ui.button_save.setEnabled(True)
def file_save(self):
from os.path import isfile
if isfile(self.filename):
import codecs
s = codecs.open(self.filename,'w','utf-8')
s.write(unicode(self.ui.editor_window.toPlainText()))
s.close()
self.ui.button_save.setEnabled(False)
if __name__ == "__main__":
app = QtGui.QApplication(sys.argv)
myapp = StartQt4()
myapp.show()
sys.exit(app.exec_()))
新增加的代码如下:
response = False
# buttons texts
SAVE = 'Save'
DISCARD = 'Discard'
CANCEL = 'Cancel'
# if we have changes then ask about them
if self.ui.button_save.isEnabled() and self.filename:
message = QtGui.QMessageBox(self)
message.setText('What to do about unsaved changes ?')
message.setWindowTitle('Notepad')
message.setIcon(QtGui.QMessageBox.Question)
message.addButton(SAVE, QtGui.QMessageBox.AcceptRole)
message.addButton(DISCARD, QtGui.QMessageBox.DestructiveRole)
message.addButton(CANCEL, QtGui.QMessageBox.RejectRole)
message.setDetailedText('Unsaved changes in file: ' + str(self.filename)) message.exec_()
response = message.clickedButton().text()
# save file
if response == SAVE:
self.file_save()
self.ui.button_save.setEnabled(False)
# discard changes
elif response == DISCARD:
self.ui.button_save.setEnabled(False)
# if we didn't cancelled show the file dialogue
if response != CANCEL:
我们使用QtGui.QMessageBox生成信息提示框,然后设置文本信息、标题、图标、并且增件了三个按钮。第二个参数设置每个按纽对应的ButtonRole(具体细节可以参考文档)。setDetailedText 设置详细的提示信息。然后通过exec_()来运行消息提示框。消息框返回被按下的按纽值,因此我们可以根据返回值来选择下一步要进行的操作。消息框外观如下:
QYolk I - PyQt4中的列表部件
注解:
yolk的安装步骤请参考安装yolk
在PyQt4中我们有三种列表部件可以使用:List View、Tree View和Table View。这些部件都可以在列表框架中使用(Model and Item Based)。这里我们使用的是Item Based:
在这个例子中,我们使用的是Tree View。当你在Tree View部件上点击鼠标右键时,会出现“编辑项目” 选项,通过它可以给部件增加列。需要注意的是列从0开始编号: