TR7100EP Maintenance Manual_en

AOI Maintenance Manual
Daily Maintenance
For safety purposes and to ensure smooth running of the machine:
1.Check the testing environment and clear area of any hazards such as water,
exposed wiring, and other harmful elements. Check for normal voltage.
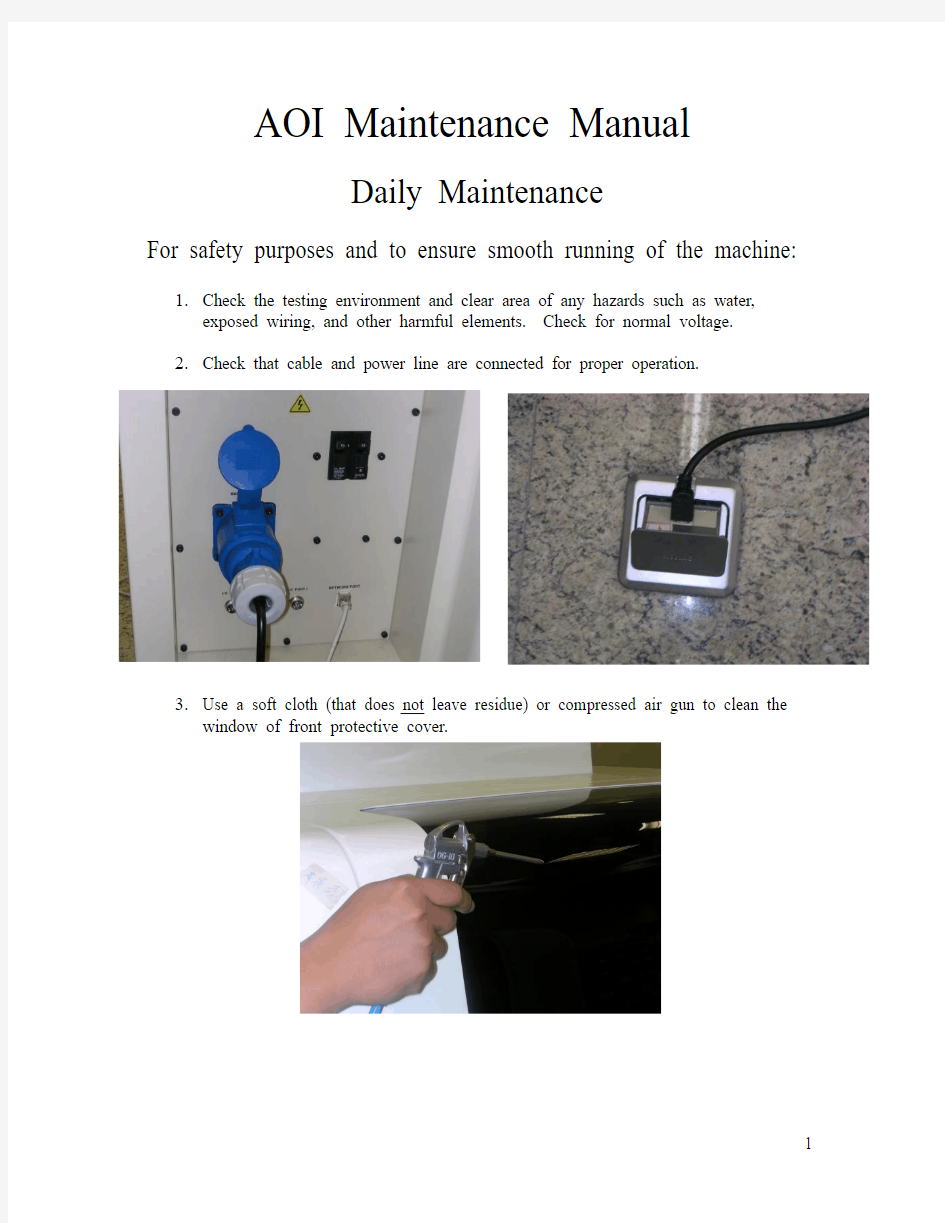
2.Check that cable and power line are connected for proper operation.
https://www.360docs.net/doc/e16666146.html,e a soft cloth (that does not leave residue) or compressed air gun to clean the
window of front protective cover.
4.Confirm that the inside of the machine is clear of debris or foreign objects.
5.Test all lights of the signal tower. After system startup, touch the two upper
corners of the user-machine interface (screen) to get to the menu. Select the light button and test: 1) Red Light, 2) Yellow Light, 3) Green Light, 4) Buzzer (sound).
6.Test the Emergency Knob by firmly pressing down. The touch screen and signal
tower must flash red and the Buzzer must be heard. Once finished, turn the knob to the right and release and press the Reset button on the touch screen. Inside the machine, the Emergency Stop can be found on the inside right of the machine.
Off position engages engineering mode, which only enables the Emergency Knob.
On position engages operator mode that enables the Emergency Knob and the
front and back covers. By lifting the front or back cover in operator mode, the Buzzer will sound in alarm. To stop the Buzzer in this mode, close the cover(s) and reset the machine.
7.Check that all five fans in the back of the machine are blowing outward (7100EP).
Check that the two fans in the back and the right side (when facing the machine) are blowing outward. The fans on the right side are in the upper rectangular part of the grid. Check that the fan on the left side is pulling air in, which is located on the upper left rectangular grid (7100).
Warning: Except where noted, the following procedures are to be done in the Power Off mode. Failure to do so can result in personal injury and damage to the tester.
https://www.360docs.net/doc/e16666146.html,e a soft cloth and clean the user-machine interface.
2.Make sure the plugs are screwed on tightly in the following locations:
Inside the machine:
a)Series of three plugs along the front right edge of the machine (internal).
b)Series of three plugs along the front left edge of the machine (internal).
c)Sensors 2 and 3 located in the central area of the machines (Note: the
sensors are placed according to customer specifications, so the locations
might be interchanged.)
d)Series of plug in the back edge of the machine (internal).
3.Open the panels of the machine (front) and clean the filters behind the panels, on
both sides with a vacuum or compressed air gun (7100EP). If the filters are too
dirty to be cleaned, they can be replaced. On the inside bottom of the machine,
remove four screws from each of the grates and clean the filters within (left and
right).
4.With a soft cloth (that does not leave residue), clean conveyer belt of flux from
testing material.
Warning: Except where noted, the following procedures are to be done in the Power Off mode. Failure to do so can result in personal injury and damage to the tester.
1.Locate the pairs of screws on both sides of the machine and remove with a
screwdriver. After removing the panels, remove the filter from the inside of the
panel and clean with a vacuum or condensed air gun. Removing the panels
should reveal the fan filters, which should be cleaned with a vacuum or bush.
(Warning: Using a compressed air gun here is not recommended unless the air is blown outward from the machine.) (7100)
2.Remove the conveyer belt and clean the wheels/parts with ‘Cleaning Naphtha.’
Once finished, replace the belt.
3.Clean Sensors 1 though 4 with rubbing alcohol to remove dust and debris.
4.Locate the conveyer width adjusters on both sides of he machine (internal). Use
cleaning cloth (that does not leave residue) to remove dirty oil. Once finished,
reapply bearing grease.
5.Clean the five fans (7100EP) (two on the TR7100) in the back of the machine
with a vacuum or duster. (Warning: Using a compressed air gun here is not
recommended unless the air is blown outward from the machine.)
6.Power on the TR7100 Main Test Program. From the drop down menus, find and
click on Camera Alignment. Test on the gray tile inside the machine. Check gray level box on the bottom of the screen. Out of the numbers on the screen, locate
the number in the central position. Set lighting control to 128 and Set All. Check that the numbers for the following fall into the correct range:
On 7100: Camera 0: 200 ± 10
Camera 1-4: 100 ± 10
On 7100EP: Camera 0-4: 100 ± 10
Three Month Maintenance
https://www.360docs.net/doc/e16666146.html,e master keys to open the Main PC.
On the back of the PC door, remove two screws and open the grid to the filter. The filter should be cleaned with a vacuum or compressed air gun.
To the left, open the grate also by removing two screws.
Slide out the filter that should also be cleaned.
2.On the lower console (DOS PC), remove two screws.
Clean the filter with a vacuum or compressed air gun.
3.Clean the X-Y Table:
Warning: Before performing the following steps, make sure
1)Power off the machine.
2)Engage the Emergency Knob, to ensure the safety of all personnel when
power is restored to the machine.
3)When removing the X-Y Table protective cover, do not pull too hard or
risk damaging the machine.
Necessary tools:
-Small screwdriver, about 10 cm
-Soft cleaning cloth (that does not leave residue)
-TRI service tools
There are 7 points to grease:
3
4
6
7
Preliminary tool assembly:
Step 1:
Step 2: 1) Place the orange container into the metal fitting; 2) Pull back on the chain; and 3) Connect the metal fitting to the nozzle.
1
3
Step 3: Finished tool.
Step 4: Attach the extension to the nozzle.
Cleaning:
Step 1: Remove 5 screws to remove the Y Table on the left of the machine (internal).
Step 2: Wipe the dirty oil off with the cleaning cloth.
Step 3: In each case, locate the grease lodge that represents each point.
Grease
lodge
Step 4: Use the tool pump to add grease to Point 1. When adding grease, stop after a little bit tops off.
1
Step 5: Use the tool pump to add grease to Point 7.
Step 6: Remove 4 screws and move Lighting Mount to very left.
7
Lighting
Mount
Step 7: Carefully slide off the panel.
Step 8: Wipe the dirty oil off with the cleaning cloth.
Step 9: Spread grease on ball screw manually.
Step 10: Use the tool pump to add grease to Point 2 (there are a total of 4 points).
2
Step 11: Use the tool pump to add grease to Point 2 (continued).
2 Step 12: Use the tool pump to add grease to Point 2 (continued).
2
Step 13: Insert the screwdriver as shown and remove 4 screws that will free the board on the right side of the machine (right internal). Slide the X Table slightly
forward to expose rear screws. Immediately behind the machine, on the right side, there is a small panel. Remove 4 screws and remove the panel and slide the board out the back for easier cleaning.
Step 14: Use the tool pump to add grease to Point 6.
MAINTENANCE MANUAL
MAINTENANCE MANUAL MANUAL
Version number: 1.0 Date: JANUARY 2012 Pages:2 / 42 INDEX INDEX 1.INTRODUCTION.4 2.GENERAL.5 3. INSPECTION AND DAILY MAINTENANCE (EVERY 8 HOURS). 6 3.1.S OLDERING AND OUTPUT BELT CLEANING. 6 3.2.P USHING AND HOLDER AXIS PINS6 3.3.F LUX VALVES7 3.4.R IBBON CUTTING SYSTEM8 3.5.R EAR CLAMP OF THE RIBBON SYSTEM8 3.6.R IBBON AXIS CLAMPS9 3.7.A LIGNMENT GUIDE9 Y MAINTENANCE11 4.INSPECTION AND WEEKL INSPECTION AND WEEKLY MAINTENANCE 4.1.S OLDERING TABLE CLEANING11 4.2.S OLDERING BELT ROLLER CLEANING12 4.3.IR LAMP GLASS CLEANING13 4.4.C LEAN THE VACUUM CUPS14 5. MONTHLY MAINTENANCE 15 5.1.C LEAN THE VACUUM TUBES15 5.2.V ACUUM PUMP CLEANING16 6. EVERY TWO OR THREE MONTHS 19 6.1.TEKA F ILTER19 6.2.F LUX VALVES CLEANING20 6.3.F LUX TANK22 6.4.C HANGE SOLDERING TABLE T EFLON23 7. EVERY SIX MONTH 25 7.1.G REASE25
颜色英文缩写大全
颜色英文缩写大全缩写方式一: 缩写英文中文 BK Black黑色 BN Brown棕色 BU Blue蓝色 CR Clear透明 DKGN Dark Green深绿色 GN Green绿色 GY Gray灰色 LT BU Light Blue浅蓝色 LT GN Light Green浅绿色 OG Orange橙色 PK Pink粉红色 PL Purple紫色 RD Red红色 TN Tan褐色 VI Violet粉紫色 WT White白色 YL Yellow黄色 缩写方式二:
序号英文简写英文中文1BGE beige米色 2BLU blue蓝色 3BLK black黑色 4LAV lavender淡紫色 5BGY Blue grey蓝灰色 6LBL lightblue浅蓝色 7VLT violet紫色 8SKY skyblue天蓝色 9WHI white白色 10 GRY grey灰色 11 NAT natural自然色 12 GRN green绿色 13 LPK lightpink浅粉色 14 AQU Aqua 水绿色 15 MAG magenta洋红色 16 TUR turquoise青绿色 17 PNK pink粉色 18 CRP crystal pink晶粉 19 SKN sky nature天蓝色 20 PLT purple tulip紫色 21 OLV olive橄榄绿
22HBL hotblue亮蓝 23FUS fuchsia紫红色 24 GLD golden金色 25PUR purple紫色 26 RED red 红色 27 SAL salmon 鲜肉色 28YLW yellow黄色 缩写方式三: 序号英文简写英文中文 1 WH White白色 2 BN Brown棕色 3 GN Green 绿色 4 YE Yellow黄色 5 GY Grey灰色 6 PK Pink粉红色 7 BU Blue蓝色 8 RD Red 红色 9 BK Black黑色 10VT Violet紫色 11GN/PK Green-pink绿 /粉红色12RD/BU Red-blue红/蓝色
各种颜色的英文缩写
各种颜色的英文缩写R.(RED)红 O.(ORANGE)橙 Y.(YELLOW)黄 G.(GREEN)绿 B.(BLUE)蓝 P.(PURPLE)紫 YG.(YELLOW GREEN)黄绿 BG.(BLUE GREEN)蓝绿 PB.(PURPLE BLUE)蓝紫 RP.(RED PURPLE)红紫 pR.(PURPLISH RED)紫调红 yR.(YELLOWISH RED)黄调红 rO.(REDDISH ORANGE)红调橙 yO.(YELLOWISH ORANGE)黄调橙 rY.(REDDISH YELLOW)红调黄 gY.(GREENISH YELLOW)绿调黄 yG.(YELLOWISH GREEN)黄调绿 bG.(BLUEISH GREEN)蓝调绿 gB.(GREENISH BLUE)绿调蓝 pB.(PURPLISH BLUE)紫调蓝
色调(TONE)缩写词 l.(light)浅的 p.(pale)淡的 b.(bright)明亮的 d.(dull)浊的 s.(strong)强烈的 v.(vivid)鲜艳的 g.(grayish)灰调的 dk.(dark)暗的 dp.(deep)深的 lg.(light grayish)明灰调的dg.(dark grayish)暗灰调的beige米色 blue蓝色 black黑色 brown咖啡色 cream雪白 khaki卡其色 grey灰色 navy丈青色 offwhite灰白色
palegoldenrod苍麒麟色palegreen苍绿色paleturquoise苍绿色palevioletred苍紫罗蓝色pansy紫罗兰色papayawhip番木色peachpuff桃色 peru秘鲁色 pink粉红 plum杨李色powderblue粉蓝色purple紫色 red红色 rosybrown褐玫瑰红royalblue宝蓝色 rubine宝石红saddlebrown重褐色salmon鲜肉色 salmon pink橙红色sandy beige浅褐色sandybrown沙褐色
可靠性维修性标准术语
可靠性维修性标准术语 中华人民共和国国家标准GB/T 3178-94 [可靠性维修性术语] 产品 item 修理的产品 repaired item 不修理的产品 non-repaired item 服务 service 规定功能 required function 时刻 instant of time 时间区间 time interval 持续时间 time duration 累积时间 accumulated time 量度 measure 工作 operation 修改(对产品而言) modification (of an item) 效能 effectiveness 固有能力 capability 耐久性 durability 可靠性 reliability 维修性 maintainability 维修保障性 maintenance support performance 可用性 availability 可信性 dependability 失效 failure
致命失效 critical failure 非致命失效 non-critical failure 误用失效 misuse failure 误操作失效 mishandling failure 弱质失效 weakness failure 设计失效 design failure 制造失效 manufacture failure 老化失效;耗损失效 ageing failure; wear-out failure 突然失效 sudden failure 渐变失效;漂移失效 gradual failure; drift failure 灾变失效 cataleptic failure 关联失效 relevant failure 非关联失效 non-relevant failure 独立失效 primary failure 从属失效 secondary failure 失效原因 failure cause 失效机理 failure mechanism 系统性失效;重复性失效 systematic failure; reproducible failure 完全失效 complete failure 退化失效 degradation failure 部分失效 partial failure 故障 fault 致命故障 critical fault 非致命故障 non-critical fault
maintenance-manual
C H-7H E L I C O P T E R S H E L I-S P O R T S.r.l. M M A A I I N N T T E E N N A A N N C C E E H H A A N N D D B B O O O O K K T H I R T E E N T H E D I T I O N
CH-7 HELI-SPORT MAINTENANCE CH-7 KOMPRESS 25 HOURS_____ FOLLOWING MAINTENANCE HAS TO BE EXCUTED ONLY AFTER THE FIRST 25H FLIGHT Description Q.ty Total Spare Parts Manufacture HOURS Oil transmission main gearbox, MRG filter and oil tail box replacement 76,40 40,00 1 Oil free wheel replacement * 30,94 16,00 0,4 Clean air and fuel filter and fuel pump 33,16 40,00 1 Check and alignment of pulley and belt PLX025K 80,00 2 ENGINE’S INSPECTION: CHECK UPDATED ROTAX’ MANUAL 25H ***** All prices in EURO, taxes excluded * If you utilize free wheel WARNER you can substitute the oil every 25 h If you utilize new free wheel FORMSPRAG, you can substitute the oil every 100 h FOLLOWING MAINTENANCE HAS TO BE EXCUTED AFTER EACH 50 H Description Q.ty Total Spare Parts Manufacture HOURS 50H Clean air and fuel filter and fuel pump 33,16 40,00 1 ENGINE’S INSPECTION: CHECK UPDATED ROTAX’ MANUAL ***** All prices in EURO, taxes excluded
常用颜色英文缩写大全
缩写方式一: 缩写英 文中文 BK Black 黑色 BN Brown 棕色 BU Blue 蓝色 CR Clear 透明 DKGN Dark Green 深绿色 GN Green 绿色 GY Gray 灰色 LT BU Light Blue 浅蓝色 LT GN Light Green 浅绿色 OG Orange
橙色 PK Pink 粉红色 PL Purple 紫色 RD Red 红色 TN Tan 褐色 VI Violet 粉紫色 WT White 白色 YL Yellow 黄色 缩写方式二: 序号英文简写英文中文 1 BGE beige 米色 2 BLU blue 蓝色 3 BLK black 黑色
4 LAV lavender 淡紫色 5 BGY Blue grey 蓝灰色 6 LBL lightblue 浅蓝色 7 VLT violet 紫色 8 SKY skyblue 天蓝色 9 WHI white 白色 10 GRY grey 灰色 11 NAT natural 自然色 12 GRN green 绿色 13 LPK lightpink 浅粉色 14 AQU Aqua 水绿色 15 MAG magenta 洋红色 16 TUR turquoise 青绿色 17 PNK pink 粉色 18 CRP crystal pink 晶粉 19 SKN sky nature 天蓝色 20 PLT purple tulip 紫色 21 OLV olive 橄榄绿 22 HBL hotblue 亮蓝 23 FUS fuchsia 紫红色 24 GLD golden 金色 25 PUR purple 紫色
颜色英文缩写大全
颜色英文缩写大全 缩写方式一: 缩写英文中文 BK Black 黑色 BN Brown 棕色 BU Blue 蓝色 CR Clear 透明 DKGN Dark Green 深绿色 GN Green 绿色 GY Gray 灰色 LT BU Light Blue 浅蓝色 LT GN Light Green 浅绿色
OG Orange 橙色 PK Pink 粉红色 PL Purple 紫色 RD Red 红色 TN Tan 褐色 VI Violet 粉紫色 WT White 白色 YL Yellow 黄色
缩写方式二: 序号英文简写英文中文 1 BGE beige 米色 2 BLU blue 蓝色 3 BLK black 黑色 4 LAV lavender 淡紫色 5 BGY Blue grey 蓝灰色 6 LBL lightblue 浅蓝色 7 VLT violet 紫色 8 SKY skyblue 天蓝色 9 WHI white 白色 10 GRY grey 灰色 11 NAT natural 自然色 12 GRN green 绿色 13 LPK lightpink 浅粉色 14 AQU Aqua 水绿色 15 MAG magenta 洋红色 16 TUR turquoise 青绿色 17 PNK pink 粉色 18 CRP crystal pink 晶粉 19 SKN sky nature 天蓝色 20 PLT purple tulip 紫色
21 OLV olive 橄榄绿 22 HBL hotblue 亮蓝 23 FUS fuchsia 紫红色 24 GLD golden 金色 25 PUR purple 紫色 26 RED red 红色 27 SAL salmon 鲜肉色 28 YLW yellow 黄色
设备维护保养计划
设备维护保养计划 ?维修计划 ?什么是维修计划? ?维修种类 ?设备,设施预防性维修 ?公共区域预防性维修 ?客房区域预防性维修 ?What is Planned Maintenance ?PLANNED 计划 ?Activity for which a pre-determined job procedure has been documented. ?All labor, materials, tools, and equipment required to carry out the task have been estimated. ?Their availability assured before commencement of the task. ?MAINTENANCE 维修 ?is to KEEP in its existing state ?to PRESERVE ?CONTINUE in good operating condition ?PROTECT current condition ?Maintenance Types 1. Reactive maintenance (Break down maintenance) 2. Preventative maintenance (Elective maintenance) 预防性维修 ?Periodic maintenance 定期维修 ?Predictive maintenance (PdM) 预测性维修 3. Corrective maintenance 改进性维修 4. Maintenance Prevention 维修预防
TPM是Total-Productive-Maintenance-第一个字母的缩写-本意是
TPM是T otal Productive Maintenance 第一个字母的缩写,本意是"全员参与的生产保全",也翻译为"全员维护",即通过员工素质与设备效率的提高,使企业的体质得到根本改善。TPM 起源于50年代的美国,最初称事后保全,经过预防保全、改良保全、保全预防、生产保全的变迁。60年代传到日本,1971年基本形成现在公认的TPM。80年代起,韩国等亚洲国家、美洲国家、欧洲国家相继开始导入TPM活动。90年代,中国一些企业开始推进TPM 活动。 TPM是英文T otal Productive Maintenance的缩略语,中文译名叫全面生产维修,又译为全员生产保全。是以提高设备综合效率为目标,以全系统的预防维修为过程,全体人员参与为基础的设备保养和维修管理体系。 TPM强调五大要素,即: ——TPM致力于设备综合效率最大化的目标; ——TPM在设备一生建立彻底的预防维修体制; ——TPM由各个部门共同推行; ——TPM涉及每个雇员,从最高管理者到现场工人; ——TPM通过动机管理,即自主的小组活动来推进。(PM) 其具体含义有下面4个方面: 1.以追求生产系统效率(综合效率)的极限为目标; 2.从意识改变到使用各种有效的手段,构筑能防止所有灾害、不良、浪费的体系,最终构成“零”灾害、“零”不良、“零”浪费的体系; 3.从生产部门开始实施,逐渐发展到开发、管理等所有部门; 4.从最高领导到第一线作业者全员参与。 TPM活动由“设备保全”、“质量保全”、“个别改进”、“事务改进”、“环境保全”、“人才培养”这6个方面组成,对企业进行全方位的改进。 1.TPM概念 从理论上讲,TPM是一种维修程序。它与TQM(全员质量管理)有以下几点相似之处:(1)要求将包括高级管理层在内的公司全体人员纳入TPM;(2)要求必须授权公司员工可以自主进行校正作业;(3)要求有一个较长的作业期限,这是因为TPM自身有一个发展过程,贯彻TPM需要约一年甚至更多的时间,而且使公司员工从思想上转变也需要时间。 TPM将维修变成了企业中必不可少的和极其重要的组成部分,维修停机时间也成了工作日计划表中不可缺少的一项,而维修也不再是一项没有效益的作业。在某些情况下可将维修视为整个制造过程的组成部分,而不是简单地在流水线出现故障后进行,其目的是将应急的和计划外的维修最小化。 2.TPM的起源
电缆颜色的中英文缩写对照
电缆颜色的中英文缩写对照 一:二字母缩写法 中华人民共和国国家标准 GB/T13534-92电气颜色标志的代号 Code for designation of colours for electricity 本标准等效采用国际标准IEC 757(1983)《颜色标志的代码》。 1 主题内容与适用范围 本标准规定了常用颜色标志的字母代码及表示方法。 本标准适用于电气技术方面的文件图样和标记等,也可供其他技术领域参考使用。 2 字母代码 颜色标志的字母代码一般由该颜色的英文单词缩写形式表示。 常用颜色标志的字母代码示于下表。 如果有必要采用下表所示之外的其他颜色,可按本标准中字母代码的组成形式作出规定并在相应设备的技术文件(如产品规范)中说明。
4 不同部件的不同颜色 对于不同部件上的不同颜色,各颜色标志的字母代码之间用“加号”(+)隔开。 例如,具有两根黑色、一根棕色、一根蓝色和一根绿/黄双色的五芯电缆的颜色代码为:BK+BK+BN+BU+GNYE 附加说明: 本标准由中华人民共和国机械电子工业部提出。 本标准由机械电子部机械标准化研究所负责起草。 本标准主要起草人杨芙、韦建华 二:三字母缩写法 BGE beige 米色 BLU blue 蓝色 BLK black 黑色 LAV lavender 淡紫色 BGY Blue grey 蓝灰色 LBL lightblue 浅蓝色 VLT violet 紫色 SKY skyblue 天蓝色 WHI white 白色 GRY grey 灰色 NAT natural 自然色 GRN green 绿色 LPK lightpink 浅粉色 AQU Aqua 水绿色 MAG magenta 洋红色 TUR turquoise 青绿色 PNK pink 粉色 CRP crystal pink 晶粉 SKN sky nature 天蓝色 PLT purple tulip 紫色 OLV olive 橄榄绿 HBL hotblue 亮蓝 FUS fuchsia 紫红色 GLD golden 金色 PUR purple 紫色 RED red 红色 SAL salmon 鲜肉色 YLW yellow 黄色 三、车用电路 1:TOYOT丰田(代表日本车系) B=Black黑色BR=Brown棕色G=Green绿色
Preventative Maintenance
TO:Equipment User SUBJECT:Preventative Maintenance for the microwave powered UV system. A general PM schedule for your UV system is detailed below: Power supply: There are no regular maintenance procedures that apply to the power supply except to verify proper operation of the front cooling fan(s) and to replace filters, if so equipped. Mechanical placement of power supplies should always allow for the unrestricted air movement at front and rear of the power supply chassis. Since dirt and/or dust deposits can settle on internal electrical components during use, it is advised that this material be removed with a source of dry compressed air during normal scheduled down time. Irradiator: (Regular maintenance) * Every 30 days of operation or as needed * NOTE: Dirty operating environments may require more frequent service. 1)Remove irradiator from it’s light-shield, and carefully place on workbench with the lamp cavity facing up. 2)Remove the RF screen assembly, which covers the lamp cavity, and inspect fine tungsten mesh for any signs of damage. Damage includes tears or punctures in screen mesh, especially where the screen material is attached to screen frame, arcing on the braided gasket material under screen frame, loose or missing parts. Replace screen assembly if there are any signs of damage. 3)Remove UV bulb, and clean with “Windex” glass cleaner and a lint- free cloth. Alcohol ( IPA ) can also be used to clean the UV bulbs and reflector. During normal use, foreign material that has passed through the irradiator air supply filters will deposit on the outer surface of the UV bulb and reflector. IMPORTANT: These external deposits are difficult to remove, and can eventually contribute to a reduction of UV energy at the irradiator focal point. 4)Inspect the elliptical reflector for signs of RF damage. This may be seen as a pitting of the reflective surfaces, dark discoloration on front face, top edges, or at end reflectors. Replace entire reflector assembly if any damage is observed. Note condition of polished surfaces, as a dull or hazy reflector finish can severely effect the performance of this equipment. Due to the heat in and around this lamp cavity, most chemicals that come in contact with reflectors/bulbs will be difficult to completely remove once the irradiator has been in operation for some time. Clean reflectors with “Windex” glass cleaner or alcohol (IPA) and a lint-free cloth.
颜色的英文缩写大全
颜色的英文缩写 一:二字母缩写法 中华人民共和国国家标准 GB/T13534-92电气颜色标志的代号 Code for designation of colours for electricity 本标准等效采用国际标准IEC 757(1983)《颜色标志的代码》。 1 主题内容与适用范围 本标准规定了常用颜色标志的字母代码及表示方法。 本标准适用于电气技术方面的文件图样和标记等,也可供其他技术领域参考使用。 2 字母代码 颜色标志的字母代码一般由该颜色的英文单词缩写形式表示。 常用颜色标志的字母代码示于下表。 如果有必要采用下表所示之外的其他颜色,可按本标准中字母代码的组成形式作出规定并在相应设备的技术文件(如产品规范)中说明。
4 不同部件的不同颜色 对于不同部件上的不同颜色,各颜色标志的字母代码之间用“加号”(+)隔开。 例如,具有两根黑色、一根棕色、一根蓝色和一根绿/黄双色的五芯电缆的颜色代码为:BK+BK+BN+BU+GNYE 附加说明: 本标准由中华人民共和国机械电子工业部提出。 本标准由机械电子部机械标准化研究所负责起草。 本标准主要起草人杨芙、韦建华 二:三字母缩写法 BGE beige 米色 BLU blue 蓝色 BLK black 黑色 LAV lavender 淡紫色 BGY Blue grey 蓝灰色 LBL lightblue 浅蓝色 VLT violet 紫色 SKY skyblue 天蓝色 WHI white 白色 GRY grey 灰色 NAT natural 自然色 GRN green 绿色 LPK lightpink 浅粉色 AQU Aqua 水绿色 MAG magenta 洋红色 TUR turquoise 青绿色 PNK pink 粉色 CRP crystal pink 晶粉 SKN sky nature 天蓝色 PLT purple tulip 紫色 OLV olive 橄榄绿 HBL hotblue 亮蓝 FUS fuchsia 紫红色 GLD golden 金色 PUR purple 紫色 RED red 红色 SAL salmon 鲜肉色 YLW yellow 黄色 三、车用电路 1:TOYOT丰田(代表日本车系) B=Black黑色BR=Brown棕色 G=Green绿色
常用颜色英文缩写大全
常用颜色英文缩写大全缩写方式一: 缩写英文中文 BK Black黑色 BN Brown棕色 BU Blue蓝色 CR Clear透明 DKGN Dark Green深绿色 GN Green绿色 GY Gray灰色 LT BU Light Blue浅蓝色 LT GN Light Green浅绿色 OG Orange橙色 PK Pink粉红色 PL Purple紫色 RD Red红色 TN Tan褐色 VI Violet粉紫色 WT White白色 YL Yellow黄色
缩写方式二: 序号英文简写英文中文 1BGE beige米色 2BLU blue蓝色 3BLK black黑色 4LAV lavender淡紫色 5BGY Blue grey蓝灰色 6LBL lightblue浅蓝色 7VLT violet紫色 8SKY skyblue天蓝色 9WHI white白色 10 GRY grey灰色 11 NAT natural自然色 12 GRN green绿色 13 LPK lightpink 浅粉色 14 AQU Aqua 水绿色 15 MAG magenta 洋红色 16 TUR turquoise 青绿色 17 PNK pink 粉色 18 CRP crystal pink 晶粉 19 SKN sky nature 天蓝色
20 PLT purple tulip 紫色 21 OLV olive 橄榄绿 22 HBL hotblue 亮蓝 23 FUS fuchsia 紫红色 24 GLD golden 金色 25 PUR purple 紫色 26 RED red 红色 27 SAL salmon 鲜肉色 28 YLW yellow 黄色 缩写方式三:序号英文简写英文中文 1 WH White 白色 2 BN Brown 棕色 3 GN Green 绿色 4 YE Yellow 黄色 5 GY Grey 灰色 6 PK Pink 粉红色 7 BU Blue 蓝色 8 RD Red 红色 9 BK Black 黑色 10 VT Violet 紫色
[方案]比较全的颜色的英文缩写
[方案]比较全的颜色的英文缩写 黑色 BK 棕色 BN 红色 RD 橙色 OG 黄色 YE 绿色 GN 蓝色(包括淡蓝)BU 紫色(紫红)VT 灰色(蓝灰)GY 白色 WH 粉红色PK 金黄色 GD 青绿色 TQ 银白色 SR 绿/黄双色 GNYE Purple紫色 Fuchsia紫红 Maroon茶色 Olive橄榄Navy深蓝 Teal青色 Aqua浅绿 Lime亮绿 Silver银色 Green绿色 Red红色 Yellow黄色 Blue蓝色 blueviolet蓝紫色 Pink粉红
Brown褐色 Orange橙色 powderblue粉蓝色 Gray灰色 aquamarine海宝蓝色 coral珊瑚色 chartreuse黄绿色 cadetblue军官蓝 chocolate深褐色 cornflowerblue矢车菊色 crimson深红色 cyan青绿色 darkgoldenrod深菊黄 gold金色 khaki卡其色 forestgreen森林绿 goldenrod菊花黄 lightcoral浅橘红色 lightblue浅蓝色 lightslategray浅石板灰 lightskyblue浅天空蓝 lightseagreen浅海绿色lightsalmon浅澄红色 lightpink浅粉红色 lightgrey浅灰色 lightgreen浅绿色 palegreen淡绿色 palegoldenrod淡菊黄色 orchid紫色 orangered橘红色 paleturquoise淡湖蓝色 palevioletred淡紫色 wheat小麦色 mistyrose朦胧玫瑰色 magenta洋红色 midnightblue深夜蓝 mediumseagreen中海绿色 mediumslateblue中石板蓝色mediumspringgreen中亮绿色 mediumturquoise中海湖蓝 mediumvioletred中紫色 salmon澄红色
Automotive engine maintenance(汽车发动机维护维修)
Automotive engine maintenance(汽车发动机维护维修) Print references recommend additional bookmarks Fourth, generator adjuster, font [big] [middle] [small] Classification of generator regulators Generator regulator according to its structural characteristics and principles of operation can be divided into vibration (depending on the vibration of contacts to regulate) and transistor two major categories. If the voltage regulator and current limiter, the relay closure is called a contact, and the contact of each log on is called the series, at the same time, each associated with a pair of contacts that single stage, two pairs of contacts is called double stage, is the regulator and contact number and series that is, Two, generator regulator models, specifications and applicable models 1. generator regulator model and meaning JB1546-75 "car and tractor electrical products model preparation method" stipulates that the regulator's name is FT, F means "hair", "T" means "tune"". The classification and grouping code is Among them, the meaning of voltage class code and structure code is listed as shown in table 2-1-5 and 2-1-13 respectively. Generator nominal voltage level code table 2-1-5
Maintenance manual
Maintenance manual of LPG Cylinder Filling&Conveyance Equipment ⅠSummary This maintenance manual comprises two parts;one parts:one for Carousel,and another for Conveyor,and it contains the structure drawing of each part,which is convenient for disassembly and replacing and maintenance of parts.
ⅡPart of Carousel 1、Principal axis 2、Distributor block 3、Air Distributor 4、Compressed air circular tube 5、LPG circular tube 6、Roller 7、Drive8、Scale rolling bed9、Electrical Scale
2.1Principal axis 2.1.1Structure drawing of principal axis 1、center base 2、bearing of the carousel 3、terminal pad 4、cross pipe 5、gasket 6、swivel joint 7、ball valves 2.1.2Maintenance of Principal axis. This part is the rotating center and distribution center of the filling disc.It’s required that in this no gas leak,in particular on the swivel join,in case of gas leak,it should be change the seal or swivel joint. 2.2Roller 2.2.1Drawing of roller
maintenance
1.Maintenance history ◆Maintenance has been done as long as humans have used equipment ◆Maintenance development can be divided in four steps: 1.First generation (1930-1950) –Quick reactions and fixing –Machines were less loaded and simple –Machines were easy to fix –Level of maintenance skills was low 2.Second generation (1950-1980) –Work planning and management –Big and low machines –Interval(间隔) maintenance 3.Third generation (1980-1990) –Multi-skilled employers –Professional databases –Took maintenance and reliability in machine designing into consideration –Risk and failure analyses –Maintenance surveillance 4.Fourth generation (1990→) –Fast control systems –Program based maintenance –Smart sensors aiding in locating problems –New computer technologies help to monitor machines and other equipment –Remote monitor keeps costs low and gives possibility to use expert personnel more efficiently –New features like quality of product, environment and safety issues are included in maintenance control –With the help of maintenance optimal function of the machines can be changed and therefore compensate the fluctuations in the quantity of demand and production
比较全的颜色的英文缩写
棕色BN 红色RD 橙色OG 黄色YE 绿色GN 蓝色(包括淡蓝)BU 紫色(紫红)VT 灰色(蓝灰)GY 白色WH 粉红色PK 金黄色GD 青绿色TQ 银白色SR 绿/黄双色GNYE Purple紫色 Fuchsia紫红 Maroon茶色 Olive橄榄 Navy深蓝 Teal青色 Aqua浅绿 Lime亮绿 Silver银色 Green绿色 Red红色 Yellow黄色 Blue蓝色 blueviolet蓝紫色 Pink粉红 Brown褐色 Orange橙色powderblue粉蓝色Gray灰色aquamarine海宝蓝色coral珊瑚色chartreuse黄绿色cadetblue军官蓝chocolate深褐色cornflowerblue矢车菊色crimson深红色 cyan青绿色darkgoldenrod深菊黄gold金色
forestgreen森林绿goldenrod菊花黄 lightcoral浅橘红色lightblue浅蓝色lightslategray浅石板灰lightskyblue浅天空蓝lightseagreen浅海绿色lightsalmon浅澄红色lightpink浅粉红色lightgrey浅灰色 lightgreen浅绿色palegreen淡绿色palegoldenrod淡菊黄色orchid紫色 orangered橘红色paleturquoise淡湖蓝色palevioletred淡紫色 wheat小麦色 mistyrose朦胧玫瑰色magenta洋红色midnightblue深夜蓝mediumseagreen中海绿色mediumslateblue中石板蓝色mediumspringgreen中亮绿色mediumturquoise中海湖蓝mediumvioletred中紫色salmon澄红色sandybrown黄棕色seagreen海绿色springgreen亮绿色 tan黄褐色 tomato蕃茄红色 turquoise湖蓝色 violet紫色 yellowgreen黄绿色slateblue石板蓝 skyblue天空蓝powderblue粉蓝色lightskyblue浅天空蓝 plum深紫色 peachpuff桃红色mediumpurple中紫红色mediumorchid中紫色