jsp 图片上传功能实现原创

jsp 图片上传功能实现原创
jsp 图片上传功能实现原创

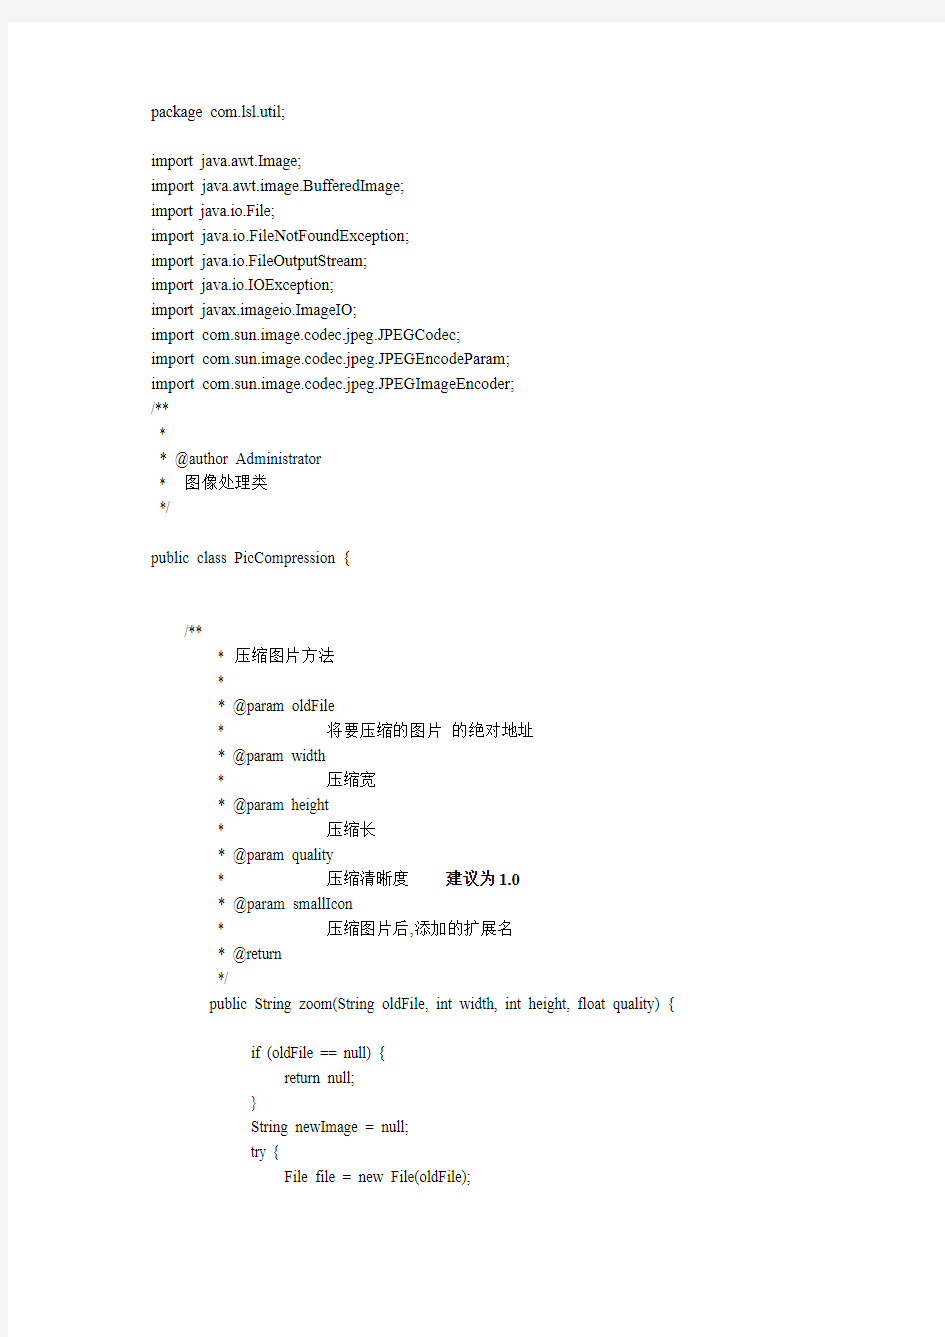
package com.lsl.util;

import java.awt.Image;

import java.awt.image.BufferedImage;

import java.io.File;

import java.io.FileNotFoundException;

import java.io.FileOutputStream;

import java.io.IOException;

import javax.imageio.ImageIO;

import com.sun.image.codec.jpeg.JPEGCodec;

import com.sun.image.codec.jpeg.JPEGEncodeParam;

import com.sun.image.codec.jpeg.JPEGImageEncoder;

/**

*

* @author Administrator

* 图像处理类

*/

public class PicCompression {

/**

* 压缩图片方法

*

* @param oldFile

* 将要压缩的图片的绝对地址

* @param width

* 压缩宽

* @param height

* 压缩长

* @param quality

* 压缩清晰度建议为1.0

* @param smallIcon

* 压缩图片后,添加的扩展名

* @return

*/

public String zoom(String oldFile, int width, int height, float quality) {

if (oldFile == null) {

return null;

}

String newImage = null;

try {

File file = new File(oldFile);

if(!file.exists()) //文件不存在时

return null;

/** 对服务器上的临时文件进行处理*/

Image srcFile = ImageIO.read(file);

// 为等比缩放计算输出的图片宽度及高度

double rate1 = ((double) srcFile.getWidth(null)) / (double) width

+ 0.1;

double rate2 = ((double) srcFile.getHeight(null)) / (double) height

+ 0.1;

double rate = rate1 > rate2 ? rate1 : rate2;

int new_w = (int) (((double) srcFile.getWidth(null)) / rate);

int new_h = (int) (((double) srcFile.getHeight(null)) / rate);

/** 宽,高设定*/

BufferedImage tag = new BufferedImage(new_w, new_h,

BufferedImage.TYPE_INT_RGB);

tag.getGraphics().drawImage(srcFile, 0, 0, new_w, new_h, null);

String filePrex = oldFile.substring(0, https://www.360docs.net/doc/25908453.html,stIndexOf('.'));

/** 压缩后的文件名*/

// newImage =smallIcon + filePrex

// +oldFile.substring(filePrex.length());

newImage = filePrex

+width+"x"+height + oldFile.substring(filePrex.length());

// newImage = smallIcon;

/** 压缩之后临时存放位置*/

FileOutputStream out = new FileOutputStream(newImage);

JPEGImageEncoder encoder = JPEGCodec.createJPEGEncoder(out);

JPEGEncodeParam jep = JPEGCodec.getDefaultJPEGEncodeParam(tag);

/** 压缩质量*/

jep.setQuality(quality, true);

encoder.encode(tag, jep);

out.close();

srcFile.flush();

} catch (FileNotFoundException e) {

e.printStackTrace();

} catch (IOException e) {

e.printStackTrace();

}

return newImage;

}

}

package com.lsl.goods.action;

import java.io.File;

import java.io.IOException;

import java.text.SimpleDateFormat;

import java.util.Date;

import javax.annotation.Resource;

import https://www.360docs.net/doc/25908453.html,mons.io.FileUtils;

import org.apache.struts2.ServletActionContext;

import org.springframework.context.annotation.Scope;

import org.springframework.stereotype.Controller;

import com.lsl.bean.GoodsInfo;

import com.lsl.bean.Lsluser;

import com.lsl.service.GoodsInfoService;

import com.lsl.util.PicCompression;

import com.opensymphony.xwork2.ActionContext;

@Controller @Scope("prototype")

public class SetGoodsPicAction {

@Resource GoodsInfoService goodsInfoService;

private File image; // 上传的文件如果多文件就用数组形式File[] image

private String imageFileName; // 上传的文件名如果多文件就用数组形式String[] imageFileName 这里用来获取文件的后缀名

private String imageContentType; //上传文件的类系如果多文件就用数组形式String[] imageContentType

//注意文件的大小不再这里设置在struts.xml配置上传文件的大小

public File getImage() {

return image;

}

public void setImage(File image) {

this.image = image;

}

public String getImageFileName() {

return imageFileName;

}

public void setImageFileName(String imageFileName) {

this.imageFileName = imageFileName;

}

public String getImageContentType() {

return imageContentType;

}

public void setImageContentType(String imageContentType) {

this.imageContentType = imageContentType;

}

//设置图片

public String setGoodsPic() throws IOException{

if(image !=null){

if(imageContentType.indexOf("image") != -1){ //检测是否为图片

String path="/Images/goodsImgs/";

String imageBasePath = ServletActionContext.getServletContext().getRealPath(path);

Lsluser lu= (Lsluser)ActionContext.getContext().getSession().get("currentUser");

String privatePath =lu.getLslId().toString();

String realPath=imageBasePath+"\\"+privatePath; //硬盘的目录这里第一个\是转译符意思是第二个\是有效字符

SimpleDateFormat dateFormat =new SimpleDateFormat("yyyyMMddHHmmssSSS");

String imageName=dateFormat.format(new Date()); //设置文件名以时间命名

String

suffixName=imageFileName.substring(https://www.360docs.net/doc/25908453.html,stIndexOf(".")).toLowerCase();//获取文件的后缀名

File saveFile= new File(new File(realPath),imageName+suffixName);

if(!saveFile.getParentFile().exists()) saveFile.getParentFile().mkdirs();//如果不存在绝对目录那就创建改目录

FileUtils.copyFile(image, saveFile); //保存原图成功

PicCompression pc = new PicCompression(); //处理图片的类

int w=200;

int h=250;

pc.zoom(new

File(realPath).toString()+"\\"+imageName+suffixName,w,h,1); //生成缩略图命名规则就是在原图的名字后面加上宽度x长度

String bigPicRelativePath = path + privatePath+"/"+imageName+suffixName; //实图的相对路径用于存放进数据库

String smallPicRelativePath = path + privatePath+"/"+imageName+w+"x"+h+suffixName; //缩略图的相对路径用于存放进数据库

GoodsInfo

addingGoods=(GoodsInfo)ActionContext.getContext().getSession().get("addingGoods");

addingGoods.setImgUrl(bigPicRelativePath);

addingGoods.setSmallImgUrl(smallPicRelativePath);

goodsInfoService.update(addingGoods);

ActionContext.getContext().getSession().put("setPicRestul", "图片上传成功");

}

}

return "setPicSuccess";

}

}

AnyQuestion --- Qq:16895920

js实现图片上传前的预览

js实现图片上传前的预览,实现完美兼容Firefox3,IE6,IE7,IE8和IE9的显示问题 1、脚本,把下面代码加到与之间 Js代码 1.

登录
JQuery代码:login.js $(function(){ $(".loginform_submit").click(function(){ if(checkInput()) { $("form").action("/loginServlet"); }else{ return false;

jsp页面验证码源代码

jsp页面验证码源代码 在java后台中生成验证码的ImageIO传到前端页面显示,同时把验证码的v alue值传入session 中用于与用户输入的验证码进行匹配,在用户验证中使用ajax技术,在不刷新页面的同时进行验证码验证。 程序结构图: VerifyCodeUtils程序主要内容为通过Java生成验证码的图片,以及验证码的value值,程序如下: package utils; import java.awt.Color; import java.awt.Font;

import java.awt.Graphics2D; import java.awt.image.BufferedImage; import java.util.HashMap; import java.util.Map; import java.util.Random; publicclass VerifyCodeUtils { privatestatic BufferedImage image = null; privatestatic Random random = new Random(); //在自己定义的一些数中,生成4位随机数 publicstatic String getVerifyCode() { String str = ""; char[] code = newchar[]{'A','B','C','D','E','F','G','H','I ','J','K','L','M','N','P','Q','R','S','T','U', 'V','W','X','Y','Z','a','b','c','d','e','f','g','h','i',' j','k','m','n','p','q','r','s','t', 'u','v','w','x','y','z','2','3','4','5','6','7','8','9'}; Random random = new Random(); for(int i = 0; i <4; i++) { str += String.valueOf(code[random.nextInt(code.length)]); } return str; }

JS实例网页上图片延迟加载的JS代码

大家如果使用firebug去查看的话就会发现,当你滚动到相应的行时,当前行的图片才即时加载的,这样子的话页面在打开只加可视区域的图片,而其它隐藏的图片则不加载,一定程序上加快了页面加载的速度,对于比较长的页面来说,这个方案是比较好的。 实现原理 把所有需要延时加载的图片改成如下的格式: 然后在页面加载时,把所有使用了lazy_src的图片都保存到数组里,然后在滚动时计算可视区域的top,然后把延时加载的图片中top小于当前可视区域(即图片出现在可视区域内)的图片的src的值用lazy_src的来替换(加载图片) 代码 lazyLoad=(function() { var map_element = {}; var element_obj = []; var download_count = 0; var last_offset = -1; var doc_body; var doc_element; var lazy_load_tag; function initVar(tags) { doc_body = document.body; doc_element = https://www.360docs.net/doc/25908453.html,patMode == 'BackCompat' ? doc_body: document.documentElement; lazy_load_tag = tags || ["img", "iframe"]; }; function initElementMap() { var all_element = []; //从所有相关元素中找出需要延时加载的元素 for (var i = 0, len = lazy_load_tag.length; i < len; i++) { var el = document.getElementsByTagName(lazy_load_tag[i]); for (var j = 0, len2 = el.length; j < len2; j++) { if (typeof(el[j]) == "object" && el[j].getAttribute("lazy_src")) { element_obj.push(all_element[key]); } } } for (var i = 0,

(完整版)JSP登陆页面代码

静态的登录界面的设计login.htm,代码如下: Html代码 1. 2. 3. 系统登录 4. 14. 15. 16.

17. 18. 19. 20. 22. 23. 24. 25.
26. 27.
28.
29.
33. 34. 35. 36. 37.
系统登录 21.
用户名
密  码
30.    31. 32.
38.

ASP net图片上传预览及无刷新上传

图片上传预览及无刷新上传 JS代码如下: //清空File控件的值,并且预览处显示默认的图片 function clearFileInput() { var form = document.createElement('form'); document.body.appendChild(form); //记住file在旧表单中的的位置 var file = document.getElementById("idFile"); var pos = file.nextSibling; form.appendChild(file); form.reset();//通过reset来清空File控件的值 document.getElementById("colspan").appendChild(file); document.body.removeChild(form); //在预览处显示图片这是在浏览器支持滤镜的情况使用的 document.getElementById("idImg").style.filter = "progid:DXImageTransform.Microsoft.AlphaImageLoader(sizingMethod='scale',src='images/abshiu.jpg'"; //这是是火狐里面显示默认图片的 if (https://www.360docs.net/doc/25908453.html,erAgent.indexOf('Firefox') >= 0) { $("#idImg").attr('src', 'images/abshiu.jpg'); } } HTML代码如下:

js鼠标点击图片切换代码

代码: <%@ Page Language="C#" AutoEventWireup="true" CodeFile="Test.aspx.cs" Inherits="Test" %> 无标题页

实验六用户注册功能的纯JSP 设计与实现

实验六用户注册功能的纯JSP 设计与实现 一、实验目的 掌握如何使用JSP 与form 表单交互获取用户注册信息; 掌握request 内建对象的使用; response 对象设置头信息刷新refresh。 二、实验环境 PC 系列微机,CPU1.2G 以上,内存256 以上,Windows XP,MyEclipse6.5。 三、实验步骤 1、在MyEclipse 中创建Web 项目jsp (1)设计用户注册页面register.html 和接收用户注册页面数据进行处理的页面 register_check.jsp。注意form 表单的中文乱码问题。这2 个页面显示格式如下:

(2)response 对象设置头信息刷新refresh 编写2 个JSP 页面,第一个responseRefresh.jsp 页面2 秒钟后跳转到第二个页面 useOut.jsp。 (3)编写3 个页面:redirect1.html,redirect2.jsp, redirect3.jsp,redirect1.html 中的请求参数 有userName,提交到redirect2.jsp 后再重定向到redirect3.jsp,在redirect3.jsp 中尝试取得 四、实验报告 1 提交用户注册页面register.html 和接收用户注册页面数 据进行处理的页面register_check.jsp 的代码。 <% String msg = "", uname = "", email = "", ulogo = ""; if (request.getParameter("msg") != null) { msg = request.getParameter("msg"); uname = request.getParameter("uname");

jQuery多图上传插件imgUp.js

本文由我司收集整编,推荐下载,如有疑问,请与我司联系 jQuery 多图上传插件imgUp.js 2017/08/07 0 开发环境:idea mysql 效果: 前台步骤如下: 1)首先导入imgPlugin.js 注:实际项目中使用的时候只需要引用:imgPlugin.js 这个就可以了,因为这 个是对imgUp.js 的封装 script type= text/javascript src= ../style-wechat/js/imgPlugin.js /script 2)在页面中加入它需要的js script type= text/javascript var imgUrls= ; $( #file ).takungaeImgup({ formData: { name : file }, url: 192.168.1.109:8080/imgUp , success: function(data) { imgUrls =data.url , ; }, error: function(err) { alert(err); } }); function addComm(){ jQuery.ajax({ url: /addComment.action , type: ‘POST’,data: {‘imageUrls’:imgUrls}, dataType: ‘json’, success: function (data) { alert( 发布成功); } }) } /script 3)在页面 中代码添加内容div > section > div > section > img src= ../../style- wechat/images/a11.png > input type= file name= file id= file > /section /div /section /div aside > div > p > p > /div /aside 后台接受图片代码: tips:感谢大家的阅读,本文由我司收集整编。仅供参阅!

使用JSP做了一个简单的登录框架

使用JSP做了一个简单的登录框架2008-05-05 11:47 功能分析:当用户提交表单时,在当前的页面判断用户的名称及密码是否正确,如果不正确则提示“登录失败”。如果正确则跳转到“欢迎界面”。 问题:防止用户未经登录而直接访问“欢迎界面”。 解决方法:在登录界面里设置session的属性值,在欢迎界面里判断session 的属性值不等于空。此时可以判断出用户是否是通过登录界面登录成功之后跳转到欢迎界面的! 共两个文档 login.jsp ; 登录界面,提供一个表单供用户输入,并判断是否正确 welcome.jsp : 欢迎界面,登录成功后显示信息,如果用户未经登录直接访问,则提示未登录,并自动跳转到登录界面! login.jsp 代码如下: <%@ page contentType="text/html;charset=gb2312"%>
用户名:
密  码:
<% //判断表单是否输入了内容

if(request.getParameter("uname")!=null && request.getParameter("upass")!=null){ //获取表单的内容 String name = request.getParameter("uname"); String password = request.getParameter("upass"); //判断输入的内容是否正确,此处使用字符串与变量进行比较,可以防止第一次运行时出现空指针错误 if("yk".equals(name)&&"123".equals(password)) { //设置Session的属性值,用于wellcome页面进行判断是否有属性 session.setAttribute("flag","ok"); //跳转到欢迎页面 response.sendRedirect("welcome.jsp"); }else { %>

登录失败!!!

<% } } %> welcome.jsp代码如下: <%@ page contentType="text/html;charset=gb2312"%> <% //判断属性是否为空,防止用户从另外的窗口中未经登录成功便打开此页面而出现登录成功的信息 if(session.getAttribute("flag")!=null) { %>

登录成功!

<% }else { //自动跳转到登录界面 response.setHeader("refresh","2;URL=login.jsp"); %>

您还没有登录,2秒后跳到登录页面

<%

java图片上传并预览,前台用jQuery插件AjaxFileUpload,后台用FileUtils.copyFile.

本文由我司收集整编,推荐下载,如有疑问,请与我司联系java 图片上传并预览,前台用jQuery 插件AjaxFileUpload,后台用 FileUtils.copyFile. 2015/01/05 0 个人笔记,以备后用. 表体代码: td colspan= 3 s:file label= 上传name= uploadFile id= uploadNumFile onchange= fileUpload( uploadNumFile , goodsRecordDtl_goodsPicture , goodsPicture_img ) / a href= # title= 查看quot;viewPic( viewPicture1 , goodsPicture , goodsRecordDtl_goodsPicture 查看图片/a div id= viewPicture1 title= 图片预览> img id= goodsPicture src= /div /td js 代码(记得要引入jquery 库和ajaxfileupload 库): //上传文件id 号function fileUpload(uploadFileId,filePathId,imgId){ var imp= document.getElementById(uploadFileId); if(imp==null ||imp== ||imp== undefined){ alert( 请选择文件return; } $.ajaxFileUpload({ url:ct + uploadFile.do , secureuri:false, fileElementId:uploadFileId, dataType: multipart/form-data , success: function (data, status){ var json = eval( ( + data + ) if(json.msg== 1 ){ alert( 上传成功$( # +filePathId).val(json.path); $( # +imgId).attr( src ,eTrade.ctx+ /upload/ +json.path); }else{ alert( 文件上传失败} }, error: function (data, status, e){ alert(e); } }); } function viewPic(dialogId,imgId,fileId){ $( # +dialogId).dialog({ height: 350, width: 600, buttons: { 取消: function() { $( # +imgId).attr( src , $(this).dialog( close } }, close:function(){ $( # +imgId).attr( src , } }); if($( # +fileId).val()== ){ return; } $( # +imgId).attr( src ,ct+ /toView.do?attachment= +$( # +fileId).val()); } 后台代码(uploadFile 命名必须与前台name= uploadFile 一致): private File uploadFile; public File getUploadFile() { return uploadFile; } public void setUploadFile(File uploadFile) { this.uploadFile = uploadFile; } @Action(value = uploadFile , results = { @Result(name = success , type = json , params = { ignoreHierarchy , false , contentType , text/html , root , dataMap }) }) public String

使用JSP实现网站用户注册和登录

课程设计报告 课程名称 Web开发技术 系别:工程技术系 专业班级:计科0801 学号: 0811080105 姓名:方海入 课程题目:使用JSP实现网站用户注册和登录 完成日期: 2011年6月 指导老师:林宝平 2011年 6月 24日

课程设计目的1.培养综合运用所学知识解决实际问题的能力;2.培养独立查找资料进行自学的能力; 3.熟悉网站常用基本模块的实现方法。 课程设计要求1.使用HTML表单提交用户信息;2.使用JavaScript验证用户输入信息;3.使用AJAX技术检测用户名是否可用;4.使用JDBC连接数据库。 课程设计注意事项1.可以相互讨论,但应独立完成; 2.代码应当整洁规范,清晰易读; 3.界面应当简洁漂亮,各种提示清晰完整。 课程设计内容 设计一个公司用户登录和注册的网站,并使用JSP技术连接SQL数据库,实现网页的用户登录注册功能

课程设计简要操作步骤1.使用HTML语言编写设计网站登录页面代码。 2.使用SQL SERVER创建用户账户密码数据库。 3.使用ODBC连接数据库和登录界面。 4.连接输入数据测试是否正确。 课程设计心得体会通过此次课程实训,是我更加明白理论与实践相结合的重要性,光学习理论是远远不够的,还要能在实际的操作上熟练的运用才是最关键的,只有不断的提高自我的实际操作水平,才能学以致用,为以后的工作打下坚实的基础。 课 程设计评语及成绩评 语 成 绩 指导教师 (签名) 2011年6月日

附件: 摘要 本文的叙述围绕着如何实现一个功能完善的网站进行展开。依据本次毕业设计的要求,主要从可行性分析、需求分析、总体设计、详细设计、编码、测试几个阶段进行毕业设计论文的编写。 接着在需求分析中,根据用户的角度,分析了所设计的网站需要实现哪些基本功能;从设计者的角度,分析了设计一个网站所用的编辑工具和编程语言及网站的软硬件开发环境。根据分析的结果,主要采用FrontPage,Dreamweaver编辑器,SQL 2000结合https://www.360docs.net/doc/25908453.html,(vbscript,j avascript)编程编程语言,进行网站的页面设计;网站的主要功能主要分为新闻、下载、友情链接、网上调查,图片几大模块。 详细设计阶段的任务就是把解法具体化。在详细设计阶段,依据总体分析的结果,进行具体页面的组织和数据库结构的设计。页面的组织主要是设计网页之间的联系,同时根据这些联系实现网页基本功能的构架;数据库的设计主要考虑各程序模块的基本功能,设计相应的表格、字段,用来存贮相应的数据记录,为页面的生成提供数据来源。 在编码阶段,进行具体网页的编码设计。在设计中,根据网页的程序界面,表单,需要的数据等,写出实际的程序代码。由于本次设计的页面比较多,不可能尽数地写出全部程序的代码,因此,在这一章节中,主要解释了在此次设计中主要用到的页面设计和数据库的编码技术。 测试的主要任务是为了发现程序中的错误,软件测试的过程亦是程序运行的过程。在本次设计中,主要采用边测试边修改的方法,在测试网页的同时根据结果及时进行相应的修改。在测试过程中,主要从外观、链接、速度方面测试网页是否能够实现相应的功能。 关键字JSP、WEB、Dreamweaver、SQL 2000 ABSTRACT The textual description is around how to realizes the perfect website of a function pr oceeds to launch.According to the request of this graduate design, primarily analyze from the viability assessment, analysis of need, total design, detailed design, code design, test this five stage to proceed this graduate design. Immediately after analyze the inside in the need, according to the customer's angle, analy zed basic functions of which demand in website for designing of realizeses;From angle of the design, analyzed to design a development environment of soft hardware for editor tool for us ing with weaving the language and website.According to the analysis's result, mostly use Drea mweaver , and connected JSP( vbscript, javascript) language, proceed the design of website's p age;The website's main function is primarily divided with the news, forums, message the guest book , net investigate, amusement. The mission of the detailed design stage is to embody the solution method.In the result o f the total analysis of detailed design stage, basis, proceed the buildup of the concrete page is with the design of construction database.Page for contact for of buildup primarily is°which design web paging, at the same time according to these contacts realizing basic function of web page;Main each procedure mold of consideration of the database's design piece form, wor

相关文档
最新文档
选择文件