PXE Server 搭建和配置
PXE Server 搭建和配置
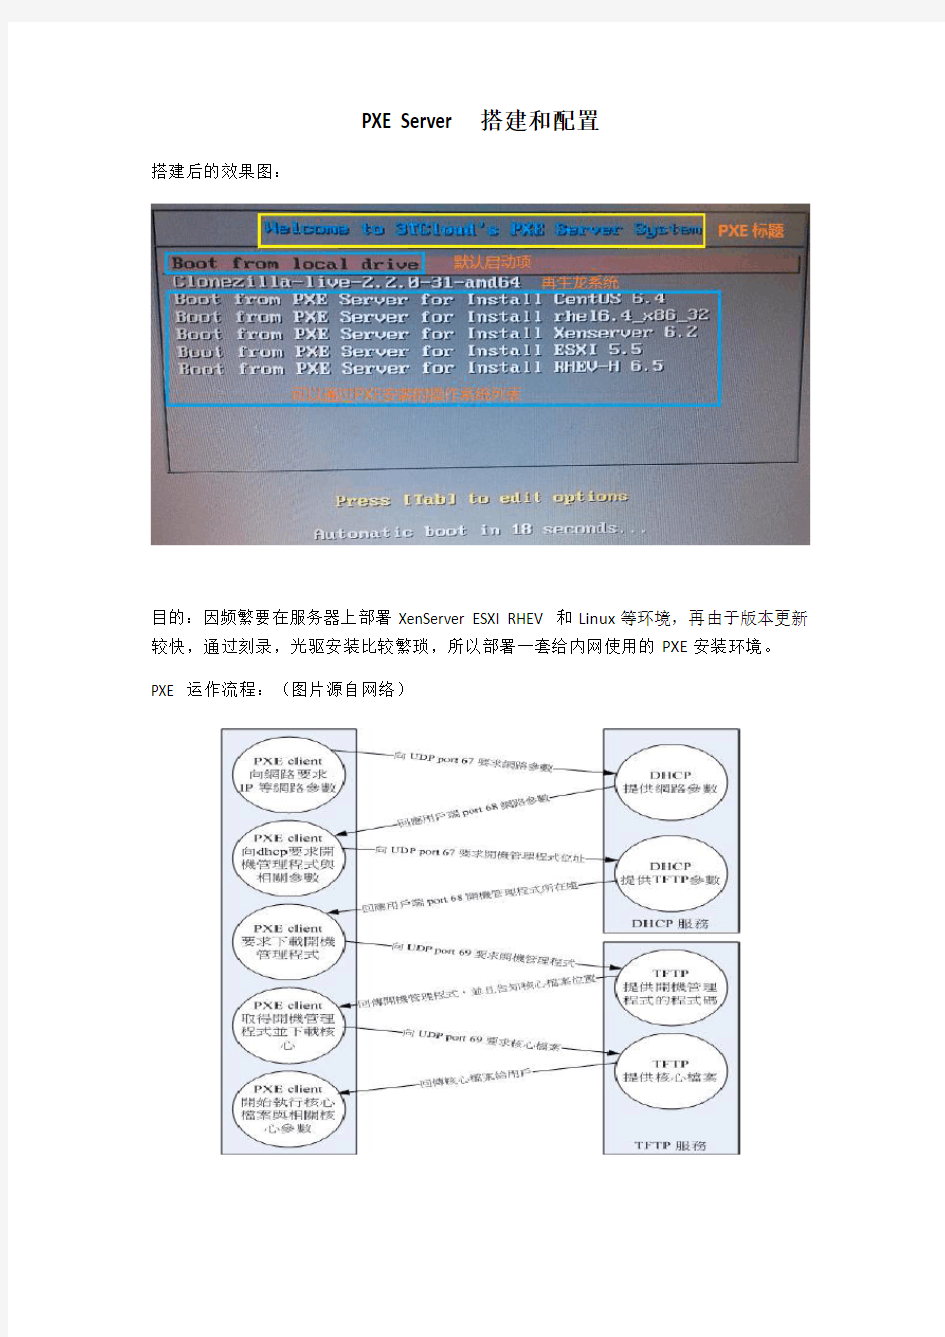
搭建后的效果图:
目的:因频繁要在服务器上部署XenServer ESXI RHEV 和Linux等环境,再由于版本更新较快,通过刻录,光驱安装比较繁琐,所以部署一套给内网使用的PXE安装环境。
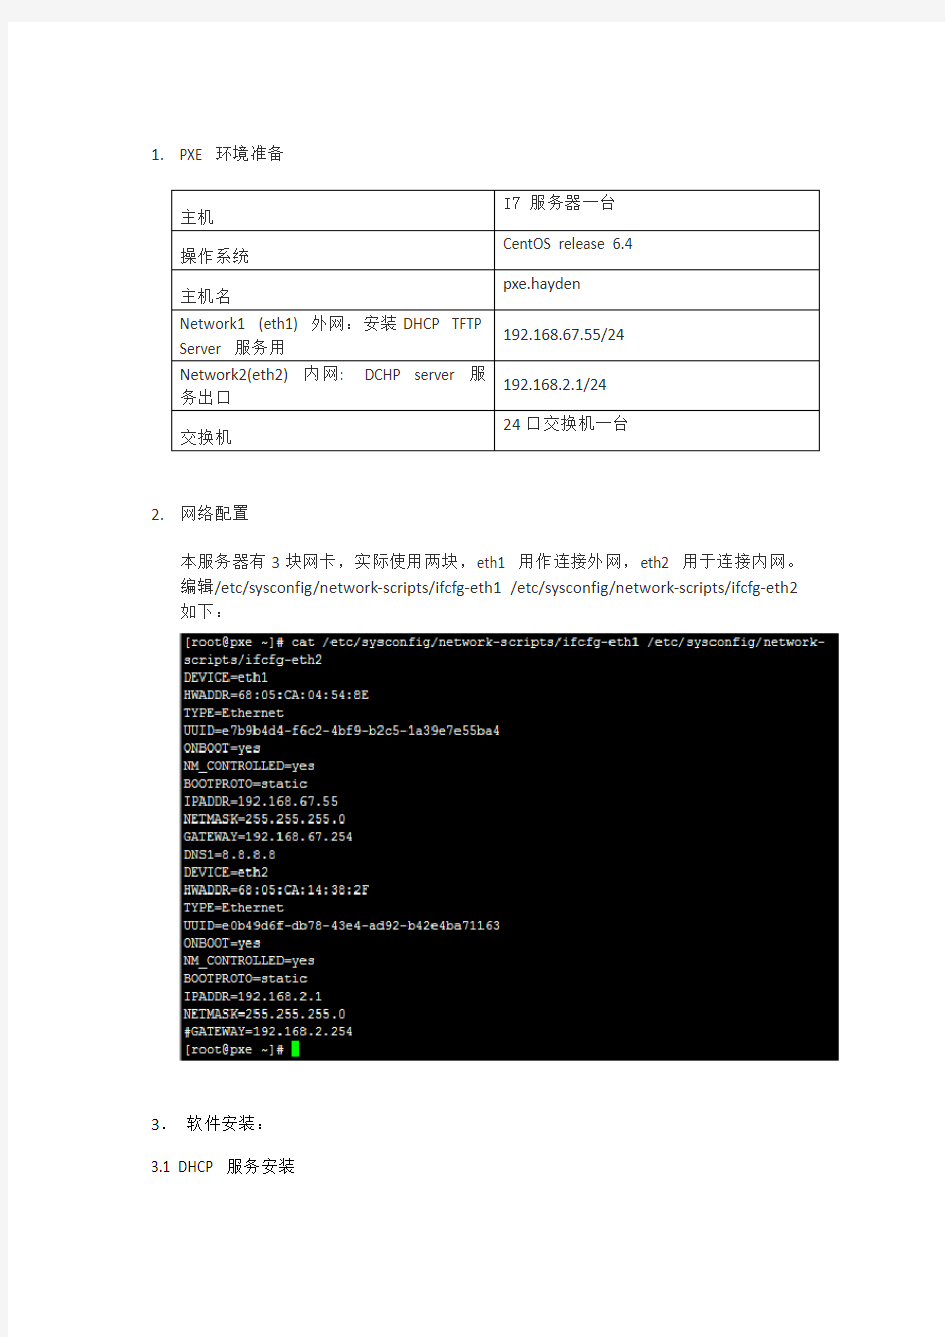
PXE 运作流程:(图片源自网络)
1.PXE 环境准备
2.网络配置
本服务器有3块网卡,实际使用两块,eth1 用作连接外网,eth2 用于连接内网。
编辑/etc/sysconfig/network-scripts/ifcfg-eth1 /etc/sysconfig/network-scripts/ifcfg-eth2 如下:
3.软件安装:
3.1 DHCP 服务安装
yum -y install dhcp
3.2 配置dhcp
vi /etc/dhcp/dhcpd.conf
配置DHCP 的监听接口vi /etc/sysconfig/dhcpd
启动dhcpd 服务:/etc/init.d/dhcpd start
3.3 安装tftp 服务:
[root@pxe ~]# yum -y install tftp-server tftp
[root@pxe ~]# vi /etc/xinetd.d/tftp
默认tftp服务的根目录是放在/var/lib/tftpboot/ 底下,现在为了方便管理,将所有资料放在/install/ 目录下,这里的TFTP的根目录就放置于/install/tftpboot 底下
[root@pxe ~]# mkdir -p /install/tftpboot/
[root@pxe ~]# chcon --reference /var/lib/tftpboot/ /install/tftpboot/
[root@pxe ~]# chcon --reference /var /install/
[root@pxe ~]# ll -dZ /install/tftpboot/
drwxr-xr-x. root root system_u:object_r:tftpdir_rw_t:s0 /install/tftpboot/
启动并观察tftp 服务:
[root@pxe ~]# /etc/init.d/xinetd restart
[root@pxe ~]# chkconfig xinetd on
[root@pxe ~]# chkconfig tftp on
[root@pxe ~]# netstat -tulnp |grep xinetd
udp 0 0 0.0.0.0:69 0.0.0.0:*
17377/xinetd
3.4 配置vi /etc/dhcp/dhcpd.conf 与tftp server 关联
3.5 使用syslinux 提供的boot loader 和开机选单的一些设置项
[root@pxe ~]# yum install syslinux
[root@pxe syslinux]# cp /usr/share/syslinux/menu.c32 /usr/share/syslinux/vesamenu.c32 /usr/share/syslinux/pxelinux.0 /install/tftpboot/
[root@pxe syslinux]# mkdir /install/tftpboot/pxelinux.cfg/
4 配置PXE 安装的ISO
4.1 配置PXE启动再生龙
4.1.1 cloneziila 介绍
Clonezilla 是一个很好的系统克隆工具,它可以说是吸取了Norton Ghost 和Partition Image 的优点。即不仅支持对整个系统进行克隆,而且也可以克隆单个的分区,这种灵活性可能更能适应备份者的需要。
有需求的朋友不妨关注下Clonezilla 的功能:
在GNU/Linux 端所支持的文件系统包括:ext2、ext3、reiserfs、xfs、jfs;同时,Clonezilla 也支持M$ Windows 上的FAT、NTFS 文件系统。这意味着,你既可以使用Clonezilla 克隆GNU/Linux 系统,也能够对M$ Windows 系统进行克隆。Clonezilla 支持使用PXEBoot 来进行Multicast 克隆。这对于需要克隆大量系统的用户极为有用。CloneZilla 包括一个Live 版,让你无需对其安装即可克隆系统。
4.1.2 下载cloneziila
从官网下载https://www.360docs.net/doc/2e1910542.html,/downloads.php
4.1.3 解压clonezilla-live-2.2.0-31-amd64.zip
4.1.4 将initrd.img 和vmlinuz 拷贝到tftp文件夹
4.1.5将filesystem.squashfs 拷贝到ftp文件夹
4.1.6 配置启动选项default文件
vi /install/tftpboot/pxelinux.cfg/default 增加:
4.2 配置PXE 安装Centos 6.4 _64
4.1.1 挂载iso文件,拷贝vmlinuz initrd.img 到tftp 文件夹下:
4.1.2 配置default 文件,增加如下内容:
4.1.3 通过NFS ftp http 服务完成系统安装。
4.3 配置PXE 安装RHEL 6.4_32
4.4 配置PXE 安装Xenserver6.2
4.5 配置PXE 安装ESXI
5.5
4.6 配置PXE 安装RHEV-H6.5