1C#编程入门三步骤
C#编程入门三部曲
第一步创建一个表单
这非常简单,只需要创建一个从System.WinForms.Form类中衍生出来的类,并对适当的属性进行初始化就可以。在我们的例子中,类定义是这样开始的:
public class TempConverter:System.WinForms.Form{
.
.
.
}
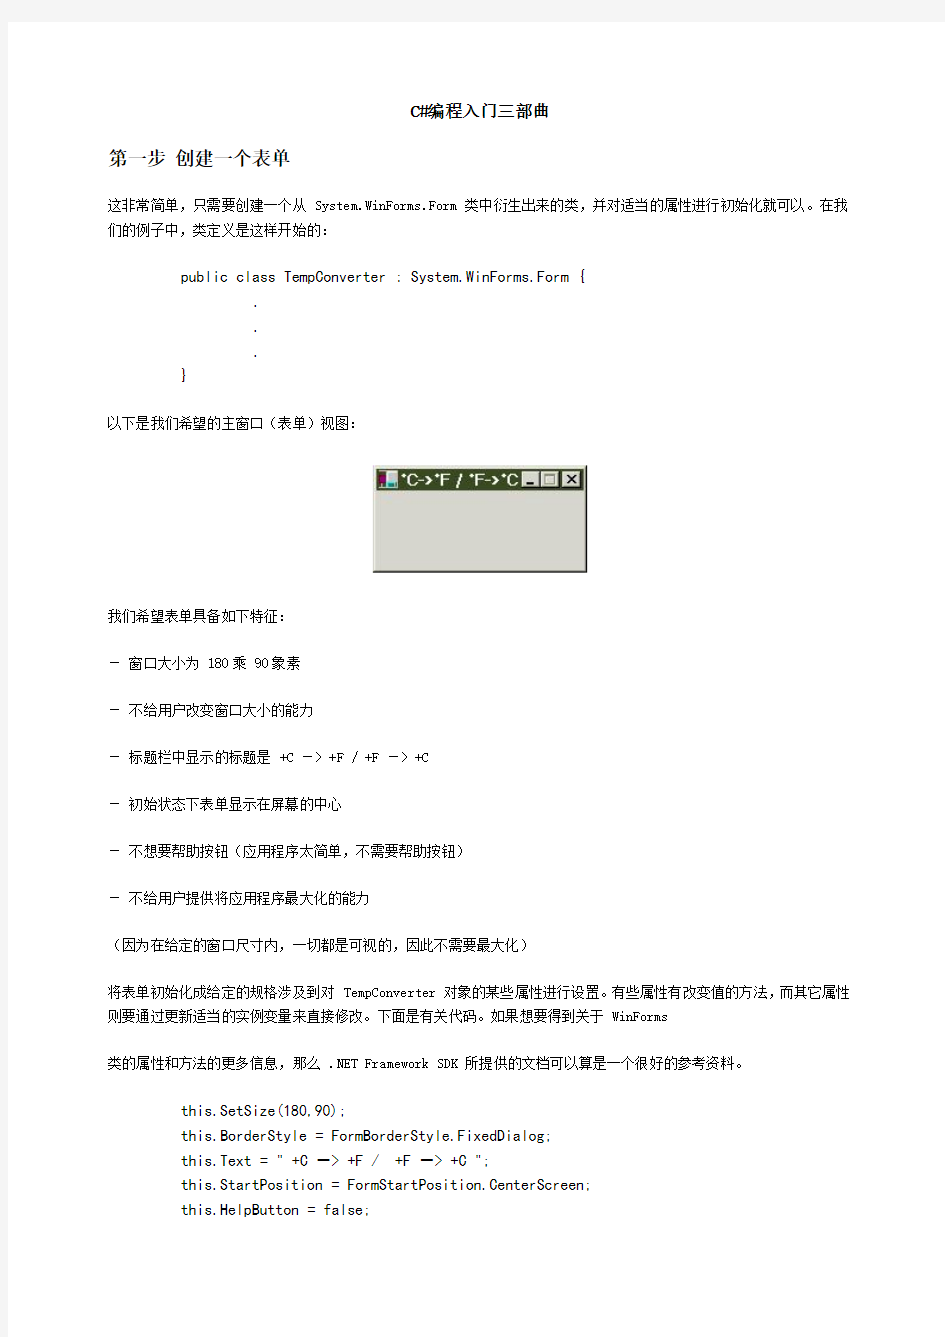
以下是我们希望的主窗口(表单)视图:
我们希望表单具备如下特征:
-窗口大小为180乘90象素
-不给用户改变窗口大小的能力
-标题栏中显示的标题是+C->+F/+F->+C
-初始状态下表单显示在屏幕的中心
-不想要帮助按钮(应用程序太简单,不需要帮助按钮)
-不给用户提供将应用程序最大化的能力
(因为在给定的窗口尺寸内,一切都是可视的,因此不需要最大化)
将表单初始化成给定的规格涉及到对TempConverter对象的某些属性进行设置。有些属性有改变值的方法,而其它属性则要通过更新适当的实例变量来直接修改。下面是有关代码。如果想要得到关于WinForms
类的属性和方法的更多信息,那么.NET Framework SDK所提供的文档可以算是一个很好的参考资料。
this.SetSize(180,90);
this.BorderStyle=FormBorderStyle.FixedDialog;
this.Text="+C->+F/+F->+C";
this.StartPosition=FormStartPosition.CenterScreen;
this.HelpButton=false;
this.MaximizeBox=false;
现在把这些代码放在一起进行编译和运行,看看表单运行后是什么样子。这里要使用类定义,创建一个构造器(其中要包含以上的代码来初始化主窗口的外观),并且要创建一个主方法来创建类的一个例示。以下是完成这一工作的代码:
public class TempConverter:System.WinForms.Form{
public TempConverter(){
this.SetSize(180,90);//定义大小//
this.BorderStyle=FormBorderStyle.FixedDialog;//窗口大小是不能改变的//
this.Text="+C->+F/+F->+C";//定义标题栏上的文字//
this.StartPosition=FormStartPosition.CenterScreen;
//设置窗口出现在屏幕的起始位置//
this.HelpButton=false;//屏闭帮助按钮//
this.MaximizeBox=false;//屏闭最大化按钮//
}
public static void Main(){
Application.Run(new TempConverter());//请求在新表单中运行T empConverter()类// }
}
以上只有Main()方法所在行是新的代码。
Application.Run(new TempConverter());
上面这一行的意思是用新表单来启动应用程序。
假设源文件叫做TempConverter.cs,那么执行以下的命令编译代码:
csc/r:System.dll/r:Microsoft.Win32.Interop.dll
/r:System.WinForms.dll TempConverter.cs
这里不再详细讲解编译命令,因为当Visual https://www.360docs.net/doc/e56065068.html,可用时,就不必要发出命令行的编译命令了。
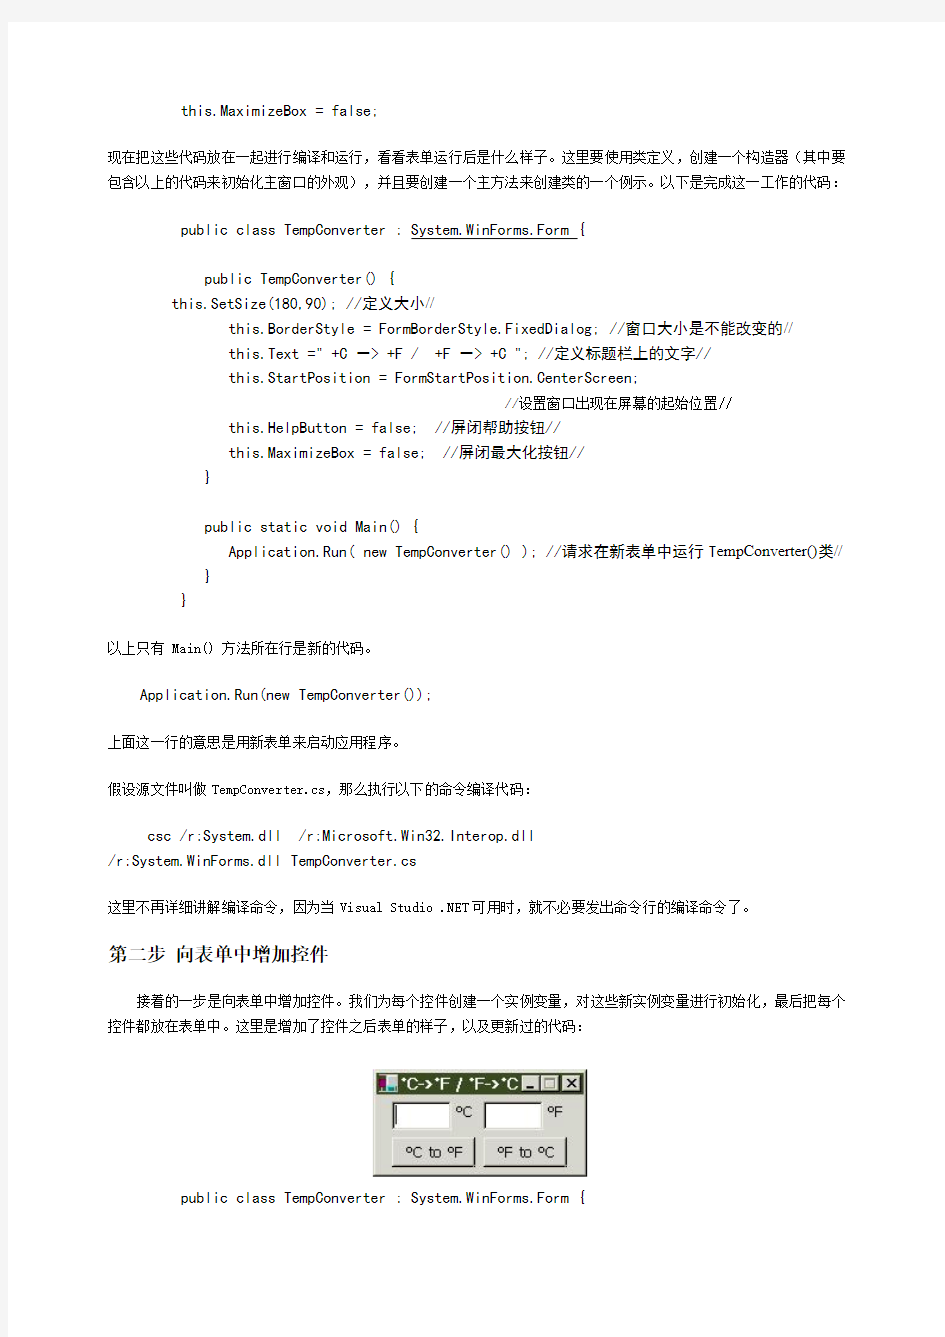
第二步向表单中增加控件
接着的一步是向表单中增加控件。我们为每个控件创建一个实例变量,对这些新实例变量进行初始化,最后把每个控件都放在表单中。这里是增加了控件之后表单的样子,以及更新过的代码:
public class TempConverter:System.WinForms.Form{
Label lTempFah=new Label();
Label lTempCel=new Label();
TextBox tTempFah=new TextBox();创建两个标签、两个文本框和两个按钮TextBox tTempCel=new TextBox();
Button bnCtoF=new Button();
Button bnFtoC=new Button();
public TempConverter(){
this.SetSize(180,90);
this.BorderStyle=FormBorderStyle.FixedDialog;
this.Text="+C->+F/+F->+C";
this.StartPosition=FormStartPosition.CenterScreen;
this.HelpButton=false;
this.MaximizeBox=false;
tTempCel.TabIndex=0;
tTempCel.SetSize(50,25);
tTempCel.SetLocation(13,5);
lTempCel.TabStop=false;
lTempCel.Text="+C";
lTempCel.SetSize(25,25);
lTempCel.SetLocation(65,5);
tTempFah.TabIndex=1;
tTempFah.SetSize(50,25);
tTempFah.SetLocation(90,5);
lTempFah.TabStop=false;
lTempFah.Text="+F";
lTempFah.SetSize(25,25);
lTempFah.SetLocation(142,5);
bnCtoF.TabIndex=2;
bnCtoF.Text="+C to+F";
bnCtoF.SetSize(70,25);
bnCtoF.SetLocation(13,35);
bnFtoC.TabIndex=3;
bnFtoC.Text="+F to+C";
bnFtoC.SetSize(70,25);
bnFtoC.SetLocation(90,35);
this.Controls.Add(tTempCel);
this.Controls.Add(lTempCel);
this.Controls.Add(tTempFah);
this.Controls.Add(lTempFah);
this.Controls.Add(bnCtoF);
this.Controls.Add(bnFtoC);
}
以上代码首先创建两个标签、两个文本框和两个按钮,然后对每个控件进行初始化并将其加入表单中。具体的含义如下:
-SetSize()初始化控件的尺寸
-SetLocation()初始化表单中控件的位置
-设置控件的TabStop属性为false表示这个控件从不被聚焦
-设置TabIndex为X表示当敲击TAB键x次后聚焦此控件
-控件的text属性表示显示在其上的文字信息
-this.Controls.Add()表示在表单上放置一个控件,要快速地添加每个控件,可以这么书写:this.Controls=new Control[]{tTempCel,lTempCel,tTempFar?.}
第三步增加响应用户事件代码
还有最后一步就可以大功告成了,就是增加一个方法来捕捉按钮点击事件。这里就是指从摄氏到华氏的按钮点击代码:
private void bnCtoF_Click(Object sender,EventArgs e){
double dTempCel=0;
double dTempFah=0;
try{dTempCel=tTempCel.Text.ToDouble();}
catch(Exception){
tTempCel.Clear();
tTempFah.Clear();
return;
}
dTempFah=1.8*dTempCel+32;
tTempFah.Text=dTempFah.ToString();
tTempFah.Focus();
tTempFah.SelectionStart=0;
tTempFah.SelectionLength=0;
tTempCel.Focus();
tTempCel.SelectionStart=0;
tTempCel.SelectionLength=0;
}
第四行到第八行(也就是try区中的一切)取回Celsius(摄氏)文本框中的数值。如果它是一个双字节数,就将其存储在dTempCel中,否则就清除两个文本框并退出。接着,用存储在dTempCel
中的值,我们用第9行中的公式将相同的温度存储在Fahrenheit中。将这个新的数值在Fahrenheit(华氏)文本框中显示,然后将光标放在每个文本框中,以便将指针设置到开头。(如果不将指针设置到开头,我们就会看到一个长长的数字的结尾,要看开头就必须滚动鼠标)。
以下是Fahrenheit按钮的代码,它将完成同样的任务,只不过是相反的处理:
private void bnFtoC_Click(Object sender,EventArgs e){
double dTempCel=0;
double dTempFah=0;
try{dTempFah=tTempFah.Text.ToDouble();}
catch(Exception){
tTempCel.Clear();
tTempFah.Clear();
return;
}
dTempCel=(dTempFah-32)/1.8;
tTempCel.Text=dTempCel.ToString();
tTempCel.Focus();
tTempCel.SelectionStart=0;
tTempCel.SelectionLength=0;
tTempFah.Focus();
tTempFah.SelectionStart=0;
tTempFah.SelectionLength=0;
}
接着,我们需要将适当的点击事件捕捉方法与按钮的Click事件联系起来。要完成这一步,我们将以下两行放在类的构造器中:
bnCtoF.Click+=new EventHandler(this.bnCtoF_Click);
bnFtoC.Click+=new EventHandler(this.bnFtoC_Click);
最后,请看完整的代码:
using System;
using System.WinForms;
public class TempConverter:System.WinForms.Form{
Label lTempFah=new Label();
Label lTempCel=new Label();
TextBox tTempFah=new TextBox();
TextBox tTempCel=new TextBox();
Button bnCtoF=new Button();
Button bnFtoC=new Button();
public TempConverter(){
this.SetSize(180,90);
this.BorderStyle=FormBorderStyle.FixedDialog;
this.Text="+C->+F/+F->+C";
this.StartPosition=FormStartPosition.CenterScreen;
this.HelpButton=false;
this.MaximizeBox=false;
tTempCel.TabIndex=0;
tTempCel.SetSize(50,25);
tTempCel.SetLocation(13,5);
lTempCel.TabStop=false;
lTempCel.Text="C";
lTempCel.SetSize(25,25);
lTempCel.SetLocation(65,5);
tTempFah.TabIndex=1;
tTempFah.SetSize(50,25);
tTempFah.SetLocation(90,5);
lTempFah.TabStop=false;
lTempFah.Text="F";
lTempFah.SetSize(25,25);
lTempFah.SetLocation(142,5);
bnCtoF.TabIndex=2;
bnCtoF.Text="C to F";
bnCtoF.SetSize(70,25);
bnCtoF.SetLocation(13,35);
bnCtoF.Click+=new EventHandler(this.bnCtoF_Click);
bnFtoC.TabIndex=3;
bnFtoC.Text="F to C";
bnFtoC.SetSize(70,25);
bnFtoC.SetLocation(90,35);
bnFtoC.Click+=new EventHandler(this.bnFtoC_Click);
this.Controls.Add(tTempCel);
this.Controls.Add(lTempCel);
this.Controls.Add(tTempFah);
this.Controls.Add(lTempFah);
this.Controls.Add(bnCtoF);
this.Controls.Add(bnFtoC);
//=new Control[]{tTempCel,lTempCel,tTempFah,lTempFah, bnCtoF,bnFtoC};
}
public static void Main(){
Application.Run(new TempConverter());
}
private void bnCtoF_Click(Object sender,EventArgs e){ double dTempCel=0;
double dTempFah=0;
try{dTempCel=tTempCel.Text.ToDouble();}
catch(Exception){
tTempCel.Clear();
tTempFah.Clear();
return;
}
dTempFah=1.8*dTempCel+32;
tTempFah.Text=dTempFah.ToString();
tTempFah.Focus();
tTempFah.SelectionStart=0;
tTempFah.SelectionLength=0;
tTempCel.Focus();
tTempCel.SelectionStart=0;
tTempCel.SelectionLength=0;
}
private void bnFtoC_Click(Object sender,EventArgs e){
double dTempCel=0;
double dTempFah=0;
try{dTempFah=tTempFah.Text.ToDouble();}
catch(Exception){
tTempCel.Clear();
tTempFah.Clear();
return;
}
dTempCel=(dTempFah-32)/1.8;
tTempCel.Text=dTempCel.ToString();
tTempCel.Focus();
tTempCel.SelectionStart=0;
tTempCel.SelectionLength=0;
tTempFah.Focus();
tTempFah.SelectionStart=0;
tTempFah.SelectionLength=0;
}
}
结语
到此为止,你看到了如何用C#进行编程的一个完整过程。这个例子虽然很简单,但是麻雀虽小,五脏俱全,理解其中的原理后,就可以大显身手,充分发挥C#的强大功能了。