气动执行器METSO说明书
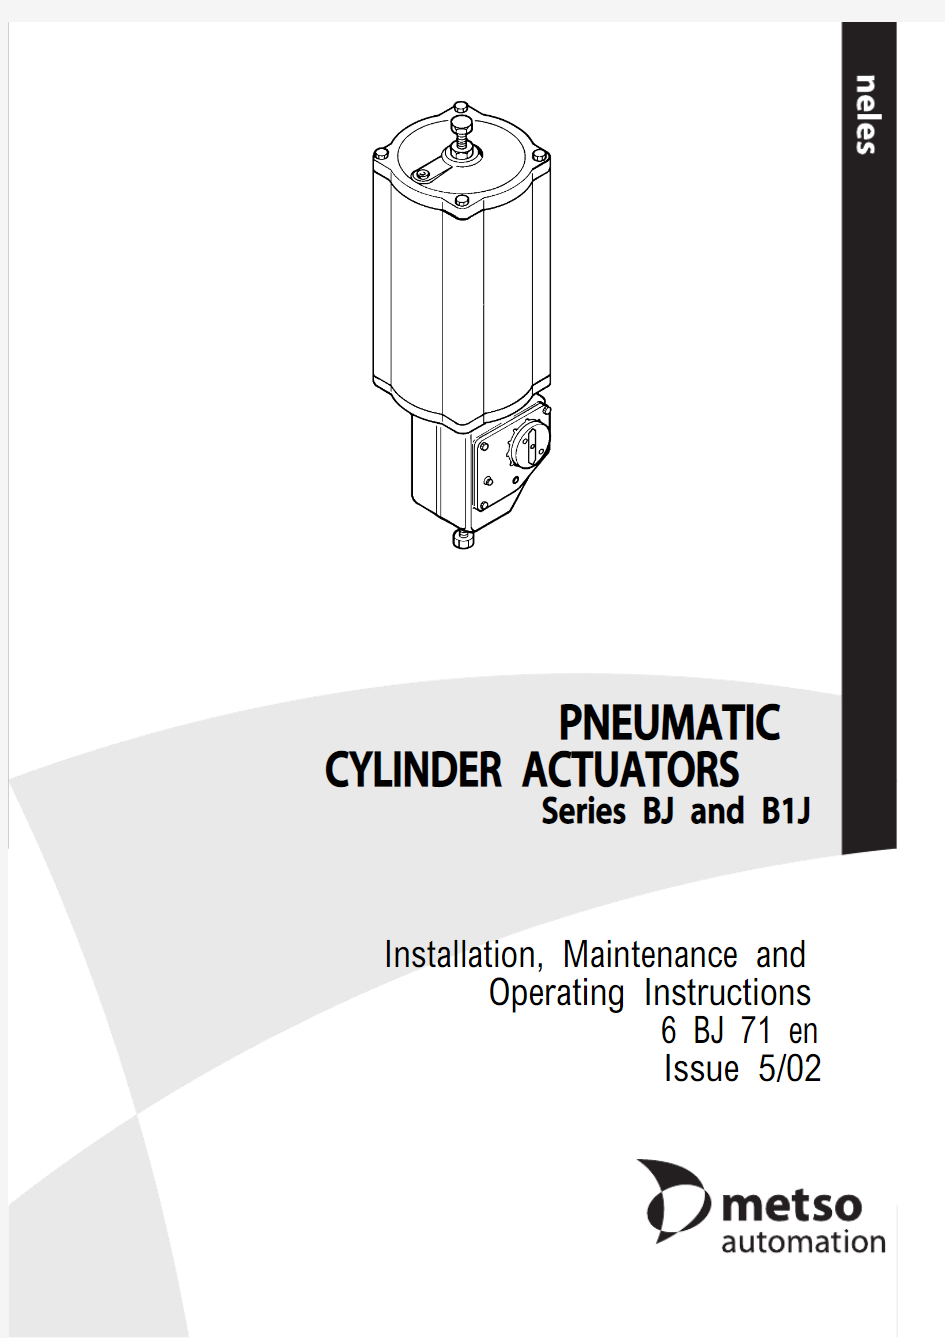
PNEUMATIC CYLINDER ACTUATORS
Series BJ and B1J
Installation, Maintenance and
Operating Instructions
2
Table of Contents
1GENERAL. . . . . . . . . . . . . . . . . . . . . . . . . . . 3
1.1Scope of the manual. . . . . . . . . . . . . . . . . . . . 3
1.2Structure and operation. . . . . . . . . . . . . . . . . 3
1.3Actuator markings. . . . . . . . . . . . . . . . . . . . . . 3
1.4Specifications. . . . . . . . . . . . . . . . . . . . . . . . . . 3
1.5Recycling and disposal of a rejected actuator. 4
1.6Safety precautions. . . . . . . . . . . . . . . . . . . . . . 4
2TRANSPORTATION, RECEPTION AND
STORAGE. . . . . . . . . . . . . . . . . . . . . . . . . . 5
3MOUNTING AND DEMOUNTING. . . . . 5
3.1Actuator gas supply. . . . . . . . . . . . . . . . . . . . . 5
3.2Mounting the actutor on the valve. . . . . . . . 5
3.3Operating directions. . . . . . . . . . . . . . . . . . . . 6
3.4Demounting the actuator from the valve. . . 6
4MAINTENANCE. . . . . . . . . . . . . . . . . . . . . . . . . 6
4.1General. . . . . . . . . . . . . . . . . . . . . . . . . . . . . . . 6
4.2Maintenance of the BJ actuator. . . . . . . . . . . 7
4.3Maintenance of the BJA actuator. . . . . . . . . . 9
4.4Changing the BJ actuator into a BJA actuator10
4.5BJR and BJAR actuators. . . . . . . . . . . . . . . . . 11
4.6BJV and BJK actuators. . . . . . . . . . . . . . . . . . 12
4.7BJVA and BJKA actuators. . . . . . . . . . . . . . . 12
4.8BJ 322 and BJA 322 actuators. . . . . . . . . . . 12
5MALFUNCTIONS. . . . . . . . . . . . . . . . . . . 13
6TOOLS. . . . . . . . . . . . . . . . . . . . . . . . . . . . 13
7ORDERING SPARE PARTS. . . . . . . . . . . 13
8EXPLODED VIEW AND PARTS LISTS. 14
8.1Actuators BJ/B1J 8-20. . . . . . . . . . . . . . . . . . 14
8.2Actuators BJ/B1J 25-32. . . . . . . . . . . . . . . . . 15
8.3Actuators BJA/B1JA 8-20. . . . . . . . . . . . . . . 16
8.4Actuator BJA/B1JA 25-32. . . . . . . . . . . . . . . 17
9DIMENSIONS AND WEIGHTS. . . . . . . . 18
9.1Actuators BJ/B1J, BJA/B1JA. . . . . . . . . . . . . . 18
9.2Actuator BJR/B1JR. . . . . . . . . . . . . . . . . . . . . 18
9.3Mounting face dimensions. . . . . . . . . . . . . . 19
10TYPE CODING. . . . . . . . . . . . . . . . . . . . . 20
READ THESE INSTRUCTIONS FIRST!
These instructions provide information about safe handling and operation of the actuator.
If you require additional assistance, please contact the manufacturer or manufacturer’s representative.
Addresses and phone numbers are printed on the back cover.
SAVE THESE INSTRUCTIONS!
Subject to change without notice
All trademarks are property of their respective owners.
1GENERAL
1.1
Scope of the manual
These instructions provide essential information for the use of Metso Automation BJ and B1J series actuators. For more details about valves, positioners and accessories, refer to the separate installation, operating and maintenance instructions of the par-ticular unit.
1.2Structure and operation
The BJ and B1J series actuators are pneumatic cylinder actuators designed for control and shut-off service.
The linkage has PTFE, PE-HD and Glacier DU bearings. The robust cast-iron housing efficiently protects the mechanism from ambient dust and moisture.
The spring provides the required safety function; the valve either opens or closes if the air supply is interrupted.
The mounting face dimensions of the BJ actuator comply with the manufacturer ’s internal standard and those of the B1J with the ISO 5211 standard.
In the BJ type, the spring is located on the piston rod side. The secondary shaft of the actuator, operated by the spring, rotates clockwise as seen from the pointer cover side. The piston then moves towards the end of the cylinder. The BJ type is normally applied for the spring-to-close operation, as it normally closes in the clockwise direction. The two keyways in the secondary shaft are positioned at an angle of 90° to each other, making it possible to change the position of the actuator in relation to the valve,see Fig. 1.
In the BJA type, the spring is located in the cylinder end side. The secondary shaft, operated by the spring, rotates counter-clock-wise as seen from the pointer cover side. The piston moves away from the cylinder end. The BJA type is used for the spring-to-open function, see Fig. 1.
The size of the spring actuator is selected according to the torque given by the spring. It is, however, important to check that there is sufficient supply pressure to give the required torque in the opposite direction.
Screws are located in the upper end of the cylinder and in the lower end of the housing to regulate the length of the piston stroke and also the rotation angle of the actuator shaft.
1.3Actuator markings
The actuator is provided with an identification plate, see Fig. 2.Identification plate markings are:1.Type 2. PO number 3.Manufacturing date 4.Checked by 5. Max. supply pressure
1.4Specifications
Ambient temperature:
Standard design
-20° - + 70°C
Low temperature design -40° - + 70°C High temperature design -20° - +120°C Maximum supply pressure:8.5 bar/850 kPa Stroke volume, dm 3(liters):
BJ 80,9BJ 101,8BJ 123,6BJ 166,7BJ 2013BJ 2527BJ 3253BJ 322
106
BJ
BJA
valve closed
valve open
2 keyways
2 keyways
opening pressure closing pressure
valve closed
valve open
Fig. 1.Operating principle of the actuator
Fig. 2.Identification plate markings
3
(5)(1)
(2)
(4)
(3)
Nominal torque at maximum supply pressure, Nm:
BJ 870BJ 10150BJ 12300BJ 16600BJ 201200BJ 252400BJ 324800BJ 3229600NB. The torque changes according to supply pressure.
1.5
Recycling and disposal of a rejected actuator
Most actuator parts can be recycled if sorted according to material. Most parts have material marking. A material list is supplied with the actuator. In addition, separate recycling and disposal instructions are available from the manufacturer. An actuator can also be returned to the manufacturer for recycling and disposal against a fee.
1.6Safety precautions
CAUTION:
Don’t exceed the permitted values!
Exceeding the permitted pressure value marked on the actuator may cause damage and lead to uncontrolled pressure release in the worst case. Damage to the equipment and personal injury may result.
CAUTION:
Don’t dismantle a pressurized actuator!
Dismantling a pressurized actuator leads to uncontrolled pressure release. Shut off the supply pressure and release pressure from the cylinder before dismantling the actuator.Otherwise, personal injury and damage to equipment may result.
CAUTION:
Follow the instructions given on the actuator warning plates!
CAUTION:
Before opening the cylinder fastening screws,release spring tension directed on actuator warning plate and in these instructions!
CAUTION:
Don’t operate the actuator manually by turning from the lever arm!
CAUTION:
Don’t dismantle the spring package!
The spring package within the cylinder is preloaded. The lock-welded fastening screw of the piston must never be opened or the spring package dismantled. The piston, piston rod, spring and spring plate of the BJ actuator are always delivered as a pre-assembled package.
CAUTION:
Don’t use the lever in the torsion arm for manual operation when the actuator is pressurized!
Shut off the supply pressure and release pressure from the cylinder before using the hand lever. Note also the dynamic torque caused by the pipe flow.
Otherwise, personal injury and damage to equipment may result.
CAUTION:
Take the weight of the actuator or valve combination into account when handling it!
Do not lift the valve combination from the actuator,positioner or limit switch or their piping.Lift the actuator as directed in section 2,
lifting ropes for a valve combination should be fastened around it.Weights are listed in the table on page 18.
Dropping may result in personal injury or damage to equipment.
M β / M N
β °
BJA
Fig. 3.Output torque a a function of turning angle
M β / M N
β °BJ
4
2
TRANSPORTATION, RECEPTION AND STORAGE
Make sure that the actuator and associated equipment have not been damaged during transportation. Store the actuator carefully before installation, preferably indoors in a dry place. Do not take it to the installation site or remove the protective caps of ports for piping until just before installation.
Lift the actuator as shown in Fig. 4: in a horizontal position from the stop screws, in a vertical position from an eye bolt screwed in the place of a stop screw. Do not use the lug for lifting dual-cylinder actuators. Refer to page 18 for weights.
3MOUNTING AND DEMOUNTING 3.1
Actuator gas supply
Dry compressed air or natural gas can be used in actuators in open-close operation, no oil spraying is needed. Clean, dry and oil-free instrument air must be used for cylinder actuators with a positioner. The air supply connections are presented in the dimensional drawings on page 18. The maximum supply pressure is 8.5 bar.
3.2Mounting the actutor on the valve
CAUTION:
Take the weight of the actuator or valve combination into account when handling it!CAUTION:
Beware of the cutting movement of the valve!Install the actuator so that the shaft of the valve or any other device to be actuated goes into the shaft bore of the actuator.If the bore is larger than the shaft diameter, use a collar in between. The actuator shaft bore has two keyways at an angle of 90°. These allow the installation position of the actuator to be changed in relation to the valve. Metso Automation valves have a bevel at the end of their shafts to facilitate installation.
The installation position can be selected freely, but Metso Automation recommends installation with the cylinder upright.The actuator is thus best protected against damage due to supply air impurities or water.
When the installation position of the actuator is altered, the arrow indicating the operating direction must be turned to correspond with the actual operation of the valve.
When necessary, lubricate the actuator bore and collar with Cortec VCI 369 or an equivalent anti-corrosive agent to prevent it from jamming due to rust.
The actuator must not be allowed to come in contact with the pipework, because the vibrations may damage it or cause unsat-isfactory operation.
In some cases, e.g. when using large actuators or with extensive pipework vibrations, the actuator should be supported. Consult Metso Automation for instructions.
If the actuator is used with devices other than Metso Automation valves, any additional parts attached to the actuator must be
properly protected.
Fig. 4.
Lifting the actuator
Fig. 5.
Ways to install the actuator
5
3.3Operating directions A sticker on the actuator cylinder indicates the spring action direction.
NOTE:
Separate instructions are available for adjusting the close limit of metal-seated butterly valves. Refer to the installation,operating and maintenance instructions of the valve.
3.3.1BJ actuator -
spring-to-close direction
Install the actuator on the valve with the piston in the upper end of the cylinder and the valve in the closed position, see Fig. 6.The cylinder must be depressurized and the air ports open.Adjust the closed-position setting using the stop screw (26) at the end of the cylinder. Seal the screw thread with a non-hard-ening sealant, such as Locktite 225 or the equivalent. The open-position setting is adjusted with the stop screw (27) at the bottom of the housing while the actuator is pressurized and the piston is in the lower position.
3.3.2BJA actuator -
spring-to-open direction
Install the actuator on the valve with the piston in the lower end of the cylinder and the valve in the open position, see fig 7. The cylinder must be unpressurized and the air ports open. Adjust the open-position setting using the stop screw (27) at the end of the cylinder. The close-position setting is adjusted with the stop screw (26) at the end of the cylinder while the actuator is pressurized and the piston is in the upper position.
3.4Demounting the actuator from the valve
CAUTION:
Take the weight of the actuator or valve combination into account when handling it!CAUTION:
Beware of the cutting movement of the valve!The actuator must be depressurized and the supply air pipes disconnected. Unscrew the actuator-side screws of the bracket and pull the actuator off the valve shaft. This is best done using a specific extractor, see fig 8 and section 6 ’Tools ’.
Note the mutual positioning of the valve and the actuator to ensure correct functioning after reassembly.
4MAINTENANCE 4.1
General
CAUTION:
Note the precautions in section 1.6 before beginning work!
Under normal conditions, the actuators do not need regular maintenance. Maintenance procedures that the end user can do himself when necessary are described below.
Unless stated otherwise, the part numbers given refer to the exploded view and parts list in section 8.
In especially harsh corrosive conditions the linkage system inside the housing must be lubricated every six months. Use Cortec VCI 369 anti-corrosive agent or the equivalent. The housing may also be half filled with semi-fluid water-resistant grease (e.g.Mobilux EP2) while the piston rod is in the lower position.If you remove the stop screw, adjust the limits after lubrication or grease filling !
2 keyways Closed-position stop screw
Open position stop screw
80°90°
Fig. 6.BJ actuator
2 keyways Closed-position stop screw
Open position stop screw
80°90°
Fig. 7.BJA actuator
Fig. 8.
Removing the actuator with an extractor
6
4.2Maintenance of the BJ actuator
CAUTION:
Don ’t dismantle a pressurized actuator!
CAUTION:
To release spring tension, the stop screw at the end of the cylinder must be removed before the cylinder fastening screws are opened!
CAUTION:
Don ’t dismantle the spring package!
The spring package within the cylinder is preloaded. Never open the lock-welded fastening screw of the piston or dismantle the spring package. The piston, piston rod, spring and spring plate of the BJ actuator are always delivered as a pre-assembled package.
The cylinder has a warning plate (43). When servicing the unit, check that the plate is in place and legible. See Fig. 9. Also check that the
cylinder has the arrow sticker indicating the spring operating direction.
4.2.1Replacment of piston seals
We recommend that all seals and soft bearings be replaced when
the actuator has been dismantled for servicing.
Detach the actuator.
Check that the cylinder has been depressurized, and the piston is at the outermost end of the cylinder.Remove the cylinder end side stop screw (26).Remove cylinder end (44).Remove housing cover (2).
Unscrew the bearing screw (29) and the cylinder fastening screws (31) from the cylinder base (6) side, see Fig. 10. If the piston turns, do not prevent the turning with the piston fastening nut; send the entire actuator to the manufacturer to be repaired. It is very dangerous if the lock welding of the piston fastening nut is broken!
Remove the cylinder with the piston - do not dismantle the spring package!Remove the O-rings.
Slide the piston out of the cylinder.Remove old seals and O-rings (24, 18).
Remove piston rod seal (16) and bearing (22). Clean the seal space.
Lubricate seal space and new O-ring with Unisilikon L250L or Molykote III. Install new bearing and O-ring, see fig 11.Clean piston seal groove and apply a thin coat of Cortec VCI 369.
Install the O-ring (18) located under the piston seals.Place piston seals (24) around the piston so that the ends of the strips are located at opposite sides. Tighten the strips with a tie ring as in Fig. 12. Strips indicated with an asterisk can be cut 1.5 to 3 mm shorter to facilitate assembly.
NOTE:
The inside surface of the cylinder must be free of any grease!
1824
BJ 8-251824
BJ 32Fig. 9. Warning plate of the BJ actuator
Fig. 10.
Opening the fastening screw of the actuator bearing unit
(22)
Press the bearing strip like this to facilitate installation
(16)
Fig. 11. Mounting the piston rod bearing and seal
*)*)
*)
Fig. 12.Tightening piston seals with a tie ring
7
Hammer or press the piston into the cylinder through the tie ring. Note the indicator arrow direction. See Fig. 13.Install new O-rings (19). Replace cylinder end and install cylinder with piston. Note the location of the air supply port:it must correspond to the exhaust air port in the cylinder base. Tighten screws (31); the torque is given in table 1.Apply bearing unit screw (29) thread with a sealant, e.g.Locktite 225, and tighten the screw as in table 1.
Fasten the housing cover temporarily so that the secon-dary shaft bearings function but the linkage can still be seen, see Fig. 14.
CAUTION:
Keep your fingers, tools or other items out of the housing while operating the actuator with the cover open!
Check the attachment of the end and the base before temporarily connecting the compressed air supply to the actuator with a shut-off valve.
Operate the actuator to check cylinder function and the condition of linkage bearings. Close the air supply and depressurize the cylinder.
Lubricate the linkage throughout with Cortec VCI 369anti-corrosive agent.
Apply sealant, e.g. Loctite 573, to the interface between housing and cover and fasten the cover. See table 1 for torque.
Install the actuator on the valve and adjust the stop screws.
To remove the cylinder base, you will need a special tool for opening the lock nut, see section 6 ’Tools ’.
4.2.2Replacement of linkage bearings and O-rings
Detach actuator from valve.
Check that the cylinder has been depressurized, and the piston is at the outermost end.
Remove cylinder end side stop screw (26).Remove housing cover (2).
Open bearing unit (5) fastening screw (29). See Fig. 10.Turn lever arm (3) to detach the bearing unit from the piston rod (10). Lift the entire linkage out of the housing.See Fig. 15.
Remove lock rings (36) and support rings (37). See Fig.16.
Remove connection arms (4) and check the condition of the bearings (20, 21).
Torque, Nm Item 2829303135Actuator BJ 8BJ 10BJ 12BJ 16BJ 20BJ 25BJ 32
909018030070011002000
359018030070011002000
881212203070
1840808080200250
1501802002504008001500
Table 1.
Tightening torques for screws
Fig. 13.
Placing the piston in the cylinder
Fig. 14.
Mounting the cover on the housing Fig. 15.
Removing the linkage from the housing
Fig. 16.Dismantling the linkage
8
The connection arm (4) bearings (20, 21) of the BJ8-25 actuator are fastened with a press-on fit, and therefore the entire connec-tion arm must be replaced instead of changing the bearings. In the BJ32 actuator, the bearings can be removed.
Remove lever arm bearings (23) and O-rings (17).
Clean the linkage parts and apply Cortec VCI 369 to bearing and seal surfaces.
Install new lever arm bearings and O-rings.
Assemble the linkage and install in the housing; the correct position is shown in Fig. 15.
Apply sealant, e.g. Locktite 225, to the bearing unit screw (29) thread and tighten the screw as in table 1.
Lubricate the linkage throughout with Cortec VCI 369anti-corrosive agent.
Apply sealant, e.g. Loctite 573, to the interface between housing and cover and fasten the cover. See table 1 for torque.
Operate the actuator to check that it is moving properly.Install the actuator on the valve and adjust the stop screws.In a corrosive environment with high ambient humidity the linkage must be lubricated with Cortec VCI 369 every six months or the housing filled with grease. See section 4.1.
4.3Maintenance of the BJA actuator
CAUTION:
Don ’t dismantle a pressurized actuator!
CAUTION:
To release spring tension, always remove the stop screw at the bottom of the housing before opening the cylinder fastening screws !
The cylinder has a warning plate (43), see fig 17. When servicing the unit, check that the plate is in place and legible. Also check that the cylinder has the arrow sticker indicating the spring operating direction.
CAUTION:
Don ’t dismantle the spring package!
The spring pack within the cylinder is preloaded. Never open the lock-welded fastening screw or the piston or dismantle the spring package. The piston, piston rod, spring and spring plate of the BJA actuator are always delivered as a pre-assembled package.
4.3.1Replacement of piston seals
We recommended that all seals and soft bearings be replaced when the actuator has been dismantled for servicing.
Detach the actuator from the valve.
Check that the cylinder has been depressurized, and the piston is at the cylinder base end.
Remove the cylinder base side stop screw (27).
Remove cylinder fastening screws (31) from the cylinder base (6) side. Lift the cylinder off together with the end.Remove housing cover (2).
Turn the linkage enough to expose the bearing unit fastening screw (29). Open the screw.
Remove the piston with the spring package - do not dismantle the spring package!
Remove old seals and the O-ring (24, 18).
Remove piston rod seal (16) and bearing (22). Clean the seal space.
Lubricate seal space and new O-ring with Unisilikon L250L or Molykote III. Install new bearing and O-ring, see fig 11.Clean piston seal groove and apply a thin coat of Cortec VCI 369.
Install the O-ring (18) located under the piston seals.Place piston seals (24) around the piston so that the ends of the strips are at opposite sides. Tighten the strips with a tie ring as in Fig. 18. Strips indicated with an asterisk can be cut 1.5 to 3 mm shorter to facilitate assembly.
NOTE:
The inside surface of the cylinder must be free of any grease!
Fig. 17.BJA actuator warning plate
Fig. 18.Tightening piston seals with the tie ring
1824
BJA 8-25*)
1824
BJA 32
*)
*)
9
Hammer or press the piston into the cylinder through the tie ring. Note the indicator arrow direction. See Fig. 19.Install new cylinder base O-rings (19). Replace cylinder with piston.
Apply sealant, e.g. Locktite 225, to the bearing unit screw (29) thread and tighten the screw as in table 1 before mounting onto cylinder base.
Fasten the housing cover temporarily so that the secon-dary shaft bearings function but the linkage can be seen.CAUTION:
Keep your fingers, tools or other items out of the housing while operating the actuator with the cover open!
Check the attachment of the end and the base before temporarily connecting the compressed air supply to the actuator with a shut-off valve.
Operate the actuator to check cylinder function and the condition of bearings. Close the air supply and depressur-ize the cylinder.
Lubricate the linkage throughout with Cortec VCI 369anti-corrosive agent.
Apply sealant, e.g. Loctite 573, to the interface between housing and cover and fasten the cover. See table 1 for torque.
To remove the cylinder base, you will need a special tool for opening the lock nut, see section 6 ’Tools ’. When reinstalling,secure the nut with Loctite 225.
Install the actuator on the valve and adjust the stop screws.
4.3.2Replacement of linkage bearings and O-rings
CAUTION:
For reasons of safety, follow the work procedure given below exactly.
Detach actuator from valve.
Check that the cylinder has been depressurized, and the piston is at the cylinder base end.
Remove cylinder base stop screw (27).Remove housing cover (2).
Open cylinder fastening screws (31) from the base side.Lift cylinder and piston until the bearing unit fastening screw (29) can be opened.
Open fastening screw. See Fig. 10.
Turn lever arm (3) to detach the bearing unit (5) from the piston rod. Lift the entire linkage out of the housing. See Fig. 15.Remove lock rings (36) and support rings (37). See Fig. 16.Remove connection arms (4) and check the condition of the bearings (20, 21).
The connection arm (4) bearings (20, 21) of the BJ8-25 actuator are fastened with a press-on fit, and so the entire connection arm must be replaced instead of changing the bearings. In the BJ32actuator, the bearings can be removed.
Remove lever arm bearings (23) and O-rings (17).
Clean linkage parts and apply Cortec VCI 369 to bearing and seal surfaces.
Install new lever arm bearings and O-rings.Assemble the linkage and install in the housing.
Apply sealant, e.g. Locktite 225, to bearing unit screw (29)thread and tighten the screw as in table 1.
Install new cylinder base O-ring (19). Install the cylinder.Apply Cortec VCI 369 anti-corrosive agent to the linkage throughout.
Apply sealant, e.g. Loctite 573t, to the interface between housing and cover, and fasten the cover.
Operate the actuator to check that it is moving properly.Install the actuator on the valve and adjust the stop screws.In a corrosive environment with high ambient humidity the linkage must be lubricated with Cortec VCI 369 about every six months, or the housing filled with grease. See section 4.1.
4.4
Changing the BJ actuator into a BJA actuator
The BJ actuator can be changed into a BJA actuator by replacing the spring package and turning the cylinder the other way around.
4.4.1Removing the cylinder
Remove the cylinder as in section 4.2.1.
4.4.2Changing the spring package
Replace the spring package of the BJ actuator with a BJA spring package ordered from the manufacturer. The cylinder must be turned 180°. See Fig. 20.
NOTE:
The warning plate of the cylinder must also be changed to
correspond with the BJA actuator!
Fig. 19.
Placing the piston in the cylinder
Fig. 20.Turning the cylinder
10
4.4.3Assembling the actuator
Assemble the actuator as in section 4.3.1.
4.5BJR and BJAR actuators
4.5.1BJR actuator
The BJR actuator is otherwise like the BJ except that it can be operated manually to bring the piston to the lower position against the spring in case there is no air supply. The BJ actuator can be changed into a BJR by replacing the cylinder end (44) accordingly and adding parts (50 to 56).
4.5.1.1Maintenance
CAUTION:
To release spring tension, always remove the threaded spindle and spindle nut at the cylinder end before opening the cylinder fastening screws!
The cylinder has a warning plate (43), see fig 21. When servicing the unit, check that the plate is in place and legible. Also check that the cylinder has the arrow sticker indicating the spring operating direction.
If air escapes between the spindle (50) and spindle nut (51), check the O-ring (54) and replace it if necessary. Also check the condition of the cylindrical rollers (56). See Fig. 22. Other maintenance as described for the BJ actuator in section 4.2.Parts list for Fig. 22:
Part Quantity Name
501Spindle
511Spindle nut
521Hand wheel
531Lock nut
541O-ring
551Spring pin
561Cylindrical roller
4.5.1.2Valve close and open position adjust-
ment
In the BJR actuator, unlike in the BJ, the upper valve position limit is adjusted with the spindle nut (51) secured with the lock nut (53). During adjusting, the spindle (50) must be in the extreme outer position.
4.5.2BJAR actuator
The BJAR actuator is otherwise like the BJA, except that it can be operated manually to bring the piston to the upper position against the spring in case there is no air supply. The BJA actuator can be changed into a BJAR by replacing the housing (1) and adding parts (50 to 56), see Fig. 24.
To make the change, the actuator must be dismantled, see section 4.3.2. A special tool is needed to unscrew and fasten the lock nut (35) fastening the cylinder base to the housing. See chapter 6 ’Tools’.
4.5.2.1Maintenance
CAUTION:
To release spring tension, always remove the threaded spindle and spindle nut at the cylinder end before opening the cylinder fastening screws!
The cylinder has a warning plate (43). When servicing the unit, check that the plate is in place and legible, see Fig. 23. Also check that the cylinder has the arrow sticker indicating the spring
operating direction.
If stiffness or noise occurs when the actuator is operated with the
handwheel, check the condition of the bearings (56), see Fig. 24.
Other maintenance as described for the BJA actuator in section 4.3. Fig. 21.BJR actuator warning plate
Fig. 22.BJR actuator
Fig. 23.BJAR actuator warning plate
11
Parts list for Fig. 24:Part Quantity Name 11Housing 501Spindle 511Spindle nut 521Hand wheel 531Lock nut 541O-ring 551Spring pin
56
1
Cylindrical roller
4.5.2.2Valve close and open position
adjustment
In the BJAR actuator, unlike in the BJA, the lower valve position limit is adjusted with the spindle nut (51) secured with the lock nut (53). During adjusting, the spindle (50) must be in the extreme outer position.
4.6BJV and BJK actuators
The actuators are otherwise like the BJ, except the BJV has a more powerful spring yielding a 1.3 times higher torque, but also requiring a higher supply pressure (5 bar/500 kPa). The BJK has a lighter spring yielding a 0.7 times lower torque and reducing the supply pressure requirement. See section 10 ’Type designa-tion ’.
4.6.1Maintenance
See section 4.2 ’Maintenance of the BJ actuator ’.
4.7BJVA and BJKA actuators
The actuators are otherwise like the BJA, except the BJVA has a more powerful spring yielding a higher torque, but also requiring a higher supply pressure. The BJKA has a lighter spring yielding a lower torque and reducing the supply pressure requirement. See chapter 10 ’Type designation ’.
4.7.1Maintenance
See section 4.3 ’Maintenance of the BJA actuator ’.
4.8
BJ 322 and BJA 322 actuators
In principle, the structure of the BJ 322 and BJA 322 actuators is similar to that of the BJ or BJA actuators, respectively. To obtain a high operating torque, these devices are, however, equipped with two cylinders connected via a linkage to the secondary shaft.See section 10 ’Type designation ’.
4.8.1Maintenance
See section 4.2 or 4.3 respectively.
Fig. 24.
BJAR actuator
12
5MALFUNCTIONS Table 2 lists malfunctions that might occur after prolonged use.
6TOOLS
For maintenance of the actuator, you will need a few special tools in addition to the usual ones. The following can be ordered from the manufacturer:
For actuator removal:- Extractor
For piston seal installation:- Tie ring
For cylinder base removal:- Lock nut key
7ORDERING SPARE PARTS
NOTE:
Use only original spare parts. This ensures proper functioning of the actuator.
When ordering spare parts, always give the following informa-tion:
Type marking indicated on the identification plate and in the relevant documents
number of parts list, part number and quantity, or
the number of these instructions, part number , name and quantity
serial number if the type designation contains the letter Y.
Symptom
Possible fault
Action
Irregular or slow operation
Low supply pressure
Make sure that supply pressure complies with minimum torque required by valve.
Check that supply air pipes are large enough.Positioner fault Check positioner operation.
Valve fault
Check that valve functions properly without actuator.
Incorrect actuator rating
Contact manufacturer to check rating.Leak in piston or piston rod seal Replace seals. See sect. 4.2.1 or 4.3.1,depending on actuator type.
Cylinder damaged by impurities Note installation position recommendation. Replace cylinder if damaged.
Worn-out actuator bearings
Check bearings as in sections 4.2.2 or 4.3.2,depending on actuator type.
Replace bearings when necessary. If operating density is high, bearings and piston seals must be replaced regularly: max. 500,000 operations.Linkage corroded in harsh, humid conditions
Clean linkage and replace bearings.
When necessary lubricate housing or fill with grease regularly as in section 4.1. If water occurs in housing, an outlet hole (? 5 mm)can be bored in lower part of housing.Bearing unit fastening screw loose
Tighten screw. Seal e.g. with Loctite 225.Backlash in joint between actuator and valve
Replace parts as necessary.
Table 2.Possible malfunctions
13
8EXPLODED VIEW AND PARTS LISTS 8.1
Actuators BJ/B1J 8-20
Item Qty Description Recommended spare 11Housing
21Cover
31Lever arm
4 2Connection arm and bearings
51Bearing unit
61Cylinder base
71Pointer cover
81Cylinder
9*)1Piston
10*)1Piston rod
11*)1Spring
12*)1Spring plate
13*)1Ring
14*)2Lock ring
15*)1Hexagon nut
161O-ring x
172O-ring x
181O-ring x
191O-ring x
20 **)2Bearing x
21 **)2Bearing x
221Bearing x
232Bearing x
243Piston seal x Item Qty Description
252Bushing
261Stop screw
271Stop screw
291Screw
304Screw
318, 12Screw
322Screw
331Nut
341Nut
351Lock nut
362Lock ring
372Support ring
391ID plate
401Filter
414Plug
421Plug
431Warning plate
441Cylinder end
581Pressure outlet valve 611Direction arrow
621Screw
*) Delivered as a set
**) Parts 4, 20 and 21 delivered as a set
14
8.2
Actuators BJ/B1J 25-32
Item Qty Description Recommended spare 11Housing
21Cover
31Lever arm
4 2Connection arm and bearings
51Bearing unit
61Cylinder base
71Pointer cover
81Cylinder
9*)1Piston
10*)1Piston rod
11*)1Spring
12*)1Spring plate
13*)1Ring
14*)2Lock ring
15*)1Hexagon nut
161O-ring x
172O-ring x
181O-ring x
191O-ring x
20 **)2Bearing x
21 **)2Bearing x
221, 2Bearing x
232Bearing x
243, 4Piston seal x
252Bushing Item Qty Description
261Stop screw
271Stop screw
291Screw
304Screw
316Stud
322Screw
331Nut
341Nut
351Lock nut
362Lock ring
372Support ring
391ID plate
401Filter
414Plug
421Plug
431Warning plate
441Cylinder end
456Nut
466Washer
581Pressure outlet valve
611Direction arrow
621Screw
*) Delivered as a set
**) Parts 4, 20 and 21 delivered as a set, actuator size 25
15
8.3
Actuators BJA/B1JA 8-20
Item Qty Description Recommended spare 11Housing
21Cover
31Lever arm
4 2Connection arm and bearings
51Bearing unit
61Cylinder base
71Pointer cover
81Cylinder
9*)1Piston
10*)1Piston rod
11*)1Spring
12*)1Spring plate
13*)1Clamping tube
15*)1Hexagon nut
161O-ring x
172O-ring x
181O-ring x
191O-ring x
20 **)2Bearing x
21 **)2Bearing x
221Bearing x
232Bearing x
243Piston seal x Item Qty Description
252Bushing
261Stop screw
271Stop screw
291Screw
304Screw
318, 12Screw
322Screw
331Nut
341Nut
351Lock nut
362Lock ring
372Support ring
391ID plate
401Filter
414Plug
421Plug
431Warning plate
441Cylinder end
581Pressure outlet valve 611Direction arrow
621Screw
*) Delivered as a set
**) Parts 4, 20 and 21 delivered as a set
16
8.4Actuator BJA/B1JA 25-32
Item Qty Description Recommended spare 11Housing
21Cover
31Lever arm
4 2Connection arm and bearings
51Bearing unit
61Cylinder base
71Pointer cover
81Cylinder
9*)1Piston
10*)1Piston rod
11*)1Spring
12*)1Spring plate
13*)1Clamping tube
15*)1Hexagon nut
161O-ring x
172O-ring x
181O-ring x
191O-ring x
20 **)2Bearing x
21 **)2Bearing x
221, 2Bearing x
232Bearing x
243, 4Piston seal x
252Bushing Item Qty Description
261Stop screw
271Stop screw
291Screw
304Screw
316Stud
322Screw
331Nut
341Nut
351Lock nut
362Lock ring
372Support ring
391ID plate
401Filter
414Plug
421Plug
431Warning plate
441Cylinder end
456Nut
466Washer
581Pressure outlet valve 611Direction arrow 621Screw
*) Delivered as a set
**) Parts 4, 20 and 21 delivered as a set, actuator size 25
17
18
9DIMENSIONS AND WEIGHTS 9.1Actuators BJ/B1J, BJA/B1JA
9.3
Mounting face dimensions BJ 8...32; B1J 8 (25)
BJ 322; B1J 32, 322
B
DIRECTION A-A DIRECTION B-B
Actua
tor
BJ, B1J*BJ B1J
BJ O
(H8)M P K
(keyway)
L S U
(UNC)
N S U N Mounting
face
815
20
25
354.76
4.76
6.35
9.52
17.0
22.3
27.3
39.3
5090801/2-
13
470M84F07
1020
25
35
404.76
6.35
9.52
9.52
22.3
27.9
39.3
44.4
60105801/2-
13
4102M104F10
1225
35
40
556.35
9.52
9.52
12.7
27.9
39.3
44.4
60.8
751301205/8-
11
4125M124F12
1635
40
45
559.52
9.52
12.7
12.7
39.3
44.4
50.6
60.8
801201205/8-
11
4140M164F14
Actua tor BJ, B1J*BJ B1J*
BJ O
(H8)
M P K
(keyway)
L S U
(UNC)
N S U N Mounting
face
2055
70
12.7
19.0
60.8
78.3
1051951453/4-
10
4140M164F14
2570
85
95
19.05
22.22
22.22
78.3
94.8
105.5
1402351801-84165M164F16
3285
95
105
22.22
22.22
25.4
94.8
105.0
116.3
155********/4-
7
4254M168F25
32295
105
120
22.22
25.4
31.75
105.0
116.3
133.9
180********/4-
7
8298M208F30
*) B1J = ISO 5211 mounting face
19
10TYPE CODING
e n
1. sign Product group
B Cylinder actuator with attachment dimensions acc. to Metso Automation standard
B1Cylinder actuator with attachment dimensions acc. to ISO 5211
2. sign Series
J Pneumatic, spring-return
3. sign Spring option
-Standard construction without sign K Light spring (0,7 x nominal torque)V Strong spring (1,3 x nominal torque)
4. sign Function code
-Spring-to-close operation without sign A Spring-to-open operation
5. sign Construction
-Standard construction without sign
R Secondary handwheel for manual operation (sizes 8- 16)RR Secondary handwheel with wormgear (sizes 20 - 32)H Manual hydraulic override
6. sign Cylinder and housing materials
-Aluminium cylinder and GG-20 housing, standard without sign S Steel cylinder and GG-20 housing B Aluminium cylinder and GGG-40 housing X Steel cylinder and GGG-40 housing
7. sign Special construction
-Standard construction without sign
Q Mechanical locking device for piston movement limit on housing end. Locking with long screw to close position
W Mechanical locking device for piston movement limit on cylinder end. Locking with long screw to open position
QW Mechanical locking device for piston movement limit on housing and cylinder ends. Locking with long screws to close as well as to open position PP
Actuator equipped with automatic latching device for open position in series BJ and B1J and for closed position in series BJA and B1JA allowing about 20degrees’ motion.
T Actuator equipped with manual latching device. Actuator can be locked to open position allowing about 20 degrees motion.Y Special construction
8. sign VDI / VDE 3845
U Attachment dimensions according to VDI/VDE 3845
9. sign
Actuator size
E.g. 20/50 = actuator size / shaft bore diameter
10. sign Materials of seals and bearings
-Standard construction without sign (-20...+70 ?C)
O-rings: Nitrile rubber. Bearings and piston seals: PE-HD
H High temperatures (-20...+120 ?C).
Dynamic O-rings: Fluorocarbon rubber. Bearings and piston seals: PTFE + C25C Low temperatures (-40...+70 ?C).
Dynamic O-rings: Epiclohydrin rubber. Bearings and piston seals: PTFE + C25
11. sign Screw material
-Steel, zinc coated and passivated. Standard, without sign
E Stainless steel
12. sign Non-standard operation range
X Valve closed position is limited to a given angle. E.g. X=30 (never fully closed).Z
Valve open position is limited to a given angle. E.g. Z=70 (never fylly open).
Pneumatic spring-return cylinder actuator, BJ/B1J
1.
2.
3.
4.
5.
6.
7.
8.
9.
10.
11.
12.
B J
K A R S Y U 20 / 55H E Z
20
Metso Automation Inc.
Europe, Levytie 6, P.O. Box 310, 00811 Helsinki, Finland. Tel. +358 20 483 150. Fax +358 20 483 151
North America, 44 Bowditch Drive, P.O. Box 8044, Shrewsbury, MA 01545, USA. Tel. +1 508 852 0200. Fax +1 508 852 8172
Latin America, Av. Central, 181-Chácaras Reunidas,12238-430 S?o José dos Campos, SP Brazil.
Tel. +55 123 935 3500. Fax +55 123 935 3535
Asia Pacific, 501 Orchard Road, #05-09 Wheelock Place, 238880 Singapore. Tel. +65 673 552 00. Fax +65 673 545 66
Middle East, Roundabout 8, Unit AB-07, P.O. Box 17175, Jebel Ali Freezone, Dubai, United Arab Emirates.
Tel. +971 4 883 6974. Fax +971 4 883 6836
https://www.360docs.net/doc/f43504265.html,
ABB定位器说明书
A B B定位器说明书-CAL-FENGHAI.-(YICAI)-Company One1
ABB智能定位器故障判断 1、气缸给信号不动:将运行操作模式设为(手动),通过操作增加和 减少键,观察OUT1和OUT2是否有输出。两个孔有交替输出,则问题出在气缸或负载;若只有一个孔输出或两个孔同时输出或一个孔常输出,则是定位器内器件有杂质卡塞,需更换定位器。 2、位置反馈信号不正常:用万用表带载测量31、32端子直流电压,应 在17-23V之间,电压在这个范围内,一般为反馈电路板问题;电压不在这 个范围内,故障出在 DCS接口或传输导线上。 3、液晶无显示:用万用表带载测量11、12端子直流电压,观察电压正负极是 否接线正确,没问题需要确定11 、12端子电压是否在之间,电压在这个范围内,一般为主板问题;电压不在这个范围内,故障出在DCS接口或传输导线上。 4、执行机构振荡:检查OUT1和OUT2至气缸入口管接头是否漏气;将运行操 作模式设为(手动),检查OUT1和OUT2是否有一个口总是漏气,如果总是有漏气,可能定位器阀体内部有轻微堵塞。如果定位器并无漏气,但在手动操作时,有一端出气量在正常开和加速开的操作中无变化,这时同样会引起振荡,这种故障需要将定位器用菜单P11选项恢复出厂设置,再重新自整定。 5、定位器无法自整定:自整定时在屏幕上显示这表示电角度不 在规定范围内,这要求安装时需注意,如下图画圈处所示,不要超出指示范围。 ABB TZID-C智能定位器安装及操作说明书 (仅供调试维修人员使用参考) ※气动连接 ·使用与定位器气源端口处标识的标准接口连接气源 ·连接定位器的输出与气动执行器的气缸 ※电气连接 ※调试步骤 1. 接通气源,检查减压阀后压力是否符合执行器的铭牌参数要求(定位器的最大供气压力 为7Bar,但实际供气压力必须参考执行器所容许的最大气源压力); 2. 接通4---20mA输入信号。(定位器的工作电源取自输入信号,由DCS二线制供电,端电 压为左右,不能将DC24V直接加至定位器,否则有可能损坏定位器电路); 3. 检查位置反馈杆的安装角度(如定位器与执行器整体供货,则由执行器供货商安装调试
ABB定位器中文说明书
气路连接 ?使用与定位器气源端口处标识的标准接口连接气源 ?连接定位器的输出与气动执行器的气缸 电气连接 根据下列接线端子图以及设计要求进行相应的配线(一般只需+11,-12,+31,-32) +11 -12 控制信号输入端子(DC4---20mA,负载电阻Max.410欧姆) +31 -32 位置返馈输出端子(DC4---20Ma,DCS+24V供电) +41 -42 全关信号输出端子(光电耦合器输出) +51 -52 全开信号输出端子(光电耦合器输出) +81 -82 开关信号输入端子(光电耦合器输入) +83 -84 报警信号输出端子(光电耦合器输出) +41 -42 低位信号输出端子(干簧管接点输出,5---11VDC, <8 mA) +51 -52 高位信号输出端子(干簧管接点输出,5---11VDC, <8 mA) 调试步骤 1.接通气源,检查减压阀后压力是否符合执行器的铭牌参数要求(定位器的最大供气 压力为7BAR,但实际供气压力必须参考执行器所容许的最大气源压力)。 2.接通4---20mA输入信号。(定位器的工作电源取自输入信号,由DCS二线制供 电,不能将DC24V直接加至定位器,否则有可能损坏定位器电路)。 3.检查位置返馈杆的安装角度(如定位器与执行器整体供货,则已经由执行器供货 商安装调试完毕,只需作检查确认,该步并非必须): ?按住MODE键。 ?并同时点击?或?键,直到操作模式代码1.3显示出来。 ?松开 MODE键。 ?使用?或?键操作,使执行器分别运行到两个终端位置,记录两终端角度 ?两个角度应符合下列推荐角度范围(最小角位移20度,无需严格对称)直行程应用范围在 -28o--- +28o 之内。 角行程应用范围在 -57o--- +57o 之内。 全行程角度应不小于25o 4.切换至参数配置菜单 ?同时按住?和?键 ?点击ENTER键 ?等待3秒钟,计数器从3计数到0 ?松开?和?键 程序自动进入P1.0配置菜单。 5.使用?和?键选择定位器安装形式为直行程或角行程。 角行程安装形式:定位器没有返馈杆,其返馈轴与执行器角位移输出轴同轴心
Fisher定位器使用说明书
Fisher定位器使用说明书 一、Fisher定位器调校基本步骤 1.将375手操器连接到接线端子上,进入菜单 选择 Setup(设置)→Basic setup(基本设置)→Auto setup(自动设 置)→Setup wizard(设置向导) 2.根据Setup wizard的提示选择相应的参数 ⑴instrument mode is in service ,continue for prompts to please out of service. 仪表模式是在线状态,继续须要准时设置为离线状态 选择 Yes. ⑵output will not track input when instrument mode is out of service. 当仪表在离线状态时,仪表的输出将不随输入的变化而变化 选择Yes. ⑶change to out of service to continue. 继续需改变为离线模式 选择out of service 选择enter 说明:仪表正常工作时其模式为in service状态,当对仪表进行调 校时需改为out of service状态。 ⑷Tru/Press select 行程/压力选择 选择Travel control ⑸Pressure units 压力单位 选择psi ⑹Max supply press 最大供气压力 此时输入的最大供气压力值应与空气过滤减压阀的输出压力一致,此 值不宜过大,过大,阀门易损坏,超行程。应调整空气过滤减压阀使 阀门刚好全行程,这时输入此时的压力值。 ⑺Actuator manufacturer 执行机构制造商 选择Fisher controls ⑻Actuator model 执行机构型号 查看阀体上的铭牌,有此执行机构型号,选择相应型号,如667,1035, 1051等。 ⑼Actuator size 执行机构尺寸 查看阀体上的铭牌,有此执行机构尺寸,选择相应尺寸,如30,34, 40,45,50,46,60,70,100等。 ⑽setup wizard is ready to send config to the Drc6000 选择send ⑾use factory default 使用工厂默认,选择Yes. ⑿To finish setting up the value run Auto Travel Calib 完成阀门设置运行自动行程调校,选择OK. ⒀Warning! Calibration will cause sudden changes in instrument output , continue?
罗托克中文说明书
电动执行机构IQ系列 安装和维护手册 出版物编号 E170C2 出版日期 .
Rotork设定器可按现场要求对执行器的控制、指示、保护功能进行设定。所有的执行器在投入使用前,有必要检查其与过程控制系统要求的兼容性。请阅读本手册。 当Rotork工作人员或指定代理商按照合同规定进行现场调试或/和验收时,执行器组态的相关文件应让客户留档备查。
本手册提供如下介绍: * 手动和电动(就地和远程)操作。 * 执行器的准备和安装。 * 根据有关阀门正确操作的要求,对执行器进行初级设定。 * 根据现场具体控制和指示的要求,对执行器进行二级设定。 * 维护 - 故障排除。 * 销售和服务。RotorkIQ系列执行器- 全世界首家推出无需打开电气端盖即可进行调试和查询的阀门执行器。 使用所提供的红外线设定器进入执行器的设定程序,即使在危险区域,也可安全、快捷地对力矩值、限位以及其它所有控制和指示功能进行设定。IQ的设定和调整在执行器主电源接通和断开时均可完成。 标准诊断功能可对控制系统、阀门和执行器的状态进行诊断,并通过执行器的显示屏上的图标和帮助屏幕来显示。 按一下设定器的按键即可在显示屏上对相应阀位的瞬时力矩进行监视。 内置的数据记录器可获取操作和阀门力矩数据,可提醒用户根据需要对阀门进行维护。运行于PC机的IQ Insight软件和/或Rotork本安型通讯器可访问数据记录器,可对执行器的所有功能进行组态和记录。 执行器是否带有设定器,可根据接线端子箱盖上的黄色标签来识别。 有关Rotork IQ和其它系列执行器的资料,可浏览我们的网站。
目录 页码 1 健康与安全 2 2 保存 3 3 IQ系列执行器的操作 3 手动操作 3 电动操作 3 执行器的显示- 4 阀位指示 执行器的显示- 5 报警指示 4 准备驱动轴套7 4.1 IQ7至IQ3 5 7 A和Z型推力底座 4.2 IQ7至IQ35 7 B型非推力底座 4.3 IQ40至IQ95 8 A和Z型推力底座 4.4 IQ40至IQ95 9 B型非推力底座5 执行器的安装 10 提升杆式阀门- 11 顶部安装 带齿轮箱的阀门- 11 侧面安装 非提升杆式阀门- 11 顶部安装 手轮密封 11 IQM调节型执行器 12 IQML线性推力装置 12 IQML线性行程的调整 12 6 接线 14 地线的连接 14 端子箱盖的拆卸 14 电缆入口 14 端子的接线 15 端子箱盖的复位 15 7 设定 16 设定程序 16 设定器 17 进入设定程序 18 设定方式-口令 18 新口令 18 检查方式 18 程序路径分支- 19 分支点 (Cr) 7.8 执行器的显示 19 设定 / 检查方式 返回阀位指示 19 8 设定- 初级设定功能 20 初级设定功能目录 21 9 设定 - 二级设定功能 30 二级设定功能目录 30 10 维护和故障排除 61 帮助显示 63 IrDA诊断和组态 68 11 重量和尺寸 70 二进制、十六进制、十进制 71 换算表
什么是执行机构执行机构
执行机构讲义 执行机构讲义 一、执行机构的由来 执行机构,又称执行器,是一种自动控制领域的常用机电一体化设备(器件),是自动化仪表的三大组成部分(检测设备、调节设备和执行设备)中的执行设备。主要是对一些设备和装置进行自动操作,控制其开关和调节,代替人工作业。按动力类型可分为气动、液动、电动、电液动等几类;按运动形式可分为直行程、角行程、回转型(多转式)等几类。由于用电做为动力有其它几类介质不可比拟的优势,所以电动型近年来发展最快,应用面较广。电动型按不同标准又可分为:组合式结构和机电一体化结构;电器控制型、电子控制型和智能控制型(带HART、FF协议);数字型和模拟型;手动接触调试型和红外线遥控调试型等。它是伴随着人们对控制性能的要求和自动控制技术的发展而迅猛发展的: 1.早期的工业领域,有许多的控制是手动和半自动的,在操作中人体直接接触工业设备的危险部位和危险介质(固、液、气三态的多种化学物质和辐射物质),极易造成对人的伤害,很不安全; 2.设备寿命短、易损坏、维修量大; 3.采用半自动特别是手动控制的控制效率很低、误差大,生产效率低下。 基于以上原因,执行机构逐渐产生并应用于工业和其它控制领域,减少和避免了人身伤害和设备损坏,极大的提高了控制精确度和效率,同时也极大提高了生产效率。今年来随着电子元器件技术、计算机技术和控制理论的飞速发展,国内外的执行机构都已跨入智能控制的时代。 二、执行机构的英文名:ACTUATORS 三、执行机构的应用领域 执行机构主要应用在以下三大领域: 1.发电厂 典型应用有: ①火电行业应用 送风机风门挡板一次进风风门挡板空气预热风门挡板烟气再循环旁路风门挡板二次进风风门挡板主风箱风门挡板燃烧器调节杆燃烧器摇摆驱动器液压推杆驱动器叶轮机调速烟气调节阀蒸气调节阀 球阀和蝶阀控制滑动门闸门 ②其它电力行业的阀门执行器应用 球阀除尘控制喷水叶轮机转速控制控制大型液压阀燃气控制阀燃烧器点火启动蒸气控制阀冷凝水再循环, 脱氧机,锅炉给水,过热控制器,再加热恒温控制器,及其它相关阀门应用 2.过程控制 用于化工、石化、模具、食品、医药、包装等行业的生产过程控制,按照既定的逻辑指令或电脑程序对阀门、刀具、管道、挡板、滑槽、平台等进行精确的定位、起停、开合、回转,利用系统检测出的温度、压力、流量、尺寸、辐射、亮度、色度、粗糙度、密度等实时参数对系统进行调整,从而实现间歇、连续和循环的加工过程的控制。 3.工业自动化 用于较为广泛的航空、航天、军工、机械、冶金、开采、交通、建材等方面,对各类自动化设备和系统的运动点(运动部件)进行各种形式的调节和控制。 过程控制和工业自动化方面的主要应用举例如下: ①在硫矿生产中的应用 注水流量控制球阀和碟阀控制 ②碳酸钾管道阀门执行器的应用 滑动门分流器闸门球阀和蝶阀球型控制阀
天伯执行机构调试
天津—伯纳德SD系列角行程电动执行机构调试方法 转动手轮至阀开中间的位置,开关放在“手动”(MAN)位置上,将就地手动控制电位器P1预先旋到中间位置上。通电后,执行器转到P1预定的位置。 打开行程控制箱盖,可见电位器凸轮机构。凸轮盘内装4片不同颜色和编号的凸轮片。下面的4和3(蓝色和黑色)为控制起始点和中点的两片凸轮。若调整阀关位置,用电笔对准凸轮板面上的 4号调整螺丝槽,向下推并朝关方向转动凸轮片,直到凸轮凸起部分刚好压动关位置行程开关。用同样的方法,调整3号凸轮,使之刚好压动开位置行程开关。 (0%)零位的调整 将自/手开关拨到“手动”(MAN)位置,转动P1电位器至0%位置的止端,使执行器朝“关”方向转动。 如果在转至“关”向行程限位开关之前就停止,松开电位器三个螺丝,缓慢转动电位器则执行机构跟随转动直到执行器带动的凸轮至“关”方向限位开关前停止,发光二极管LED刚好灭掉,重新将电位器三个螺丝紧固。 假如执行机构向“关”方向转动,在转至“关”位置时仍继续转动(即使“关”方向行程限位开关动作执行器不转动了,但红色发光二极管仍然亮),这种情况下,将电位器朝另一个方向缓慢转动直到发光二极管刚好灭掉为止,重新将电位器三个螺丝紧固。 (100%)满度位置调整 将电位器P1转至100%位置的止端,执行机构朝“开”方向转动。如果执行器向“开”方向运行在未到位置行程开关之前就停止
(发光二极管已灭掉)时,则可顺时针转动满度调整电位器P2,直至执行器转动到“开”方向行程开关即可。 假若执行器向“开”方向转动,在转至“开”位置时仍没有停止,此时可逆时针转动P2电位器直到绿色发光二极管灭掉。 上述调整完毕后,则可将“自/手”开关置于自动(AUT)位置上,接入信号为4mA时执行机构转至0%位置;信号为20mA时执行机构则应转动到100%位置;信号在4~20mA变化时执行机构则应按比例运行。
ABB定位器说明书Word版
ABB智能定位器故障判断 1、气缸给信号不动:将运行操作模式设为 1.3(手动),通过操作增加和减少键,观察OUT1 和OUT2是否有输出。两个孔有交替输出,则问题出在气缸或负载;若只有一个孔输出或两个孔同时输出或一个孔常输出,则是定位器内器件有杂质卡塞,需更换定位器。 2、位置反馈信号不正常:用万用表带载测量31、32端子直流电压,应在17-23V之间,电 压在这个范围内,一般为反馈电路板问题;电压不在这个范围内,故障出在 DCS接口或传输导线上。 3、液晶无显示:用万用表带载测量11、12端子直流电压,观察电压正负极是否接线正确, 没问题需要确定11 、12端子电压是否在8.2-8.7V之间,电压在这个范围内,一般为主板问题;电压不在这个范围内,故障出在DCS接口或传输导线上。 4、执行机构振荡:检查OUT1和OUT2至气缸入口管接头是否漏气;将运行操作模式设为 1.3 (手动),检查OUT1和OUT2是否有一个口总是漏气,如果总是有漏气,可能定位器阀体内部有轻微堵塞。如果定位器并无漏气,但在手动操作时,有一端出气量在正常开和加速开的操作中无变化,这时同样会引起振荡,这种故障需要将定位器用菜单P11选项恢复出厂设置,再重新自整定。 5、定位器无法自整定:自整定时在屏幕上显示这表示电角度不在规定范 围内,这要求安装时需注意,如下图画圈处所示,不要超出指示范围。 ABB TZID-C智能定位器安装及操作说明书 (仅供调试维修人员使用参考) ※气动连接 ·使用与定位器气源端口处标识的标准接口连接气源 ·连接定位器的输出与气动执行器的气缸 ※电气连接 ※调试步骤 1. 接通气源,检查减压阀后压力是否符合执行器的铭牌参数要求(定位器的最大供气压力 为7Bar,但实际供气压力必须参考执行器所容许的最大气源压力); 2. 接通4---20mA输入信号。(定位器的工作电源取自输入信号,由DCS二线制供电,端电 压为DC8.7V左右,不能将DC24V直接加至定位器,否则有可能损坏定位器电路); 3. 检查位置反馈杆的安装角度(如定位器与执行器整体供货,则由执行器供货商安装调试 完 毕,只需作检查确认,该步并非必须): ·按住MODE键 ·同时点击↑或↓键,直到操作模式代码1.3显示出来
ABB智能定位器TZID-C调试说明书(中文正式版)
ABB TZID-C智能定位器安装及操作说明书 ※气动连接 ·使用与定位器气源端口处标识的标准接口连接气源 ·连接定位器的输出与气动执行器的气缸 ※电气连接 根据下列接线端子图以及设计要求进行相应的配线(一般只需+11,-12,+31,-32) ※ 1.接通气源,检查减压阀后压力是否符合执行器的铭牌参数要求(定位器的最大供气压力为 7BAR,但实际供气压力必须参考执行器所容许的最大气源压力); 2.接通4---20mA输入信号。(定位器的工作电源取自输入信号,由DCS二线制供电,端电 压为DC8.7V左右,不能将DC24V直接加至定位器,否则有可能损坏定位器电路);3.检查位置反馈杆的安装角度(如定位器与执行器整体供货,则由执行器供货商安装调试完毕,只需作检查确认,该步并非必须): ·按住MODE键 ·同时点击↑或↓键,直到操作模式代码1.3显示出来 ·松开MODE键。 ·使用↑或↓键操作,使执行器分别运行到两个终端位置,记录两终端角度。
·两个角度应符合下列推荐角度范围(最小角位移20度;无需严格对称) 直行程(小角度)应用在-28°---+28°之内。 角行程(大角度)应用在-57°---+57°之内。 全行程角度应不小于25° 4.切换至参数配置菜单 ·同时按下↑和↓键 ·点击ENTER键,然后松开该键, ·计数器从3计数到0, ·松开↑和↓键 程序自动进入P1.0配置菜单 5.使用↑和↓键选择定位器运行形式为直行程或角行程。 角行程运行形式:角度变换大于-28°—+28°(56°)小于-57°—+57°(114°)。 直行程运行形式:角度变换小于-28°—+28°(56°)。 注意:进行自动调整之前,请确认实际安装形式是否与定位器菜单所选形式相符,因为自动调整过程中定位器对执行器行程终端的定义方法不同,且线性化校正数据库不同,可能导致较大的非线性误差。 6.启动自动调整程序(执行器或阀门安装于系统后最好通过此程序重新整定); ·按住MODE键 ·点击↑键一次或多次,直到显示出“P1.1” ·松开MODE键 ·按住ENTER键3秒直到计数器倒数到0 ·松开ENTER键,自动调整程序开始运行(显示正在进行的程序语句号)。 ·自动调整程序顺利结束后,显示器显示“COMPLETE”。
ABB定位器使用说明书
ABB定位器使用说明书 气路连接 ●使用与定位器气源端口处标识的标准接口连接气源 气源的要求:仪表气体(无忧、无尘、无水、符合DIN/ISO8573-1污染及含油三级标准,最大颗粒直径<5um,且含量<5mg/m3,滴油<1mg/m3。露点温度低于工作温度10k ●连接定位器的输出与气动执行机行器的气缸 电气连接 1.接通气源前,现将气源管放空一段时间以排除路中可能存在的灰尘、杂质、水、 油等。建议放空时间30分钟,可以用收或者白纸、白布进行气源质量的检查。检查减压阀后压力是否符合执行器的铭牌参数要求(定位器的最大供气压力为6BAR,但实际供气压力必须参考执行器所容许的最大气源压力) 2.接通4—20MA输入信号。(定位器的工作电源取自输入信号,由DCS二线制供电, 不能将DC24V直接加至定位器,否则有可能损坏定位器电路)。 3.检查位置返馈杆的安装角度(如定位器与执行器整体供货,则已经由执行器供货 商安装调试完毕,只需作检查确认,该步并非必须)。 .按住MODE键 .并同时点击↑或↓键,直到操作模式代码1.3显示出来。 .松开MODE键。 .使用↑或↓,使执行器分别运行到两个终端位置,记录两终端角度 .两个角度应符合下列推荐角度范围(最小角位移20度,无需严格对称)执行程应用范围在-28°----+28°之内 角行程应用范围在-25°-----+57°之内 全行程角度应不小于25° 4.切换参数配置菜单 .同时按住↑或↓键 .点击ENTER键 .等待3秒钟,计数从3计数到0
. 松开↑或↓键 程序自动进入P1.0配置菜单。 5.使用↑或↓键选择定位器安装形式为直行程或角行程。 角行程安装形式(rotary):定位器没有返馈杆,其返馈轴与执行器角位移输出轴同轴心,一般角位移为90° 直行程安装形式(linear):定位器必须通过返馈杆驱动定位器转动轴,一般定位器的返馈杆角位移小于60°,用于驱动直行程阀门气动执行器。 注意:进行自动调整之前,确认实际安装形式是否与定位器菜单所选形式相符,因为自动调整过程中定位器对执行器行程终端的定义方法不同,且线性化校正数据库不同,可能导致较大的非线性误差。出厂时的缺省设置为:linear 6.启动自动调整程序(执行器或阀门安装于系统后最好通过此程序重新整定): .点击↑键 .显示器显示“P2.- SEPOINT” .松开MODE和ENTER两键 .显示器显示“P2.0 MIN_PGE” 3.从第二组配置参数中选择阀门作用方式P2.3 .按住MODE键 .点击↑键3次 .显示器显示“P2.3 ACTION” .松开MODE键 4.更改阀门作用方式 .点击↑键选择“REVERSE” 5.切换至“P2.7EXIT”存储并退出(如软件版本是2.0以上,则切换P2.8EXIT) .按住MODE键 .点击↑键多次直至显示器显示“P2.7EXIT” . 松开MODE键 .用↑或↓键选择NV_SAVE .按住ENTER键直到计数器倒计结束后松开 前面所进行的设定和自动调整中所测得的参数将存储在EEPROM中,定位器转换到先前 所选择的运行模式。 程序简易功能图表 1.运行操作菜单
基于STM32的测量定位系统设计说明
第一章绪论 1.1概述 1.1.1研究现状 在地质勘探或是油田勘探的过程中,常会用到地震勘探。爆炸震源是地震勘探中广泛采用的非人工震源。虽然目前已发展了重锤、连续震动源、气动震源等一系列地面震源,但陆地地震勘探经常采用的重要震源仍为炸药。 炸药安放的过程中需要测量起爆电缆的长度,准确的测定线路的长度是勘探顺利进行的前提和保证。但是由于炸药安放在地面下的竖井中,难以直接测量线缆的长度。目前勘测中常使用的方法是利用电阻表测量电缆的电阻值,再通过换算得出导线的长度。测量过程中需要人工对测量结果进行换算和记录,不仅增加了勘探的工作量,在换算和记录过程中还容易产生错误。 在地址勘测中,勘测地点往往都在野外,缺乏固定的标记物和指示。尤其在密林和荒漠等环境中,必须借助仪器来定位。目前最常用定位仪器通常都要使用到GPS。 GPS是Global Positioning System(全球定位系统)的缩写,是美国从本世纪70年代开始研制,历时20年,耗资200亿美元,于1994年全面建成,具有在海、陆、空进行全方位实时三维导航与定位能力的新一代卫星导航与定位系统。该系统的建立从根本上解决了人类在陆地、海洋、航空、航天等各个方面的导航和定位问题, 具有很高的实用价值。在电力系统通信和电力系统自动化等领域也有广泛的应用。 当初,设计GPS系统的主要目的是用于导航,收集情报等军事目的。但是,后来的应用开发表明,GPS系统不仅能够达到上述目的,而且用GPS卫星发来的导航定位信号能够进行厘米级甚至毫米级精度的静态相对定位,米级至亚米级精度的动态定位,亚米级至厘米级精度的速度测量和毫微秒级精度的时间测量。因此,GPS系统展现了极其广泛的用途。 用GPS信号可以进行海、空和陆地的导航,导弹的制导,大地测量和工程测量的精密定位,时间的传递和速度的测量等。对于测绘领域,GPS卫星定位技术已经用于建立高精度的全国性的大地测量控制网,测定全球性的地球动态参数;用于建立陆地海洋大地测量基准,进行高精度的海岛陆地联测以及海洋测绘;
(仅供参考)abb定位器简明操作说明
TZID-C 智能定位器 安装及操作说明书
气路连接 ?使用与定位器气源端口处标识的标准接口连接气源 ?连接定位器的输出与气动执行器的气缸 电气连接 根据下列接线端子图以及设计要求进行相应的配线(一般只需+11,-12,+31,-32) +11 -12 控制信号输入端子(DC4---20mA,负载电阻Max.410欧姆) +31 -32 位置返馈输出端子(DC4---20Ma,DCS+24V供电) +41 -42 全关信号输出端子(光电耦合器输出) +51 -52 全开信号输出端子(光电耦合器输出) +81 -82 开关信号输入端子(光电耦合器输入) +83 -84 报警信号输出端子(光电耦合器输出) +41 -42 低位信号输出端子(干簧管接点输出,5---11VDC, <8 mA) +51 -52 高位信号输出端子(干簧管接点输出,5---11VDC, <8 mA) 调试步骤 1.接通气源,检查减压阀后压力是否符合执行器的铭牌参数要求(定位器的最大供气 压力为7BAR,但实际供气压力必须参考执行器所容许的最大气源压力)。 2.接通4---20mA输入信号。(定位器的工作电源取自输入信号,由DCS二线制供 电,不能将DC24V直接加至定位器,否则有可能损坏定位器电路)。 3.检查位置返馈杆的安装角度(如定位器与执行器整体供货,则已经由执行器供货 商安装调试完毕,只需作检查确认,该步并非必须): ?按住MODE键。 ?并同时点击?或?键,直到操作模式代码1.3显示出来。 ?松开 MODE键。 ?使用?或?键操作,使执行器分别运行到两个终端位置,记录两终端角度 ?两个角度应符合下列推荐角度范围(最小角位移20度,无需严格对称)直行程应用范围在 -28o--- +28o 之内。 角行程应用范围在 -57o--- +57o 之内。 全行程角度应不小于25o 4.切换至参数配置菜单 ?同时按住?和?键 ?点击ENTER键 ?等待3秒钟,计数器从3计数到0 ?松开?和?键 程序自动进入P1.0配置菜单。 5.使用?和?键选择定位器安装形式为直行程或角行程。 角行程安装形式:定位器没有返馈杆,其返馈轴与执行器角位移输出轴同轴心 Page 2 of 9
执行器安装与调试
执行器安装与调试 摘要:本文中的执行器指电站汽水系统电动/气动的截止阀门、烟风系统电动/气动风门以及其它系统相应的执行DCS命令控制某种介质的机构或设备。随着计算机水平的发展,执行器的更新也在加快、品种也在增加,本文结合#1机组(600MW)的情况将对当前执行器的安装、调试进行讨论。 关键词:执行器安装、执行器原理调试 1、执行器安装 1.1、直接安装式执行机构。如执行程电动执行机构安装在调节阀的上部,一般是由制造厂配套组合好的。还有气动薄膜调节阀、气动活塞调节阀、气动隔膜阀等,其执行机构也是由制造厂组装的。其连接方式一般都是通过双面发兰连接的。下图所示为磨煤机入口冷风关断门自行设计制作的连接法兰: 1.2、角行程电动执行机构的安装。这种形式的执行机构一般为箱式结构,落地式安装,可以直接固定在地板或混凝土基础上,也可固定在槽钢或角钢底座上。 1.2.1、安装位置的选择: ●执行机构一般安装在调节机构的附近,不得妨碍通行和调节机构的检修,并应便于
操作、维护。 ●连杆不宜过长,否则应加大连接管的直径,一般不大于5米。本现场利用机务专业废弃的无缝管,安全可靠。 ●执行机构和调节机构的转臂应在同一平面动作。在1/2开度时,转臂应与连杆近似垂直。 ●执行机构与调节机构用连杆连接后,应使执行机构的操作手轮顺时针转动时调节机构关小,逆时针转动时调节机构开大。 ●当调节机构随主设备产生热态位移时,执行机构的安装应保证其和调节机构的相对位置不变。本现场烟风、制粉系统全部采用了底座支撑在风道上生根的方法,避免了热膨胀的影响。 1.2.2、底座安装, ●执行机构底座支架如下图 执行机构底座一般采用δ=20mm的钢板制作,如下图所示。与执行机构本身底座用螺栓连接(注意平垫、弹垫要齐全);与执行机构支架连接可以焊接。
定位器使用说明
定位器使用说明 一、总体介绍 TZLF-2103型定位器(以下简称低频定位器)为主动式发送器,按照一定频 率(200ms间隔,2104的发送时长为24ms左右)连续发送125KHZ低频信号,信号包括其自身编号和天线号,用于进行不同定位器和同一定位器不同天线的区分与识别。该定位器最多可配置4路低频发送天线,天线号分别为0、1、2和3。4根天线交替发送信息,发送不同的信息,同一时刻,只有一根天线发送信息。 0号天线发送:定位器号+天线号0 1号天线发送:定位器号+天线号1 2号天线发送:定位器号+天线号2 3号天线发送:定位器号+天线号3 天线发送信号,是按照一定顺序发送的,0-1-2-3-0-1-2-3,时间间隔约200ms,若少部分天线还是按照这个顺序发送。 当具有低频接收功能的标识卡进入低频信号范围时,标识卡可自动接收低频信号,并进行解析,判断定位器号和天线号。当标识卡离开低频信号范围后,标识卡进入待机状态。 TZLF-2103型定位器是TZLF-2101型定位器的升级版,最大信号距离仍为5m (某些室内场合,信号距离可达8m)。与老版定位器相比,主要有如下几点区别: 1)增加了信号距离可调节的功能,调节范围为2.0-3.5m或2.0-8m; 2)体积更小; 3)增加了2路低频发送天线,多达4路低频发射; 4)外置24V直流电源,也可多个定位器集中供电。 如图1所示为定位器主视图,侧面伸出旋钮和开关为用于调节定位器天线信号距离。
图1 定位器尾部有四个天线孔,其上编号为天线号,如图2所示,即2号天线从 左边第一个天线孔引出,以此类推。 图2 低频定位器最多可配置4路低频发送天线,每路天线的信号距离都可通过本 组的旋钮和开关来调节。 二、主要技术指标 1)工作电压:DC8V-50V(建议24V) 2)工作电流:DC24V下0.4A(MAX) 3)工作频率:125KHz。 4)通信距离:室内2.0m—8.0m;室外2.0m—3.5m 5)工作温度: 0℃~85℃
ABB定位器新版操作说明
TZID-C 智能定位器 简明安装及操作说明书(V3.1) ABB (中国)自动化有限公司 仪器仪表总部 Tel: 021 5048 0101 F ax: 021 6105 6992 HOT LINE: 8008190190 4006209919
气路连接 ?使用与定位器气源端口处标识的标准接口连接气源 气源的要求:仪表气体(无油、无尘、无水,符合DIN / ISO8573-1污染及含油三 级标准,最大颗粒直径< 5um,且含量<5mg/m3,油滴<1mg/m3。露点温度低于工作 温度10k。 ?连接定位器的输出与气动执行器的气缸 电气连接 根据下列接线端子图以及设计要求进行相应的配线(一般只需+11,-12,+31,-32) +11 -12 控制信号输入端子(DC4---20mA,负载电阻Max.410欧姆) +31 -32 位置返馈输出端子(DC4---20Ma,DCS+24V供电) +41 -42 全关信号输出端子(光电耦合器输出) +51 -52 全开信号输出端子(光电耦合器输出) +81 -82 开关信号输入端子(光电耦合器输入) +83 -84 报警信号输出端子(光电耦合器输出) +41 -42 低位信号输出端子(干簧管接点输出,5---11VDC, <8 mA) +51 -52 高位信号输出端子(干簧管接点输出,5---11VDC, <8 mA) 调试步骤 1.接通气源前,先将气源管放空一段时间以排除管路中可能存在的灰尘、杂质、水、油等。 建议放空时间30分钟,可以用手或者白纸、白布进行气源质量的检查。声明:如由于灰尘、杂质、水、油等造成定位器的损坏,ABB将不提供质保。检查减压阀后压力是否符合执行器的铭牌参数要求(定位器的最大供气压力为6 BAR,但实际供气压力必须参考执行器所容许的最大气源压力)。 2.接通4---20mA输入信号。(定位器的工作电源取自输入信号,由DCS二线制供电,直接加 至定位器的电压不能超过30V / 50mA,否则有可能损坏定位器电路)。 3.检查位置返馈杆的安装角度(如定位器与执行器整体供货,则已经由执行器供货商安装调 试完毕,只需作检查确认,该步并非必须): ?按住MODE键。 ?并同时点击?或?键,直到操作模式代码1.3显示出来。 ?松开 MODE键。 ?使用?或?键操作,使执行器分别运行到两个终端位置,记录两终端角度 ?两个角度应符合下列推荐角度范围(最小角位移20度,无需严格对称) 直行程应用范围在 -28o--- +28o 之内。 角行程应用范围在 -57o--- +57o 之内。 全行程角度应不小于25o 若角度未符合上述要求,则需通过调节反馈杆、联轴器或者定位器的安装位置使得角度值满足上述要求。 Page 2 of 13
阀门定位器.模块使用说明书
ZXQ系列电动阀门智能定位器/阀门操作器 (电子式伺服控制器) 使用说明书 DOC NO:201109 ZXQ2003 ZXQ2004B ZXQ2004 ZXQ2004C
目录 一、概述 (2) 二、主要技术指标 (2) 三、定位器面 板 (3) 四、接线方 式 (5) 五、设定操作方
法 (6) 六、错误代码列表 (9) 附录:其它标定操作(出厂后如需此项操作,请在厂家指导下使用) (9) 如顾客所购买的是本公司Z型(机电一体)执行器,部定位器无需对执行器转角标定,接线无误即可正常使用。 ZXQ系列电动阀门智能定位器是以工业单片机为核心的智能信号采集控制系 统,体积小巧,可选择安装在电动执行器的接线盒或以 DIN导轨方式固定在外,能 直接接收工业仪表或计算机等输出的4~20mA DC信号(其它输入信号类型可在出厂前定制),与电位器反馈的电动执行器配套对各种阀门或装置进行精确定位操作,能对电动执行器的转角(或位移)进行自由标定,同时输出4~20mA DC的执行器转角位置(或位移)反馈转换信号,可精确设定执行器转角位置的下限限位值和上限限位值,定位器采用3个按键操作,9个LED灯可直接显示定位器模态,4位数码LED通过按键切换显示阀位实际开度值、阀位设定开度值、定位器壳温度,操作方便。 ●控制精度:0.1%~3.0%(通过U4参数可调) ●可接电动执行器反馈信号:电位器500Ω~10KΩ ●可接收外部控制信号(DC):4~20mA (1~5V、0~10V、开关量等出厂前定制)●输入阻抗:250Ω; ●通过修改U1参数可设定:①DRTA/正动作,RVSA/逆动作模态②输入信号中断 时“中断”模态—OPEN(开)、STOP(停)、SHUT(闭) ●可选:可控硅输出(AC,1000V,25A) ●输出执行器位置信号:低漂移输出4~20mA DC对应执行器全闭至全开,信号完 全与输入隔离(光电隔离),输出负载≤500Ω ●环境温度:0~80℃,相对湿度:≤90%RH ●有超温保护功能: 定位器壳温度≥70℃时,定位器停止对执行器的开闭控制 ●外形尺寸: ZXQ2003→77mm(底面长)×76mm(底面宽)×51mm(高/厚); ZXQ2004→74 mm(底面长)×57mm(底面宽)×45mm(高/厚)
RotoRK_型号为IQ或IQM阀门说明书(参考用的阀门调试说明)
如图1-3 按Left 键 按+或-键:修改密码值 按Enter 键:确认被修改的密码 按Enter 键:确认密码 按Down 键:进入 按Down 键 按Down 键 按Left 键 键: 按阀门调试说明书 IQ 型号为两位式阀门 IQM 型号为调节型阀门 我们不论调试IQ 还是IQM 型号的阀门,都必须首先将阀门切换开关切换到就地位置,方可进行阀门调试,否则也只简单地看一看阀门一此参数而已。 二、IQ 和IQM 调试说明: 第一步:密码确认(PS:Password )如图1-1、1-2 RotoRK 的IQ 和IQM 两种型号的阀门,在开始调时都需要进行密码确认,如果不进行密码确认就不能够修改阀门的内部参数,阀门也就不能实现各种功能。在调试阀门时,首先按下Down 键阀门LED 显示器会显示如图1-1画面,这时密码还没有被确认,按Enter 键密码就被确认,这时LED 显示器会显示如图1-2画面。 第二步:密码修改(PC:Password Changed)如图1-3 如果你想更改密码可以在显示如图1-2的画面时按Left 键LED 显示器会显示如图1-3的画面,按+和-键可以修改密码,最后只要按一次Enter 键时被修改后的密码会闪烁一次,表示修改密码成功。以后再次进入就必须输入此密码方可进入该系统。 第三步:力矩设定(Set torque value closed and open )如图1-5、1-6 开关阀力矩可设范围为40%——100%,如果越出此范围阀门会自动报警,每按一次+或-键时1%的递增或者递减。所被设定的力矩值确认之后,可以按Enter 键确认所设力矩值,这时可以看到所设力矩值会闪烁一次,这表明你所设定的力矩值已被存入阀门的存储器中,阀门已认可你的设定。 图1-5中的字符(TC:Torque Closed );图1-6中的字符(TO:Torque Open ) 第四步:开关行程设定(Set limit closed and open ) 将阀门移动到一个合适的全关位置,当LED 显示器显示如图1-7时,按Enter 键时,显示器上的两条横线会闪烁一次,这表示阀门的全关位置已被执行器所接收并确认。再次将阀门移动到全开位置,当显示如图1-8时,按Enter 键时,显示器上的两条横线会闪烁一次,这表示阀门的全开位置已被执行器所接收并确认。再按Down 键时,就退出阀门的设定程序返回阀位指示,如果想再次修改参数,那也只有重新进入阀门的设定程序。 如图1-2 如图1-1 如图1-4 如图1-5 如图1-6 如图1-2 如图1-2 如图1-5
ABB阀门定位器中文说明书
TZID-C 智能定位器 安装及操作说明书 MOTOYAMA ENG. WORKS LTD 本山製作所 株式 会社
气路连接 ?使用与定位器气源端口处标识的标准接口连接气源 ?连接定位器的输出与气动执行器的气缸 电气连接 根据下列接线端子图以及设计要求进行相应的配线(一般只需+11,-12,+31,-32) 调试步骤 1.接通气源,检查减压阀后压力是否符合执行器的铭牌参数要求(定位器的最大供气 压力为7BAR,但实际供气压力必须参考执行器所容许的最大气源压力)。 2.接通4---20mA输入信号。(定位器的工作电源取自输入信号,由DCS二线制供 电,不能将DC24V直接加至定位器,否则有可能损坏定位器电路)。 3.检查位置返馈杆的安装角度(如定位器与执行器整体供货,则已经由执行器供货 商安装调试完毕,只需作检查确认,该步并非必须): ?按住MODE键。 ?并同时点击?或?键,直到操作模式代码1.3显示出来。 ?松开 MODE键。 ?使用?或?键操作,使执行器分别运行到两个终端位置,记录两终端角度 ?两个角度应符合下列推荐角度范围(最小角位移20度,无需严格对称)直行程应用范围在 -28o--- +28o之内。 角行程应用范围在 -57o--- +57o之内。 全行程角度应不小于25o 4.切换至参数配置菜单 ?同时按住?和?键 ?点击ENTER键 ?等待3秒钟,计数器从3计数到0 ?松开?和?键 程序自动进入P1.0配置菜单。 5.使用?和?键选择定位器安装形式为直行程或角行程。 角行程安装形式:定位器没有返馈杆,其返馈轴与执行器角位移输出轴同轴心
智能定位器安装操作说明书
TZID-C 智能定位器 安装及操作说明书ABB (中国)自动化有限公司仪器仪表总部 Tel: 010 8456 6688 Fax: 010 8456 7650
气路连接 ?使用与定位器气源端口处标识的标准接口连接气源 ?连接定位器的输出与气动执行器的气缸 电气连接 根据下列接线端子图以及设计要求进行相应的配线(一般只需+11,-12,+31,-32) 调试步骤 1.接通气源,检查减压阀后压力是否符合执行器的铭牌参数要求(定位器的最大供气 压力为7BAR,但实际供气压力必须参考执行器所容许的最大气源压力)。 2.接通4---20mA输入信号。(定位器的工作电源取自输入信号,由DCS二线制供 电,不能将DC24V直接加至定位器,否则有可能损坏定位器电路)。 3.检查位置返馈杆的安装角度(如定位器与执行器整体供货,则已经由执行器供货 商安装调试完毕,只需作检查确认,该步并非必须): ?按住MODE键。 ?并同时点击?或?键,直到操作模式代码1.3显示出来。 ?松开 MODE键。 ?使用?或?键操作,使执行器分别运行到两个终端位置,记录两终端角度 ?两个角度应符合下列推荐角度范围(最小角位移20度,无需严格对称)直行程应用范围在 -28o--- +28o 之内。 角行程应用范围在 -57o--- +57o 之内。 全行程角度应不小于25o 4.切换至参数配置菜单 ?同时按住?和?键 ?点击ENTER键 ?等待3秒钟,计数器从3计数到0 ?松开?和?键 程序自动进入P1.0配置菜单。 5.使用?和?键选择定位器安装形式为直行程或角行程。 角行程安装形式:定位器没有返馈杆,其返馈轴与执行器角位移输出轴同轴心
罗托克中文说明书
罗托克中文说明书 公司标准化编码 [QQX96QT-XQQB89Q8-NQQJ6Q8-MQM9N]
电动执行机构 IQ系列 安装和维护手册 请确保完整阅读和理解本手册 出版物编号 E170C2
Rotork设定器可按现场要求对执行器的控制、指示、保护功能进行设定。所有的执行器在投入使用前,有必要检查其与过程控制系统要求的兼容性。请阅读本手册。 当Rotork工作人员或指定代理商按照合同规定进行现场调试或/和验收时,执行器组态的相关文件应让客户留档备查。
本手册提供如下介绍: * 手动和电动(就地和远程)操作。 * 执行器的准备和安装。 * 根据有关阀门正确操作的要求,对执行器进行初级设定。 * 根据现场具体控制和指示的要求,对执行器进行二级设定。 * 维护 - 故障排除。 * 销售和服务。RotorkIQ系列执行器 - 全世界首家推出无需打开电气端盖即可进行调试和查询的阀门执行器。 使用所提供的红外线设定器进入执行器的设定程序,即使在危险区域,也可安全、快捷地对力矩值、限位以及其它所有控制和指示功能进行设定。IQ的设定和调整在执行器主电源接通和断开时均可完成。 标准诊断功能可对控制系统、阀门和执行器的状态进行诊断,并通过执行器的显示屏上的图标和帮助屏幕来显示。 按一下设定器的按键即可在显示屏上对相应阀位的瞬时力矩进行监视。 内置的数据记录器可获取操作和阀门力矩数据,可提醒用户根据需要对阀门进行维护。运行于PC 机的IQ Insight软件和/或Rotork本安型通讯器
可访问数据记录器,可对执行器的所有功能进行组态和记录。 执行器是否带有设定器,可根据接线端子箱盖上的黄色标签来识别。 有关Rotork IQ和其它系列执行器的资料,可浏览我们的网站。